
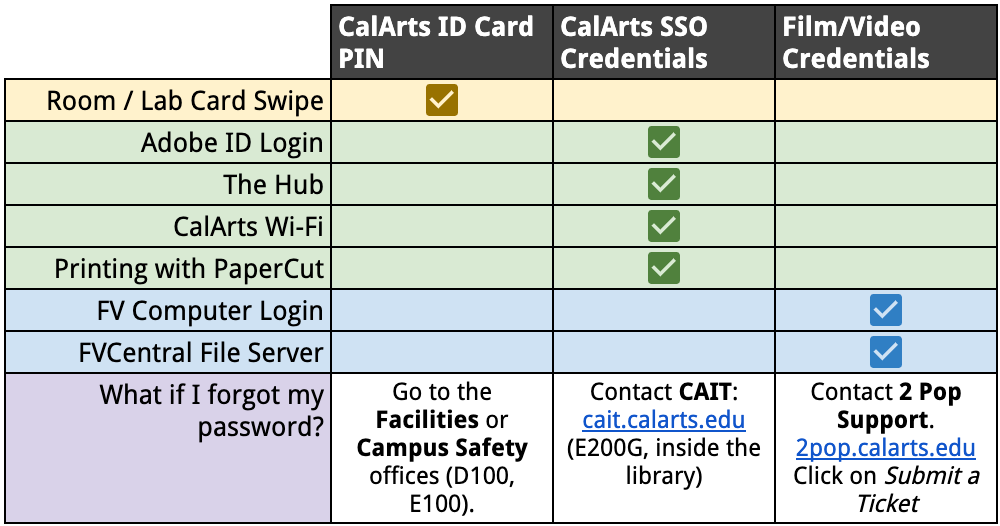
Your FV Computer Account
Film/Video Login Screen
The login screen of Film/Video computers will prompt you to enter a Name and a Password.

They’ll also state that by logging in, you’re agreeing to the CalArts – School of Film/Video policies, which can be found on our 2 Pop website as part of the Student Handbook.

The Name/Password you’ll use to log in is usually given to you during the new student orientation. If you didn’t receive these credentials, or if you’ve forgotten them, use our 2 Pop website (https://2pop.calarts.edu) to submit a ticket.
NOTE: Your Film/Video credentials are different from your CalArts SSO credentials, which you use when logging into your CalArts email, the Hub, and other services. Film/Video credentials are only used when logging into Film/Video computers.
This handy chart may help you keep track of which credentials you should use:
First Logon / Changing Your Password
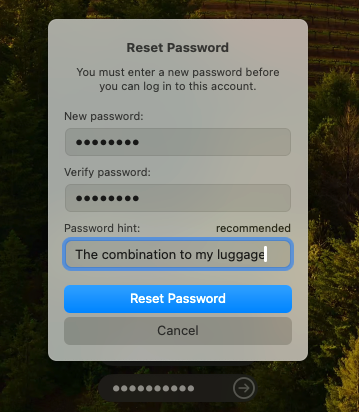
The first time you log into a Film/Video computer (or if you had your password reset), you’ll be prompted to change your password.
Film/Video passwords require all of the following:
- At least eight (8) characters long
- At least one (1) uppercase letter
- At least one (1) lowercase letter
- At least one (1) number or symbol
You can also optionally set a hint, in case you forget your password.
Your Login Session
Every time you log in to a School of Film/Video computer, you start with a clean session and a simple gray desktop.

This gray color is actually the grayscale midpoint of the Rec. 709 color space, and it was chosen to maintain neutral color perception while working in the labs.
Your Home Folder
Everything in your home directory – the Desktop, Documents, Downloads, Movies, Music, Pictures, and Public folders – will be completely empty except for “default” files that are pre-populated by us.
It is very important to remember that this home directory is temporary and is deleted every time you log out.
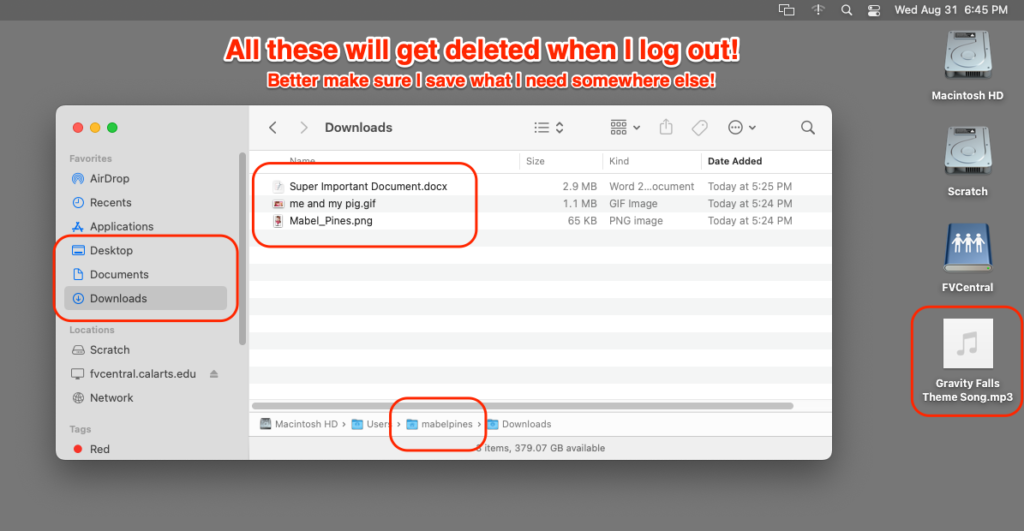
Anything that you need to save should be copied to external storage or your folder on our FVCentral file server before you log out.
To reiterate: do NOT leave anything in your temporary home directory. It will be deleted when you log out and cannot be recovered.
Instead, save your files to external storage or your FVCentral folder before logging out of the computer.
The Scratch Drive
You’ll notice a drive labeled “Scratch” on your desktop.
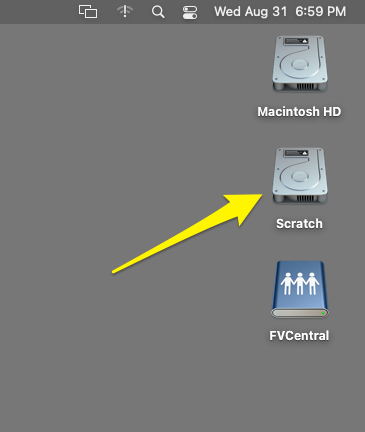
The Scratch drive is local storage you can use while working on the computer. It’s extremely high-performance, so it will be able to read and write files faster than an external drive or your FVCentral folder. It also does not get erased when you log out.
However, the Scratch drive is not secure. Everybody who logs into the computer has full access to everything on the Scratch drive, including anything you may leave there.
Because everybody has full access to it, other users (including yourself!) are allowed to delete its contents to make room for their own.
Additionally, even though it does not get erased when you log out, it does get erased periodically. The Scratch drives in most labs get erased every Friday during morning maintenance (7:00am – 9:00am).
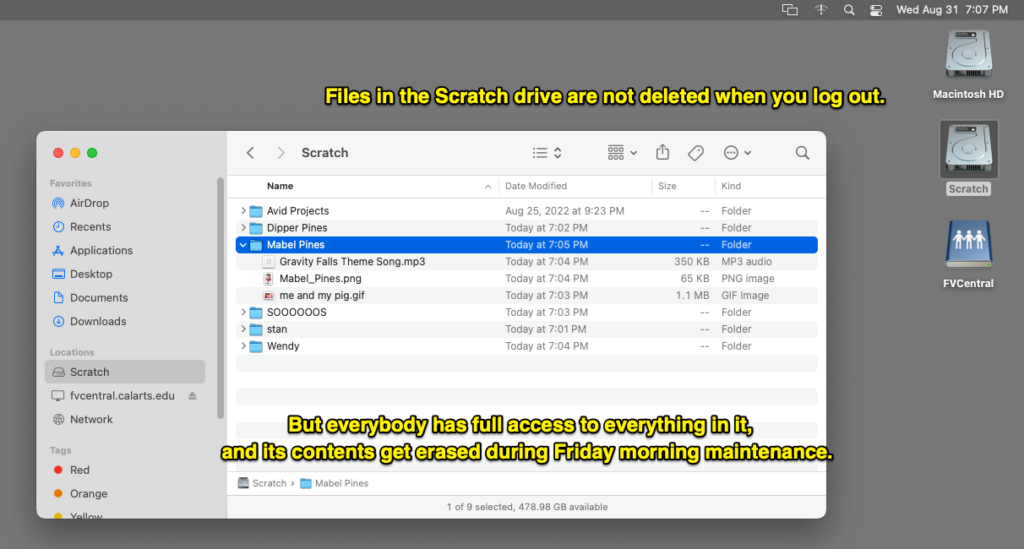
Finally, the Scratch drive is local to each computer, so its contents can only be accessed from that computer.
So what’s the point of the Scratch drive?
Well, since it’s incredibly high-performance, it makes a great place to work on your projects, especially when the projects have large video or audio files. You’re unlikely to experience any data lag when working from the Scratch drive, even with extremely large files.
With that understanding, here’s the recommended way to use the Scratch drive:
- Log into the computer
- Make a folder for yourself on Scratch, then copy your project to it
- Work on your project from Scratch
- Before logging out, copy your project off Scratch and onto external storage or your FVCentral folder
- Log out of the computer
Your FVCentral Folder
FVCentral is the network storage server used by our School. It’s accessible from all Film/Video computers, and is used for a wide variety of things. You’ll learn more about these as you continue with your courses.
Every School of Film/Video student gets a folder with 250 GB of storage space on FVCentral.
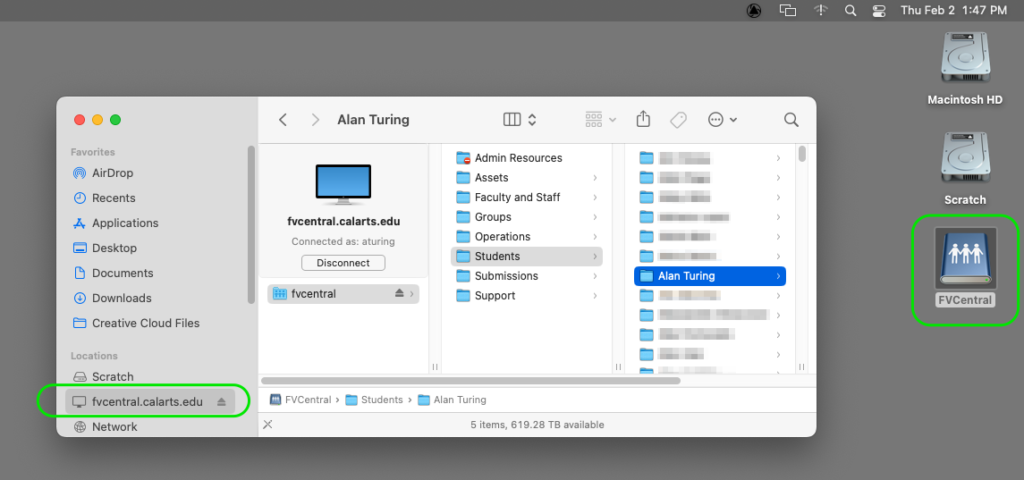
Your folder can be found either by double-clicking on the FVCentral icon on the desktop, or by clicking on fvcentral.calarts.edu in the Finder sidebar. Browse to the Students folder, and you should see a subfolder with your name on it.
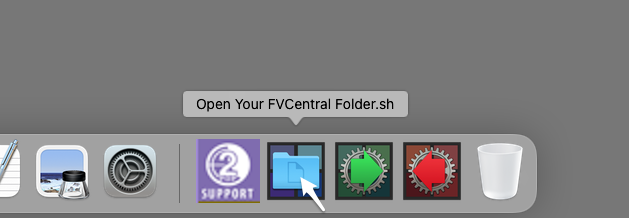
You can also click the aptly-named Open Your FVCentral Folder script in the Dock, which will automatically open your FVCentral folder in a new Finder window.
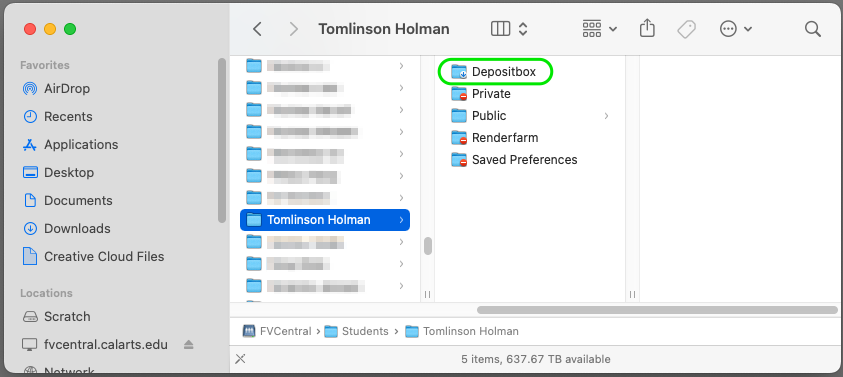
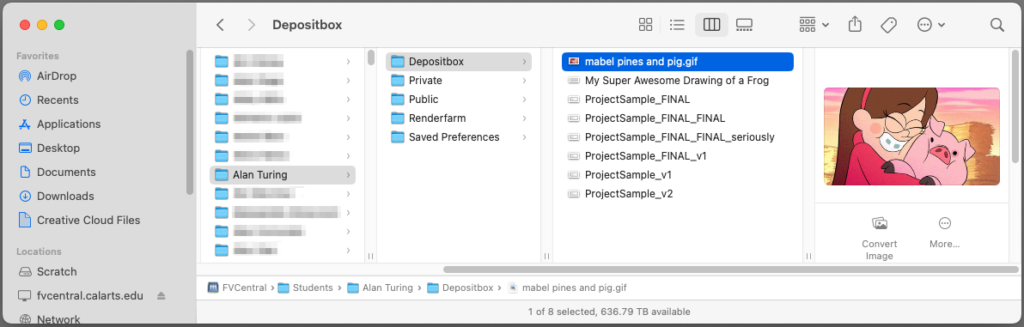
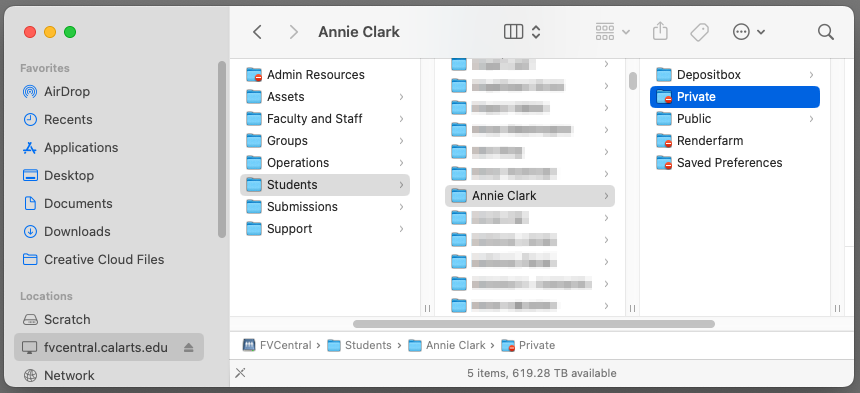
Your FVCentral folder has five subfolders: Depositbox, Private, Public, Renderfarm, and Saved Preferences.
You have full access to all of your five subfolders, but other Film/Video users will not.
Subfolders
Depositbox
The Depositbox folder is where other Film/Video users can share files with you.
When looking at another user’s Depositbox, you’ll notice its icon differs a bit from other folders.
If you drag-and-drop a file or folder into someone’s Depositbox, you’ll get a pop-up notification informing you that you can put items into Depositbox, but you won’t be able to see them afterwards. It also mentions that users with sufficient permissions – in this case, the person whose Depositbox this is – will be able to see the items you added.
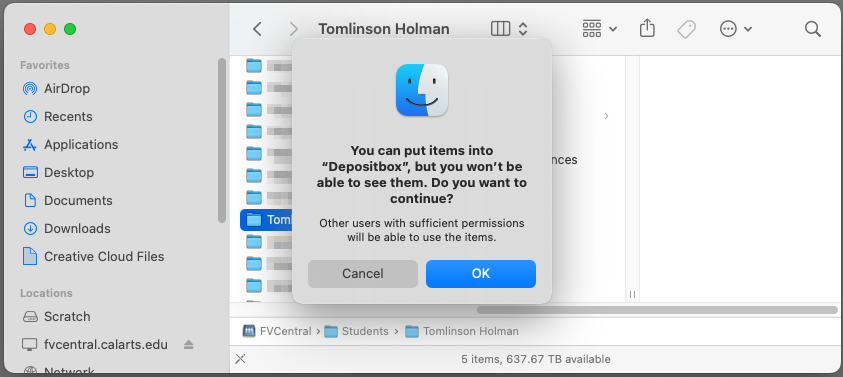
If you click OK, a copy of your item will be placed into this user’s Depositbox. Your original copy will remain in its original location.
If the user’s Depositbox already has a file in it with the same name, you’ll get an error message indicating so, and you won’t be able to overwrite the existing file.
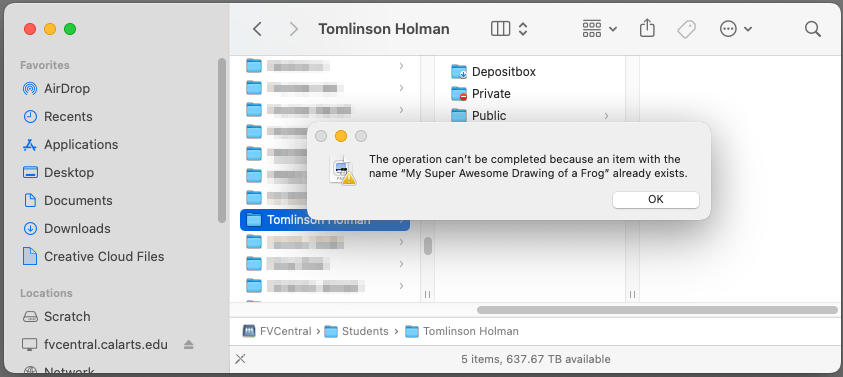
In this case, you’ll want to change the name of your file before attempting to copy it into the Depositbox again.
Of course, within your own Depositbox, you will have full access to everything that anyone adds.
Depositbox folders may also be used by faculty – who also have folders on FVCentral – as a way for students to turn in assignments.
Private
Your Private folder is, as the name suggests, completely private. This will likely be your primary storage folder on FVCentral.
Only you have access to your Private folder. You’ll notice that you won’t have access to see inside others’ Private folders either.
Public
Your Public folder is viewable by all Film/Video users, but they cannot make any changes to any of the files.
This is another way in which you can share files with others, in a much broader way.
Renderfarm
The Renderfarm folder will only come into play should you take advantage of our on-campus render farm. It’s where you’ll put your project when you need the render farm to have access to it.
You’ll learn more about the render farm as you continue with your courses.
Saved Preferences
The Saved Preferences folder is used by the Save and Restore Preferences scripts, which can be found in the Dock.
More information about these scripts can be found in the section below, Save and Restore Preferences.
For now though, just keep in mind that making changes inside this folder may prevent those scripts from working properly for you. It’s best to leave it alone unless instructed otherwise.
Courses
You’ll notice that faculty folders have an additional subfolder for Courses.
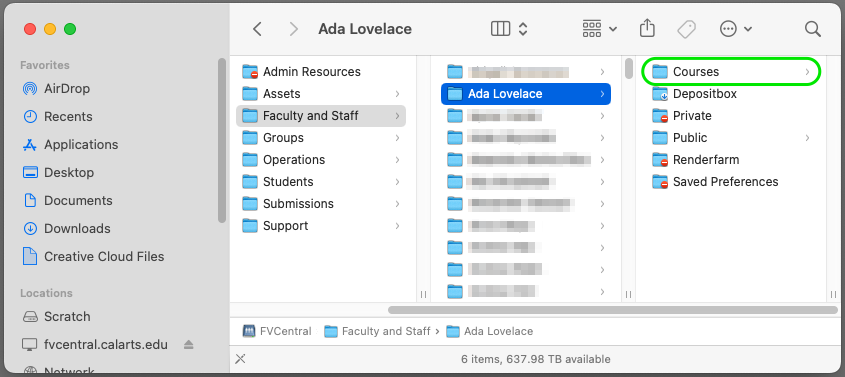
The Courses folder is a place for faculty to make course materials available to students.
Each faculty member may structure their Courses folder differently, so check with your faculty regarding its use.
Storage Quota
All students are given 250 GB of storage space in their FVCentral folder. It’s a good idea to periodically check how much you are currently using.
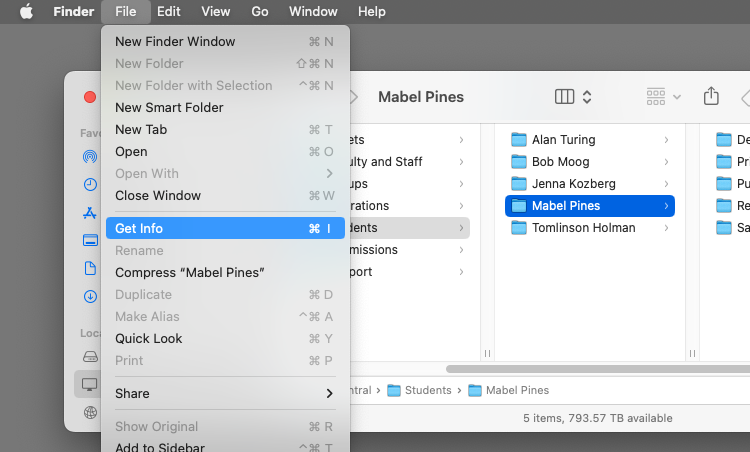
To check your current usage, select your personal folder in the Finder and go to File > Get Info.
Your current usage is located on the upper right-hand corner of the Get Info window.
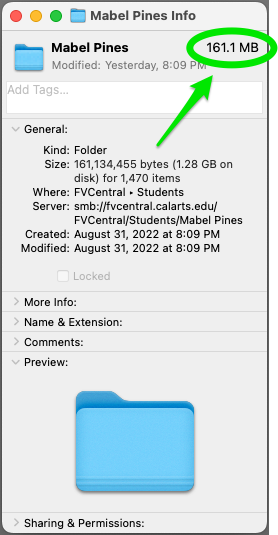
If you exceed your 250GB quota, you will not be able to save any new files to your folder until you free up some space by deleting files that are no longer needed.
Accessing FVCentral
FVCentral gets automatically mounted when you log into a Film/Video computer. However, you can also access FVCentral from a personal computer.
You must be on the “CalArts WiFi” network to do so; the “CalArtsGuest” network will not work.
From macOS
To mount FVCentral on a Mac computer, click on Finder and select Go > Connect to Server.
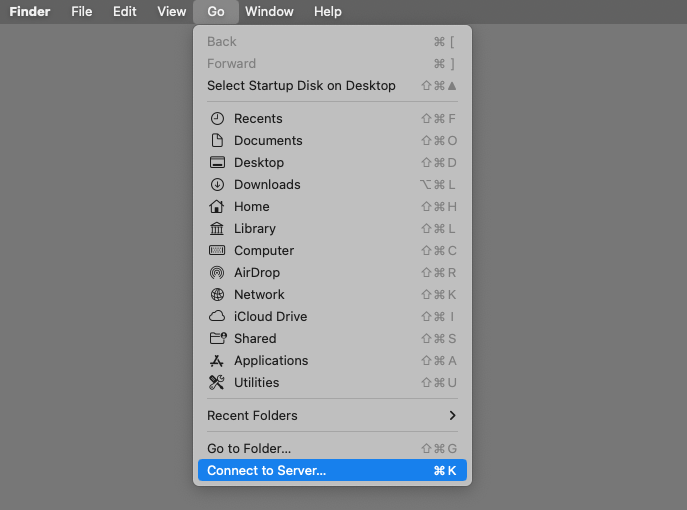
Type in smb://fvcentral.calarts.edu, then click Connect.
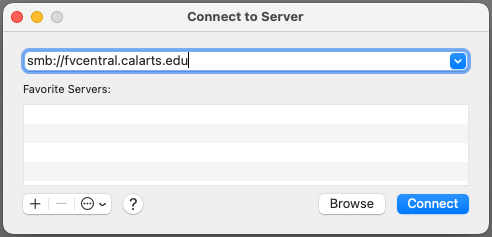
Finally, type in the username and password you use to log into Film/Video computers, then click Connect.

Done!
From Windows
To mount FVCentral in Windows, open File Explorer, select This PC from the left-hand pane, then click Map network drive from the ribbon menu (inside the Computer tab).
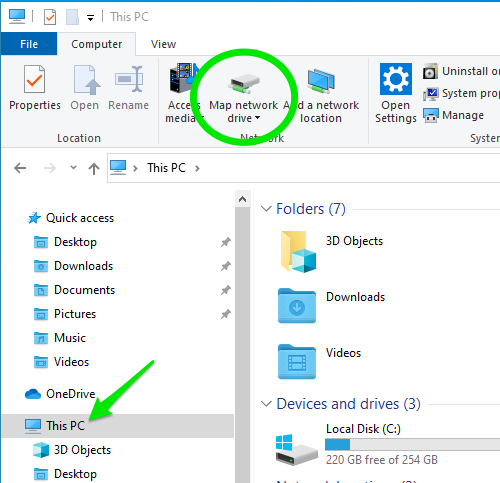
In the Map Network Drive window, choose a letter for the Drive (any letter is fine).
For the Folder, enter:
\\fvcentral.calarts.edu\fvcentral
Uncheck Reconnect at sign-in, but do check Connect using different credentials.
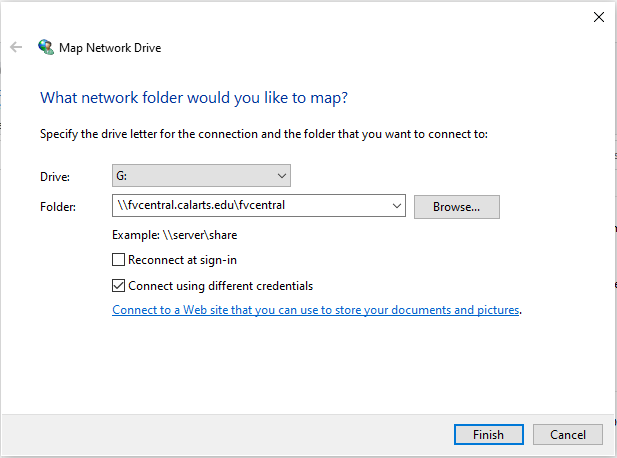
Type in the username and password you use to log into Film/Video computers, but add the prefix “FV\” to the beginning of your username. Finally, click OK.
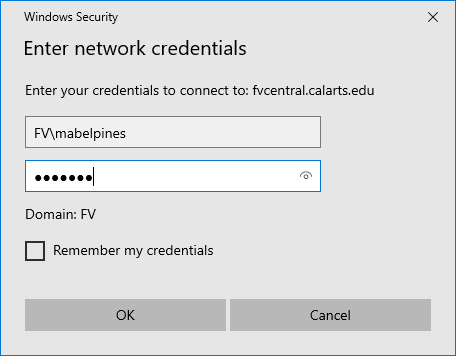
Done!
The Dock
Move the mouse to the bottom of the primary display to reveal the Dock.

The Dock’s contents will vary from computer to computer and lab to lab. It’s populated with the most commonly used applications and shortcuts for the computer and lab you are currently logged into.
There are a few Dock items that remain consistent on all Film/Video computers. These items are found in the right-hand section of the Dock, next to the Trash icon.

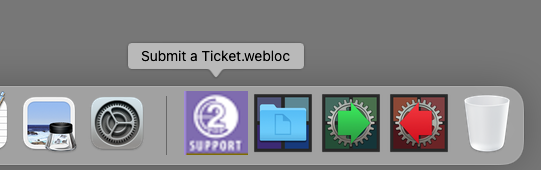
Clicking on the 2 Pop Support icon on the left will open a browser window directly to the page where you can create a support ticket.
The Open Your FVCentral Folder icon will open a new Finder window to your FVCentral folder.
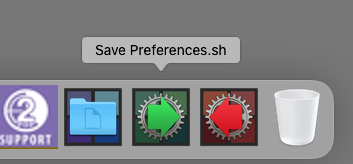
The next two icons are for the Save Preferences and Restore Preferences scripts.
Save and Restore Preferences
As mentioned earlier, every time you log into a Film/Video computer, you start with a “clean” session. Any preferences or settings that you may have previously set will have been lost, and applications will revert back to the default preferences we set for everyone.
Using the Save Preferences and Restore Preferences scripts allows you save and restore your personal preferences for selected production applications.
To use these scripts, first set your desired preferences in your application(s). Once you have your preferences set, close all open applications, then click the Save Preferences icon in the Dock.

You’ll get a pop-up window reminding you to close all applications.
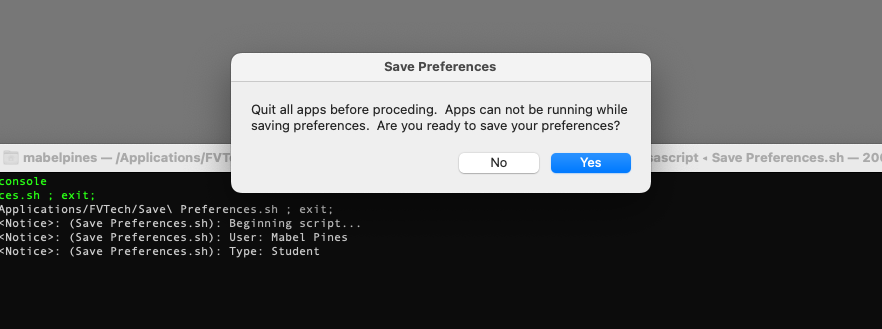
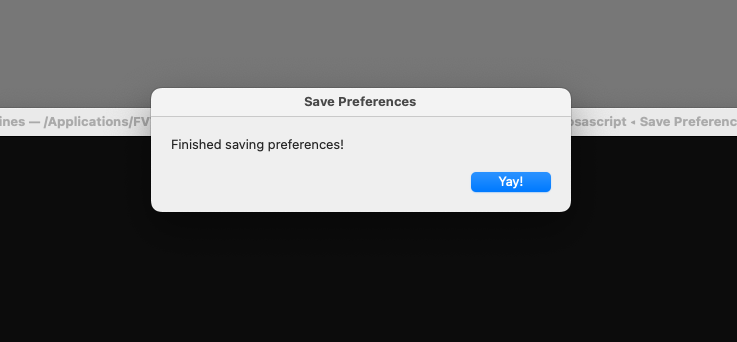
After you click Yes, the script will run. You’ll get another pop-up window notifying you once it’s done.
You may notice that your Saved Preferences folder on FVCentral now has files in it.
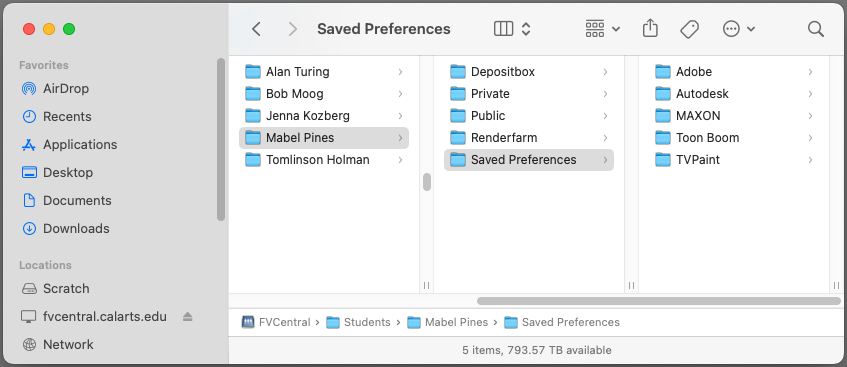
This is where the Save and Restore Preferences scripts store their data. Since this data is in your FVCentral folder, it does not get erased when you log out of the computer.
Now that your preferences are saved, you can safely log out of the computer. Any time you want to restore your preferences – from any Film/Video computer – just click the Restore Preferences icon from the Dock.

It’s best to restore your preferences as a first step when you log in, and to save your preferences as a last step before you log out.
The Save and Restore Preferences scripts will work with the following applications:
- Adobe After Effects
- Adobe Animate
- Adobe Audition
- Adobe Character Animator
- Adobe Illustrator
- Adobe InCopy
- Adobe InDesign
- Adobe Lightroom Classic
- Adobe Media Encoder
- Adobe Photoshop
- Adobe Prelude
- Adobe Premiere Pro
- Autodesk Maya
- Blender
- Maxon Cinema 4D
- Toon Boom Harmony Premium
- Toon Boom Storyboard Pro
- TVPaint
- Unreal Engine
Web Browsers
All Film/Video computers come with Safari and Google Chrome installed. You’re welcome to use whichever browser you’d like.
However, Google Chrome is set as the default browser because it integrates better with our CalArts accounts, which are powered by Google Workspace. Logging into Google Chrome with your CalArts account will allow you to synchronize your bookmarks and web credentials no matter which computer you use.
It will also make it easier to take advantage of your CalArts SSO credentials, particularly when using the Adobe apps. More on that in a moment.
For all these reasons, we recommend logging into Google Chrome as one of the first things you do when you log into a Film/Video computer. Let’s take a look at what that process looks like.
Signing into CalArts SSO
When you first open Chrome, you’ll be taken straight to the CalArts SSO page. Enter your CalArts SSO credentials and click Sign In.

If you have multi-factor authentication enabled, complete the secondary authentication of your choice. Your list of options may look different, depending on which ones you have set up.

After you’ve successfully authenticated, you’ll be taken to the CalArts SSO page. Click on the Google panel to open up your email. Again, the panels you see may vary from the screenshot.

It will ask you to verify that it’s your account. Just click Continue.

You’ll be taken to your email inbox. Let’s enable Chrome synchronization so that you’ll have access to all your bookmarks, history, and saved web credentials.
Click your avatar/icon in the upper-right corner of the Chrome window, and choose Turn on sync.

It will confirm whether you want to enable sync. Click Yes, I’m in.

Done! After a few moments, all of your bookmarks, history, and saved web credentials will automatically become available to you.
This may seem like a lot of different steps, but once you get used to it, the whole process should take 30 seconds or less.
Adobe Apps / Adobe ID
All Film/Video computers will have most of the Adobe Creative Cloud applications installed, such as After Effects, Photoshop, and Premiere Pro. In order to use these applications, you have to sign in with an Adobe ID.
Luckily, all students are given a free Adobe Creative Cloud subscription, which is linked to your CalArts SSO account.
Normally, Adobe limits the number of computers you can have linked to your Adobe ID. Fortunately, Film/Video computers will not count towards your number of linked computers.
Before opening any Adobe apps on a Film/Video computer, it’s highly recommended to sign into your CalArts SSO account as described above.
When you open an Adobe app for the first time after logging into the computer, you’ll be asked to sign into an Adobe account as well.
Instead of entering your email address, click the Continue with Google button.

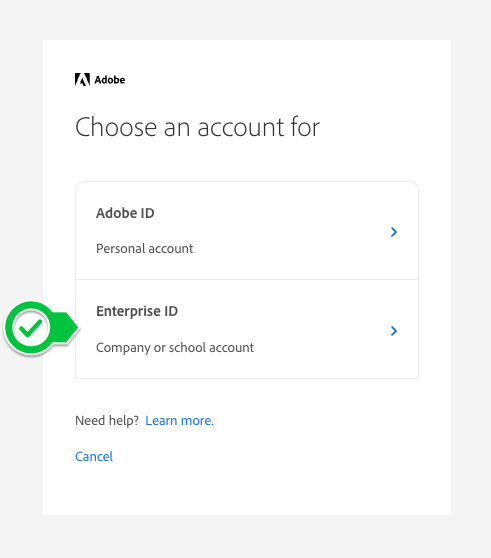
If you get prompted to choose an Adobe ID or an Enterprise ID, choose Enterprise ID.
Finally, you’ll get a confirmation that your Adobe ID is now signed in.
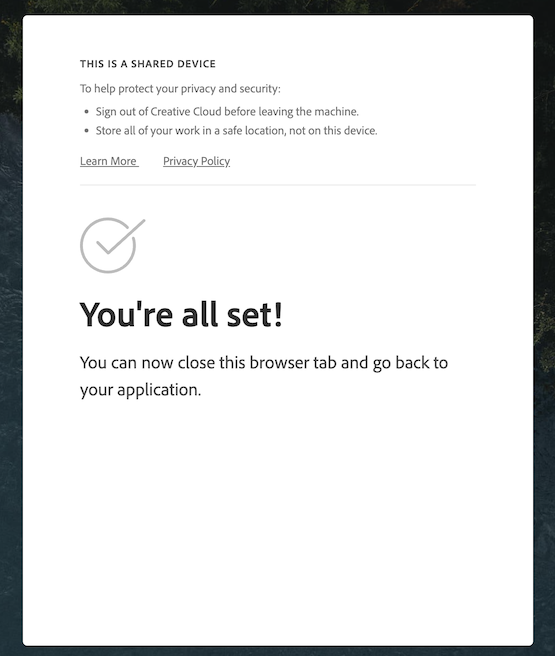
Done! You can close the browser tab and go back to the Adobe application you had opened.
If you run into any trouble with your Adobe subscription, contact CalArts IT (CAIT). See the table at the beginning of this document for more information.
Printing Using PaperCut
The School of Film/Video, like much of the Institute, is using PaperCut software to manage printing.
When sending a print job, select the printer you would like to print to and click Print, just like normal.
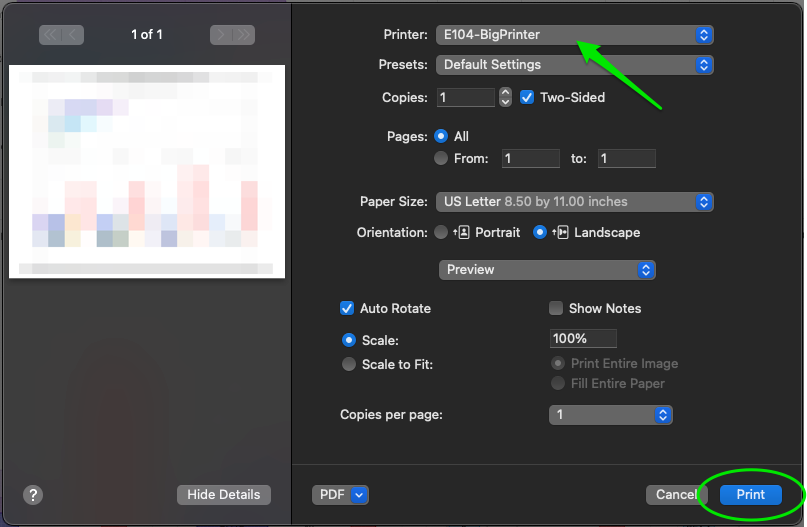
What this actually does is send the job to the print server. In a few moments, you’ll get a PaperCut pop-up window. Log in using your CalArts SSO credentials.
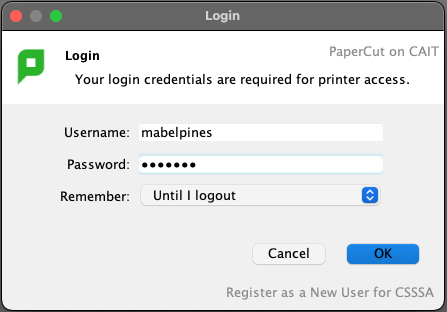
After a few more moments, PaperCut will confirm the details about your print job, including your document’s name, the printer you are sending it to, and the cost of the print job. Click Print one more time to send the job to the printer queue.
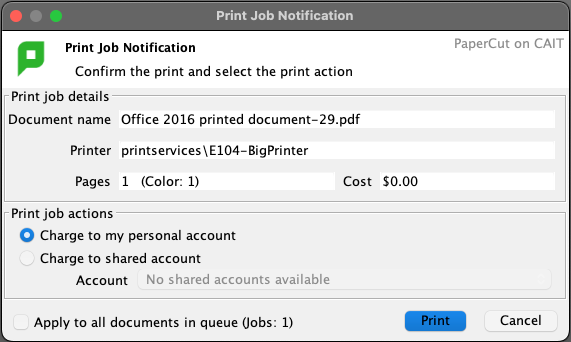
Done! Your documents will start to print once the print queue is ready!
You can check your PaperCut account balance, add funds, and transfer funds by going to https://printservices.calarts.edu and logging in with your CalArts SSO Credentials.
Logging Out
Before logging out of a Film/Video computer, remember that your home folder on that computer gets permanently deleted once you log out. Please make sure that:
- Any files that you need to preserve are saved to an external storage device (like a USB drive) or your FVCentral folder.
- Any projects you worked on from the Scratch drive are saved and copied back to an external storage device or your FVCentral folder.
- You run the Save Preferences script if you changed any preferences and wish to preserve them for next time.
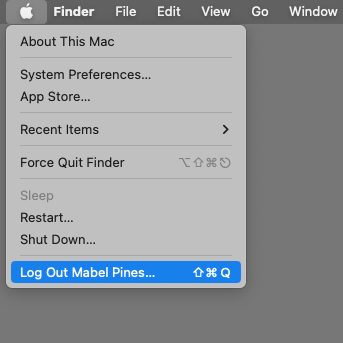
When you’re done using the Film/Video computer, click the Apple Menu in the upper-left corner and choose Log Out.
Summary
When logging into a Film/Video computer, follow these general steps:
- Log in with your Film/Video credentials.
- Click the Restore Preferences icon in the Dock (Optional)
- Open Google Chrome and sign into your CalArts SSO account
- Enable sync on Google Chrome
- Sign into your Adobe ID using the “Continue with Google” button
- Have fun and be creative!!
When logging out of a Film/Video computer, follow these general steps:
- Save all your projects and close all your applications
- Click the Save Preferences icon in the Dock (Optional)
- Make sure you have copies of your files copied back to an external storage device or your FVCentral folder.
- Log out, and treat yourself to something for being so amazing!
Maintenance
Every Friday from 7:00 am to 9:00 am, staff perform server and computer maintenance. There is no access to the labs, computers, and servers at this time.
Any computers left logged in may be restarted without saving your data, so be sure to log out before maintenance time begins!
There may be additional maintenance times to address any critical issues that may arise. We’ll try our best to give advance notice of this ahead of time, but you should still save and backup your data regularly throughout the day, just in case.
Remote Screen Sharing
Computers may be remotely screen shared by our system administrators for various maintenance or troubleshooting tasks.
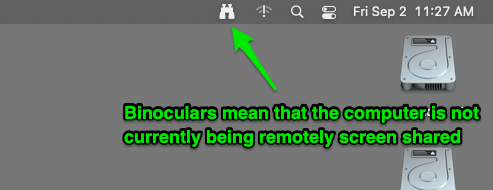
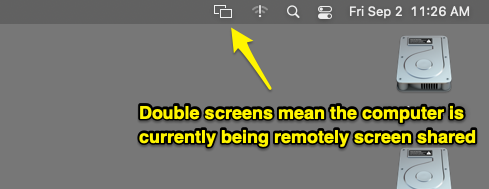
Privacy and security are important, so there is a visual indicator in the top menu bar whenever remote screen sharing is active.
When you see the icon of a pair of binoculars, that means the computer is currently not being remotely screen shared.
If, instead of binoculars, you see an icon of two rectangles – like two mirrored screens – that means the computer is currently being remotely screen shared.
Getting Help with 2 Pop Support
The best and fastest way to get tech help is to submit a request with 2 Pop Support. Click on the Submit a Ticket bookmark in the Dock to open the 2 Pop Support website.
You can also click the “Submit a Ticket” button at the top of this page or send an email to 2popsupport@calarts.edu from your own device.
Tech staff is available Monday through Friday from 8:30 am to 8:30 pm.
When submitting a ticket, be sure to provide the room number, computer number, screenshots, and a detailed description of the issue you are having so we can better help you.