
Production Drives, Backup Storage and Best Practices
Taking care of your digital data is an essential part of being a filmmaker today, and protecting it should be taken seriously. Drive failures happen more often than you would think, and without having backups, you run the risk of losing your project. You are responsible for understanding and implementing a backup process for your projects.
The School of Film/Video recommends certain specifications for use in the digital editing and animation labs. The following are guidelines for production drives, backup storage, formatting, versioning, naming conventions, and backup workflows.
There is no completely safe method for storing your digital media files, so the more copies of your project you can store in multiple places, the better!
Production Drives
Your production drive is your primary drive that you’ll use to edit audio and video in real time. As such, it will need to be fast and robust, ideally a SSD (solid-state drive).
If you purchase a HDD (hard disk drive) it must have a rotation speed of 7200 RPM or higher, and it must use a USB-C connector with a USB 3.0 or higher interface.
More details about HDD recommendations can be found below in the “Hard Disk Drive (HDD)” section.
Backup Storage
Your backup storage is used to back up your production drive. It should have a larger storage capacity than your production drive so that it can keep multiple versions of your project, including older versions of files that have been modified or deleted.
Speed is not as important for backup storage drives since you won’t be working on your project directly from backup storage. In this case, HDDs are usually ideal since they can provide large storage capacity without necessarily needing to be fast.
It’s highly recommended that you have more than one backup copy of your production drive stored, ideally, in different locations. For example, you could have copies of your production drive stored on both a separate HDD as well as FVCentral and/or FileCloud (more on those later).
Storage Options
Let’s detail some of your available storage options a little bit more thoroughly.
External Drives
Solid State Drive (SSD)
Solid State Drives (SSDs) use electronic memory chips to store your data, which offer extremely fast transfer speeds. They have no moving parts, so are not as prone to damage from physical impact. However, they tend to be more expensive than hard disk drives (HDDs), and they come in lower storage capacities.
Portable thumb drives are technically SSDs, but they have a smaller storage capacity (and a higher failure rate) than regular SSDs. Try to avoid using them.
Hard Disk Drive (HDD)
Hard Disk Drives (HDDs) use rotating magnetic platters to store your data. They’re more affordable than Solid State Drives (SSDs), but are slower and more susceptible to damage from physical impact. On the other hand, they come in much higher storage capacities than SSDs.
Drive Requirements
Whether you opt for an SSD, an HDD, or both, there are some requirements you should consider when purchasing.
USB Interface
To be compatible with School of Film/Video computers, your drive must have at least a USB 3.0 or higher connection. Thunderbolt 3 or greater is ideal.
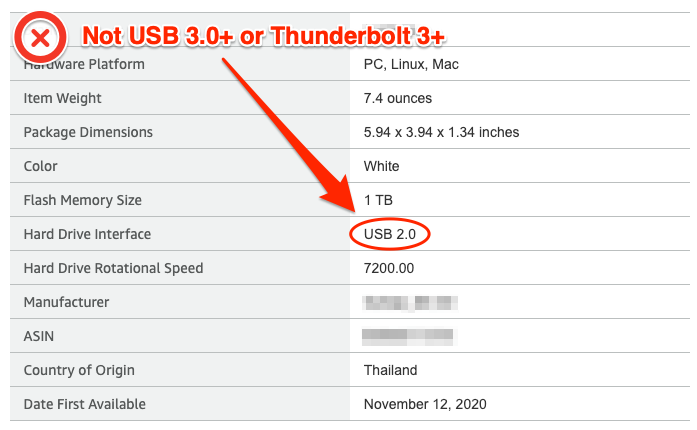
Do not use a USB 2.0 drive; they are too slow for playback and editing, and may even be too prohibitively slow to be used for backup storage.
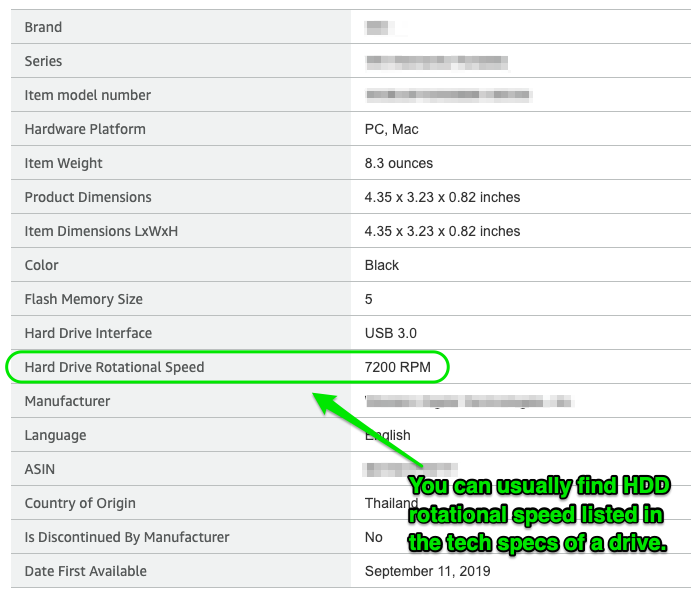
When purchasing an HDD, the technical specifications will usually list what kind of interface it uses.
USB Connector
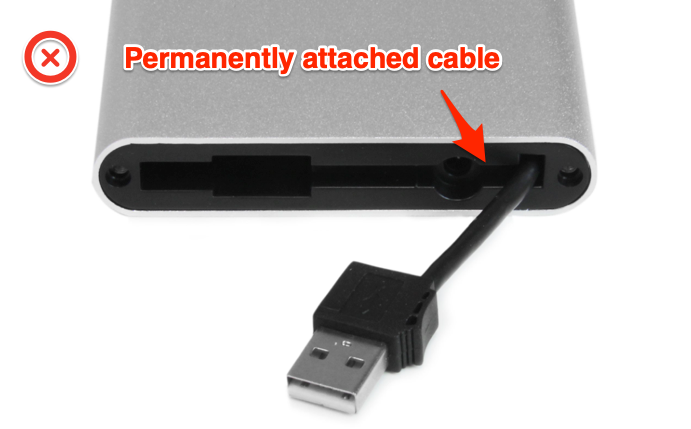
Do not use drives with cables permanently attached to them; the wear and tear on the cable can lead it to fail, and then you have no way to access your drive.
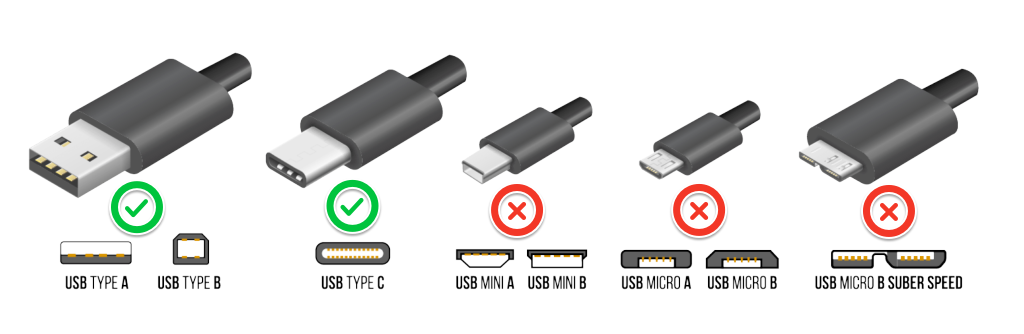
We do not recommend using USB mini or USB micro cables. Try to stick to only USB-A and USB-C.
Rotational Speed (HDDs Only)
As mentioned above, any HDD you purchase must have a rotational speed of 7200 RPM (“revolutions per minute” or rotational speed) or higher.
SSDs do not have rotating disks, so for those you don’t need to worry about the RPM or rotational speed.
Drive Cooling (HDDs Only)
For long or higher resolution projects, your HDD drive should have adequate cooling in the form of an internal fan or heat sinks. Without adequate cooling, the life of your drive will be shortened and may result in premature failure.
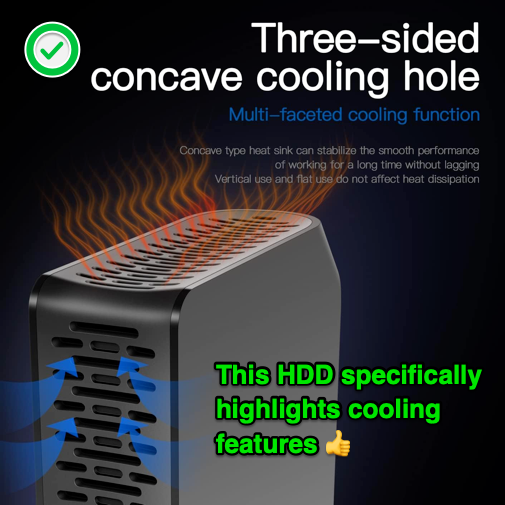
SSDs do not generate as much heat as HDDs, and so cooling is not as much of an issue.
Storage Capacity
For production drives, make sure they can hold all of your media and production files and leave at least 20% overhead; full drives can become fragmented and slow.
For backup drives, make sure they can hold multiple copies of all your project files. You’ll want to keep versioned copies as your project progresses, so your drive must be able to accommodate all these copies.
When estimating your storage needs, keep in mind that rendering and transcoding your media will take up a considerable amount of space on your drive.
Also, RAW video files are very large, so be particularly mindful of drive space when shooting RAW.
When in doubt, always overestimate the amount of data capacity you think you’ll need.
Summary
To summarize, these are what you should look for when shopping for a drive:
- USB 3.0 or higher, or Thunderbolt 3 or higher
- USB-A and/or USB-C connectors
- No permanently-attached connectors
- At least 7200 RPM (HDDs only)
- Adequate cooling (HDDs only)
- Capacity for 20% overhead (production drives) or for multiple versioned copies of your project files (backup storage)
FVCentral
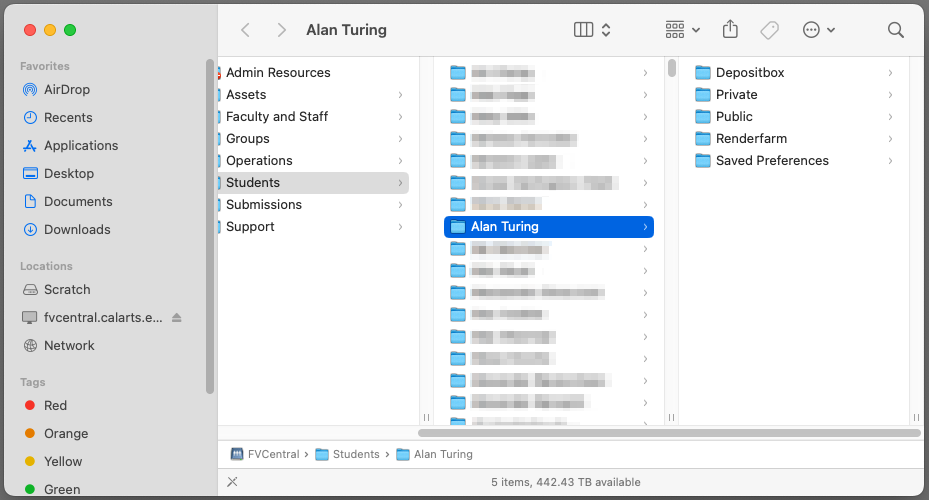
FVCentral is the network storage server used by our School. It’s accessible from all Film/Video computers, and is used for a wide variety of things.
Typically FVCentral should be considered one of your backup storage locations. In most cases, the network connection to FVCentral is too slow to be used as production storage.
By default, all Film/Video accounts get 250 GB of storage on FVCentral, although additional storage can be requested and approved on a case-by-case basis.
FVCentral can only be accessed while on-campus, and currently there is no remote or cloud accessibility for it when you’re off-campus.
At the end of each academic year, right after labs close for the summer, your data is permanently erased from FVCentral, so be sure to pull any of your important project materials off FVCentral before then.The 2 Pop article, Your FV Computer Account, goes into more detail about FVCentral.
FileCloud
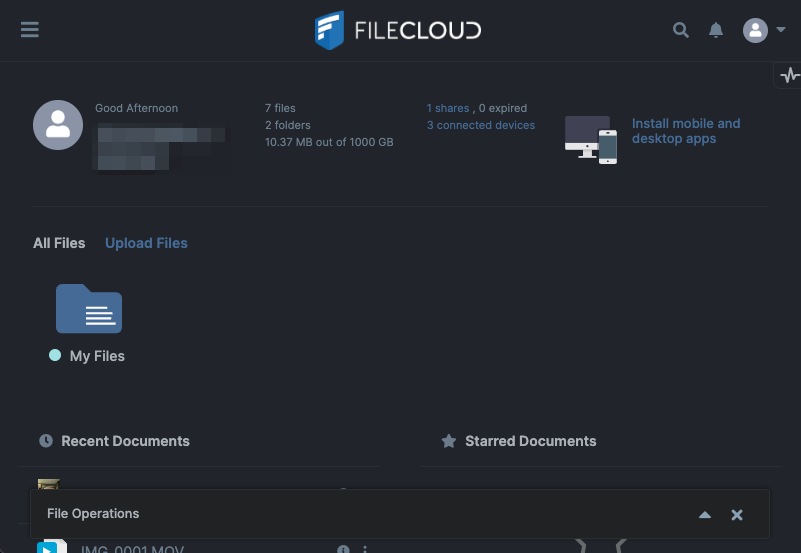
FileCloud is the cloud-based storage server used by the entire CalArts Institute. It’s accessible at https://filecloud.calarts.edu from any device that has an internet connection.
By default, all CalArts users get 1 TB of cloud storage on FileCloud. Data upload/download speed will heavily depend on your internet connection; it may be faster or slower depending on what kind of connection you have. Typically, it will be slower than FVCentral storage.
Access to/from your FileCloud account must be done using either a web browser or one of FileCloud’s apps. Currently, we are not installing FileCloud apps on the Film/Video computers, so you’ll have to rely on the web interface when using one of our computers.
Your FileCloud storage is not deleted until after you graduate or unenroll from CalArts.
Since this service is available to all CalArts users – regardless of School – it’s managed and supported by CalArts IT (CAIT) rather than the School of Film/Video or 2 Pop Support.
Like FVCentral, FileCloud should be considered one of your backup storage locations, even if you use one of FileCloud’s apps to synchronize it to your computer. Having a copy of your project files in the cloud is extremely helpful, but the reliance on internet speed will make it too restrictive to use as production storage.
Google Account
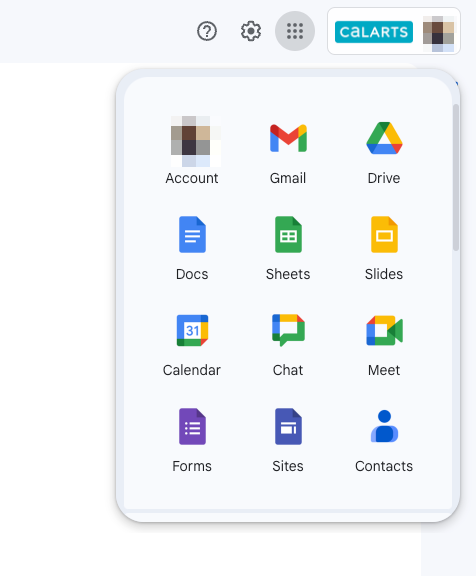
Your CalArts email address – ending in @calarts.edu, @students.calarts.edu, or @alum.calarts.edu – is actually a managed Google Workspace account. Through it, you have access to Gmail, as well as Google’s online office suite which includes things like Google Docs and Google Sheets.
Your Google Workspace account also comes with some online storage, but it’s not intended to be used for backup or long-term storage; it will fill up naturally from emails and Google Workspace files.
The recommendation is to use your Google Workspace storage mostly for collaboration purposes. Things that need to be backed up and/or archived should be moved to one of the other storage options available to you, such as your FileCloud account.
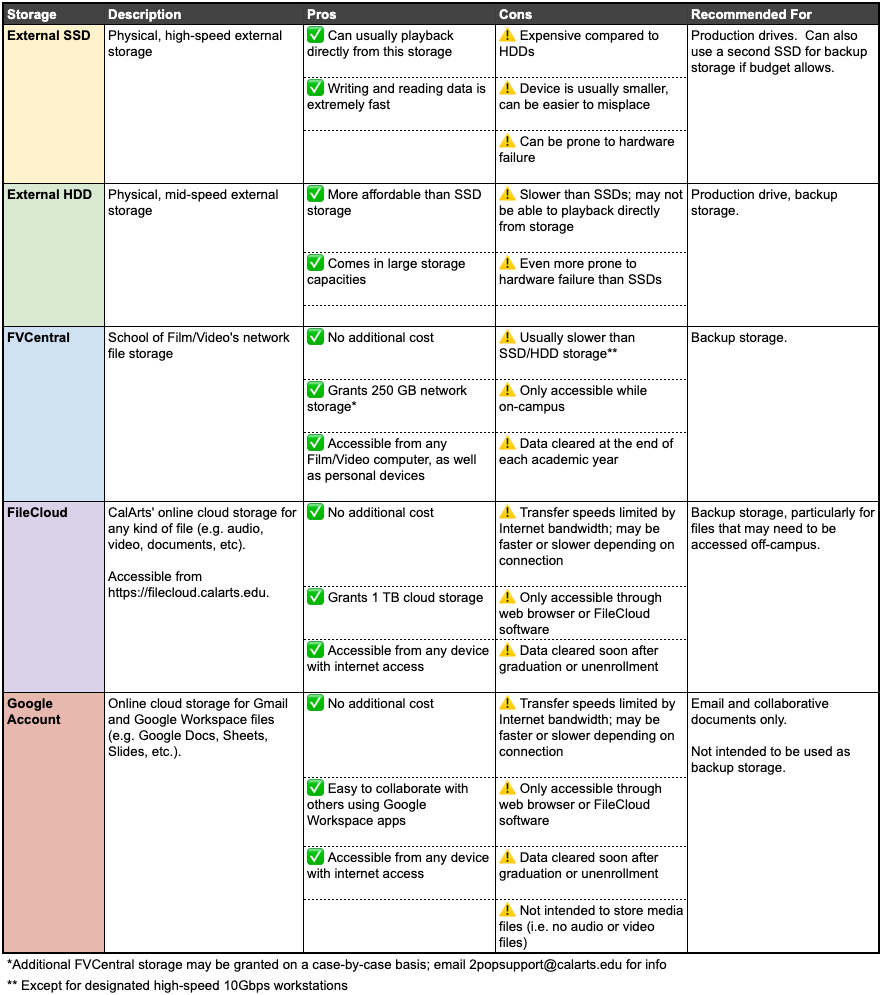
Which to use?
We’ve presented a handful of the storage options available to you, which can be summed up in the chart below.
Drive Formatting
In order to work with our Mac computers, your drives – whether they are SSD or HDD – must be formatted correctly.
Brand new drives are almost always formatted incorrectly for use with a Mac computer. Sometimes they’ll come with an installation app, or with instructions for you to download software from their website. This is almost never necessary, and you should avoid installing anything that’s likely to simply be bloatware. All you should need to do is to format the drive using Disk Utility, which we’ll walk you through below.
If you currently own a drive that is formatted for PC (FAT32, exFAT, NTFS, etc.) it must be reformatted for use with Mac computers. This will erase all files on your drive, so be sure to copy your data off the drive before proceeding with a reformat.
Reformatting your drive will erase all files currently on that drive. If you’re formatting an existing drive, be sure to back up your data before continuing!
To reformat your drive on a Mac:
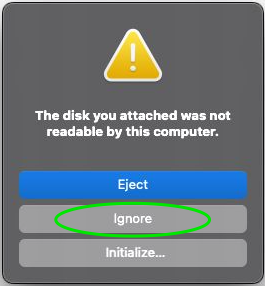
1.Connect your drive to the Mac. If you get a pop-up window about the drive, just click the Ignore button.
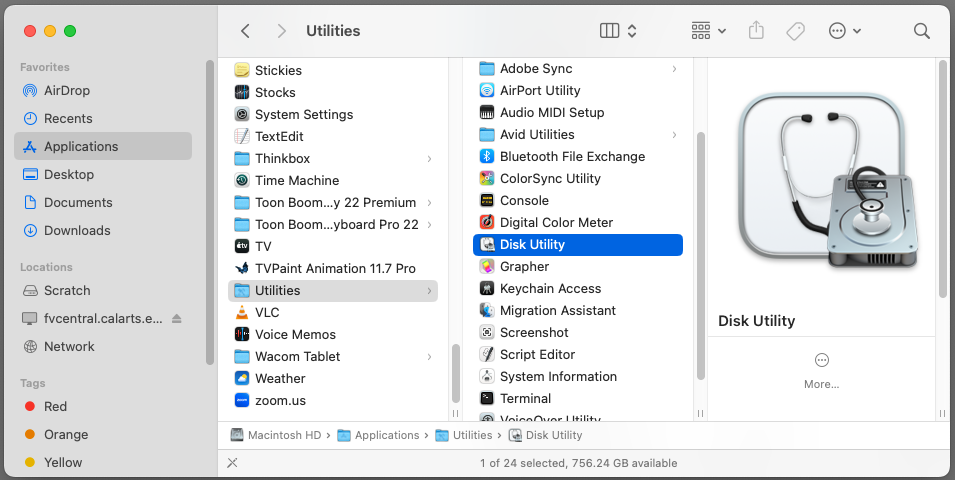
2. Click on Finder and navigate to Applications > Utilities > Disk Utility.
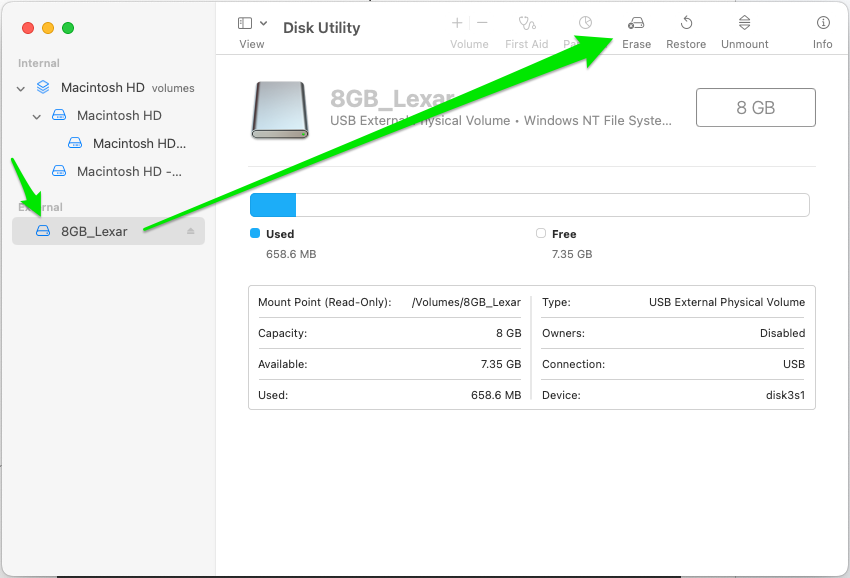
3. In the left-hand pane of the Disk Utility window, under the External section, click on your external drive, then click the Erase button on top.
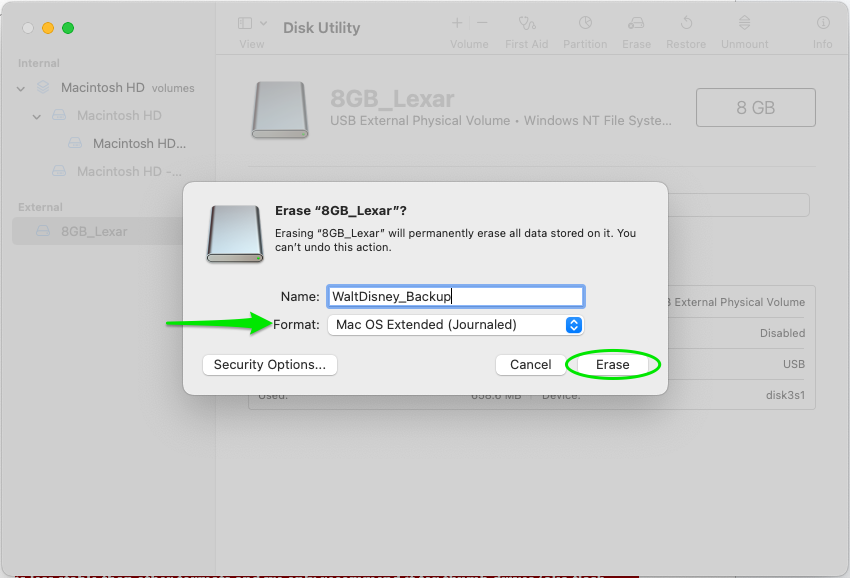
4. In the pop-up window that appears, enter a name for your drive (consider including your name in the drive name in case it gets lost). In the Format drop-down, select Mac OS Extended (Journaled), then click Erase.
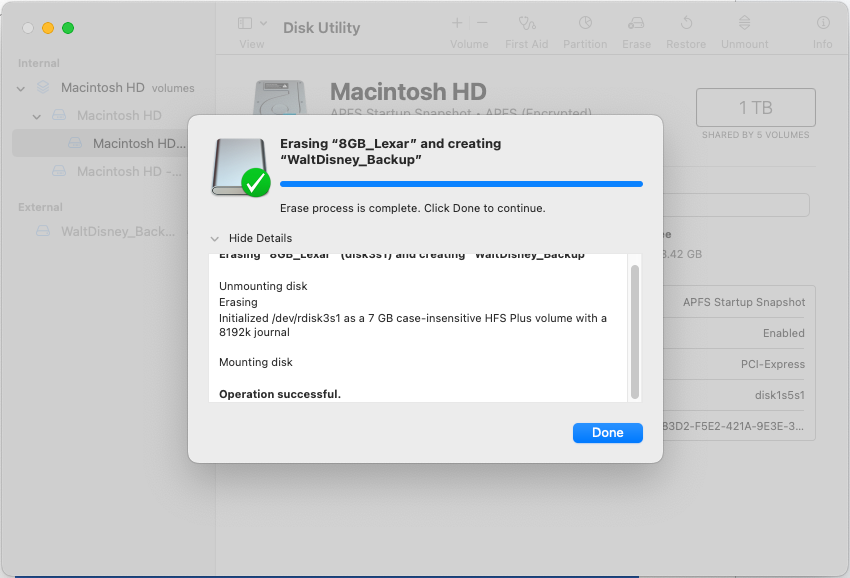
Once the format completes, just click Done and close the Disk Utility window, and you’re done!
If you need to connect a Mac formatted drive to a Windows-based PC, you will need to install compatibility software onto the PC, such as MacDrive or HFS+ for Windows by Paragon Software.
ExFAT formatted drives can be used on both MacOS and Windows computers. However, it’s less stable than other formats and we only recommend it for thumb drives that are used for transferring files between computers. We do not recommend ExFAT for production or backup drives.
Versioning Up
It’s a good idea to keep multiple versions of your project as you continue working on it. In fact, each day when you sit down to work, you should begin by duplicating your project, updating the name to reflect a new version, then begin your day’s work using this updated project version.
For example, if you are currently working on v02 (version 2) of your project file, make a duplicate and name it v03. Tomorrow, duplicate it and name it v04.
Dates can also be used instead of or along with version numbers. For example, 20231215 (December 15, 2023).
As you create new versions of your project, do not delete previous versions; they may be crucial in the event of data loss or file corruption!
Naming Files / Folders
Acceptable Characters
Using non-Latin-script alphabets – such as Mandarin (官話), Arabic (الْأَبْجَدِيَّة الْعَرَبِيَّة), or Cherokee (ᏣᎳᎩ ᎦᏬᏂᎯᏍᏗ) – in your file and folder names is fine.
In fact, almost any character that’s part of the UTF-8 encoding standard is acceptable to use. However, certain special characters will cause problems. See the next section on characters to avoid.
Naming conventions for Film/Video showcases and festivals require Latin-script alphabets only. During submission time, any files / folders that use non-Latin-script alphabets will need to be renamed to conform to the CalArts Standard Naming Convention, which is covered in its own section below.
Characters to Avoid
Certain special characters are interpreted by computers differently than alphabet characters. These special characters can sometimes lead to file corruption – especially when transferring between computers.
When naming files or folders, try to avoid using special characters as much as possible.
Some examples of special characters to avoid in your file and folder names are:
- pound sign (#)
- dollar sign ($)
- percentage sign (%)
- asterisk (*)
- ampersand (&)
- tilde (~)
- back slash (\)
- forward slash (/)
- question mark (?)
- plus sign (+)
- quotation marks, single (‘) or double (“)
Periods (.) should only be used in file extensions. Please do not remove any periods that are automatically added by the computer.
If you’re unsure whether you should use a certain character, avoid using it.
Also avoid using emojis (🚫 📁 😭) in file and folder names, as they can create problems with certain programs.
CalArts Standard Naming Convention
CalArts has an official Standard Naming Convention which you can refer to when submitting to Film/Video showcases and festivals, which sets specific guidelines for file / folder names.
This naming convention can also be used for keeping multiple versioned copies of your project folder.
Standardized naming prevents errors during file transfers and ensures compatibility across platforms. Sometimes special characters, or even spaces, can corrupt a file when copying between two computers running on different operating systems. When in doubt about a character, avoid using it.
Best Practices for Backups
Backing up regularly can be a tricky thing to remember, and it may take a while to make it a habit. Here are some tips (and reminders!) to help make it easier.
- Before beginning work for the day, duplicate your project on your production drive and increment its version (see the “Versioning Up” section above).
- Set aside time at the end of a class or work session solely for backing up your work. Save to your production drive first, then copy from there to your backup storage.
- Remember, backup storage is a separate storage location from your production drive – such as another external drive, FVCentral, or FileCloud.
- The Scratch drives on our computers are not backup locations, since they are regularly erased. They are intended only as temporary production storage while you work on your project. See the 2 Pop article, Your FV Computer Account, for more information about Scratch drives and how to use them.
- Be certain you are not working from your backup drive. Work should only be done from your production drive or the computer’s Scratch drive.
- If you are working from the Scratch drive, be sure to copy to both your production drive and your backup storage when finished working for the day.
Further Help
If you have any additional questions, you can submit a ticket by clicking the Submit a Ticket button at the top of this page, or by sending an email to 2popsupport@calarts.edu.
Disclaimer
This document contains information and recommendations that are accurate to the best of the knowledge of the School of Film/Video. All purchases of any hardware discussed within this document are done at the sole risk of the purchaser. The School of Film/Video does not assume any responsibility for such purchases nor does it directly endorse any hardware/software manufacturer and/or retailer/vendor. The School of Film/Video does not provide direct technical support for personal hardware or software. All data stored on local/network drives within the School of Film/Video’s labs are done at your own risk. Every student is responsible for backing up their data.