
Working with the Pro Tools FV Edit Template
The FV Edit template contains all you need to get started with basic sound editing and design. Separate versions of this template exist for frame rates 23.98, 24, 25, and 29.97. All can be found either on the server FVCentral > Support > Pro Tools Templates, or in the Documents folder of the Mac you are working on in Documents > Pro Tools > Session Templates > FV. The FV Edit template contains:
- Example Dialogue for setting a good monitoring level
- Sync pop at 00:59:58:00
- 12 Mono Dialogue Tracks ( Dlog 1-12)
- 6 ADR tracks (ADR 1-6)
- 12 Foley Tracks (Foley 1-12)
- 12 Mono & 12 Stereo Effects Tracks ( FX Mono 1-8, FX Stereo 1-8)
- 8 Stereo & 8 Mono Background Tracks ( BG Stereo 1-8, BG Mono 1-8)
- 8 Stereo & 8 Mono Music Tracks (Music Stereo 1-8, Music Mono 1-8)
These tracks are grouped in track folders. You can click on the folder icon on the left button left corner of the track head to collapse or expand a group of tracks.
Tracks utilize the Channel Strip plugin for basic EQ shaping and compression. All outputs are routed to play back directly to the Stereo Monitors (Headphones) output of whatever system you are working on.
This tech doc explains the process of moving your clips into the template after you have imported them from Premiere Pro, FCPX of Media Composer. For instructions on how to export sound and image from these applications, see the tech docs for Moving From [your editing application] to Pro Tools.
Preliminary Session Management
- After importing the tracks from your AAF file, the first step is to duplicate your imported tracks so that you have a clean copy of them in your session to use as a backup for future reference. Begin by selecting all of the imported tracks from the AAF file: click on the name of the first imported track, hold the shift key, and click the name of the last imported track. Right click on one of the selected tracks and click Duplicate. The Duplicate tracks window will pop up and, since you want to duplicate everything, leave all options checked and click Ok.


- Now select the original imported tracks again in the same manner, right click, and this time select Hide and Make Inactive. Now you have effectively replaced the original imported tracks with the duplicates. In the Tracks list, you can see the inactive originals with italicized names and light grey dots.


To reactive and/or show inactive tracks, in the Tracks list, click to select a track, then right-click and select Show or Show and Make Active. You can also click on the dot next to the name to quickly show or hide the track.
If you ever find that you are hearing a track or clip which you cannot find in your Edit window, you may have a hidden track which has not been made inactive!
Tips on Track Organization
The first section fo the template is Dialogue. In most cases, dialogue is the most important part of a film soundtrack. It is good to keep dialogue from different characters on different tracks, especially if they sound significantly different from each other. In cases where you are dealing with dialogue from production sound, it is best to utilize a special technique called checkerboarding: alternating character dialogue in a scene between only two or three tracks, sometimes even separating lines from a single character; alternate audio clips from boom microphones according to camera angle; alternate audio clips from lavalier microphones according to character.

Foley is for sounds that weren’t picked up in production, or which otherwise don’t have the desired detail. Typically, Foley is divided into footsteps, objects or props, and body or clothing movement. What makes Foley different from Effects is usually that Foley is specific and performative: it must match some movement onscreen. In this way, recording Foley can be a very fast and effective way to get just the right sound for a particular action. You could, of course, pull effects from Soundminer to do this, but in the time it takes to find, edit, and sculpt one kind of passable sound, you could easily have recorded several spot-on foley cues.

Effects are momentary world sounds, some that address action onscreen, some that draw attention to things offscreen, some as simple as a door closing, some as complex as a gunfight with shots. Soundminer is a quick and effective resource for sound effects (see Using Soundminer), but you are encouraged to record your own sound effects, both in the field and the Recording Studio. The Effects tracks in the template are separated into Mono and Stereo, but effects can be organized in many more ways. Often, sound designers group sound effects tracks by similarity or material, for instance metal sounds on tracks 1 & 2 and wood sounds on tracks 3 & 4 in the example below.

You could also organize them by duration or presence: the first effects track could have shorter or more present sounds and the later effects tracks could have longer and less present sounds. Are these sounds which should all be affected with the same plugin(s)? Think about what sound effects your film has or needs, what you would like them to do, and how you would like them to sound, then organize them most effectively for those purposes.

Backgrounds, also called Ambiences, set the scenes of your film. They act as a kind of bed for all other sounds of the film. Typically they last for the entire duration of a scene, unless the environment changes mid-scene. Backgrounds include exterior environmental sounds (city, suburbs, forest, etc.), general kinds of activity defining a place (busy cafe, half-empty party, birds chirping), and interior sounds (room tone, ventilation noise, humming appliances). It is often very effective to layer several backgrounds in order to create unique sound situations.

The next group is Music. Music in film is typically classified as either diagetic vs. non-diagetic. Diagetic music comes from something onscreen or otherwise inside the world of film, for instance speakers at a party or from a record player in a quiet room. Non-diagetic music comes from outside the world of the film, often as in what is usually referred to as the film score. Film composers will often deliver stems of the different elements of the score, which together make the entire score. That way if one element gets in the way of the dialogue, for instance, it can be adjusted without affecting the rest of the score.

For just about any and all films, these template groups are quite useful. It is best to consider the template an organizational tool, rather than anything too proscriptive. You are by no means required to use all groups. Even if your film doesn’t exactly have what you’d call dialogue, you can for instance use the Dialogue tracks for the main element (or anchor element) of your soundtrack. Or if your film doesn’t exactly have what you’d call music, you can for instance use the Music tracks for non-diagetic atmospheric or “tonal” effects. Rather than narrowing your soundtrack to fit these groups, think of it as expanding the definitions of Dialogue, Effects, Backgrounds, and Music to work for your soundtrack.
Moving Clips into Template Tracks
- First, take note of how your timeline looks in comparison to how they did in your picture editing software timeline. Are your mono clips in mono tracks? Are your stereo clips in stereo tracks? If not, are they split between two mono tracks? Are they panned left and right properly, or are they both panned center? Are all the elements of your soundtrack (Dialogue, Effects, Backgrounds, Music) easy to recognize and organize?

- Sometimes sounds brought into your editing software appear to be stereo clips but are actually duplicated mono clips with the exact same waveform on the left and right channels. For most purposes, this is unnecessary and one channel should be deleted.
- To confirm that this is the case with one of those pseudo-stereo clips, place your selector at a clearly visible part of the waveform and zoom very far in. You can zoom in to the waveform vertically by clicking the up and down arrows on the Audio Zoom In tool in the top right corner (you can also hold shift + option + scroll). As you can see, the waveforms are identical.


Zoom back out easily to see everything in your session by double-clicking the Quick Zoom tool with the magnifying glass to the right of the Audio Zoom In tool. It will revert to the last used tool.
The other tools in the toolbar are, from left to right after the quick zoom tool, the Trim tool, the Selector tool, the Grabber (or Hand) tool, the Scrubber tool, and the Pencil tool. The bar which includes the Trim, Selector, and Grabber tools is the Smart Tool.
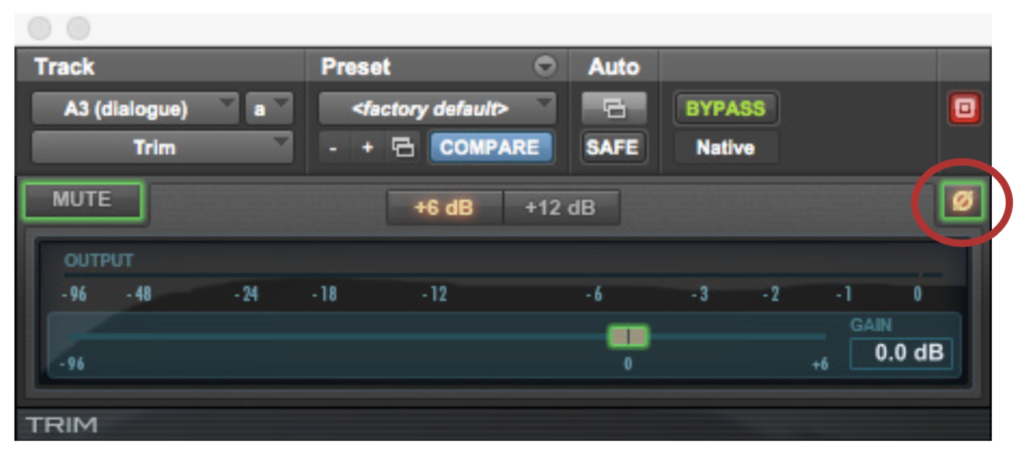
- If you’re still unsure, the most certain way to determine if two clips are the same is to do a polarity flip. Click on the Solo ‘S’ button below one of the tracks (circled in red below; the button will turn yellow), then hold shift and click on the Solo button on the next track.

- On the second track, add a Trim plug-in by clicking one of the empty boxes in the Inserts A-E column: go to plug-in > Other > Trim (mono). Click the ∅ polarity flip button. This will reverse the positive and negative signal values, leaving you with the mathematical difference of the two clips. If they are truly the same, the difference is zero (i.e. silence). Listen to the result (press spacebar), and if it is significantly lower, or with low frequencies drastically cut, or if it is entirely silent, you can be sure that one of those clips is unnecessary.
- Delete one of the two clips by selecting is and pressing delete.

To be clear, deleting clips on the timeline does not affect the original file. Pro Tools utilizes non-destructive editing. You can always drag sound files form the Clips list back on to the timeline, if necessary.
- Select the remaining clip, then hold control and drag the clip to the template track which matches its track group — in this case, Dlog 1M. The clip will change color to match the track.

- To do this with multiple clips, select one, then hold shift while selecting other clips. You can select them one by one by clicking each, or by dragging with the selection tool (cursor on the top half of the waveform, or in empty space on the timeline) to expand your selection. Again hold control and drag the clips to the appropriate template track.

So long as you have enough template tracks, you could even select all your imported clips and drag them down into the template tracks. It is good, however, to be conscientious of how your clips should be arranged. Going slowly here and properly organizing your clips will save you time in the long run.
- If you need more audio tracks, keep in mind that twice as many will be available by showing the hidden template tracks. In the tracks window, select the tracks you want to show (or option + click to select all tracks), right click on them and click Show.

- To add even more template tracks, duplicate a track that has the settings you want for the new track, for example – if you need more dialogue tracks – Dlog 12. When the Duplicate Tracks window pops up, enter in the number of duplicates you want to make and uncheck Active Playlist, Alternative Playlists, and Automation. Click Ok. They will have the same functionality as the other template tracks. Be sure to rename the track(s) accordingly (in this example, you will rename it Dlog 13). Double click on the track name, enter the new name, then click Ok.


Avoid making new tracks! Duplicate the tracks that already exist in the template. If you make new tracks, they will not have the proper grouping or output assignments.
Working with Stereo Clips and Tracks
- For each true stereo sound effect, whether it appears as a single stereo clip or a pair of mono clips, select the clip(s), then hold control and drag it (them) into the appropriate stereo template track. If it was a pair of mono clips, the two clips will join together to make a single stereo clip with the two waveforms displayed. The clip will change color to match the track.

- Take note the track panning of your stereo clips (circled in red above). Some stereo clips some through with both their left and right channels panned to the center. You will need to change the panning automation to fix this. Click on the Track View Selector which currently says “waveform” and go to pan left > front pos left. The track view will display the panning information for the left channel of your track.

A quick way fo viewing the automation for any automatable parameter is to hold ctrl + cmd and click on the parameter you’d like to view. For instance, hold ctrl + cmd and click on the left panning number. The front pos left automation view will come up on the track.
- With the selection tool, double click on the clip to select it, then press delete. Since you are in the panning track view, you will delete the automation on the clip, not the clip itself. The panning will default back to full left position.

If you’d rather adjust the automation, rather than delete it completely, put your cursor in the top quarter of the clip, above the first waveform. Your selection tool will becomes a downfacing bracket. Click and drag up or down as desired. Hold command while adjusting for more precision.
- Do the same for the right channel panning automation. Click on the Track View Selector again, go to pan right > front pos right. Select the clip and press delete to set the panning to full right position.

- When you have moved all your clips into the template tracks, and duplicated tracks from your AAF file are complete empty (excluding the leader), select all those duplicated AAF tracks, right click on the name of one of them and click Delete… Now you are ready to start your sound edit and design!
