-
-
- Computing Kit Unpacking Instructions - Cintiq
- Computing Kit Unpacking Instructions - iMac
- Computing Kit Unpacking Instructions - iPad Pro with Apple Pencil
- Computing Kit Unpacking Instructions - Keyboard & Mouse
- Computing Kit Unpacking Instructions - Mac Pro
- Computing Kit Unpacking Instructions - MacBook Pro
- Computing Kit Unpacking Instructions - NEC Display
-
-
-
- Adobe CC 2019 Sign In Procedures
- Audacity in F105 or A108
- Connecting To FVCentral with your Mac
- Connecting to FVCentral with your Windows 10 PC
- Creating an Email Filter in Gmail
- Installing TeamViewer
- Minimum Specifications for Personal Computers
- Saving Adobe Photoshop Files from FVCentral
- Your Computer Account
-
- Burning a Blu-ray in Toast Titanium or Compressor
- Creating an iLok and Avid Master Account for Pro Tools or Media Composer
- Loading MixPre-3 and MixPre-6 Presets
- Moving from Avid Media Composer to Pro Tools
- Moving from Final Cut X to Pro Tools
- Moving from Premiere to Pro Tools
- Pro Tools FV Edit Templates
- Pro Tools Installation & Activation
- Recording in F104
- Sound Devices MixPre Quickstart
- Sound Mix and Post Production Questionnaire 2020
- Using Soundly from Home
- Using Soundminer
- Using Standard Leader
- Using the Sennheiser MKH 418S Stereo Mic with the MixPres
- Working on Surround Pro Tools Sessions in E105 or E60
- Working with the Pro Tools FV Edit Template
- Creating DNxHD for Pro Tools with Shutter Encoder
- Recording Foley at Home
- Show all articles ( 4 ) Collapse Articles
-
- Adobe Premiere Pro CC 2020 14.1 Update - Potential Issues
- Basic Color Correction After Scanning with the Cintel
- CalArts Leaders
- Creating an iLok and Avid Master Account for Pro Tools or Media Composer
- DCP Creation with DCP-o-matic
- Film Scanning Policies & Procedures
- Synchronizing Audio and Video with Merge Clips in Premiere
- Troubleshooting Premiere
- Using Standard Leader
- Vimeo Recommended File Upload Settings
- Working in 4K
- Working with Open Captions in Premiere
- Working with Proxies in Premiere for RED & 4K Projects
- YouTube Recommended Upload Settings
Using Andor 1 Video Wall
Last Updated:
- Technical Support
- Production and Installation
- Using Andor 1 Video Wall
< Back
You can play a single video and spread it across multiple screens without having to segment the video in your editing software.
- Put the same video file in each USB drive
- Plug in, power up, and sync all your Andor 1 media players
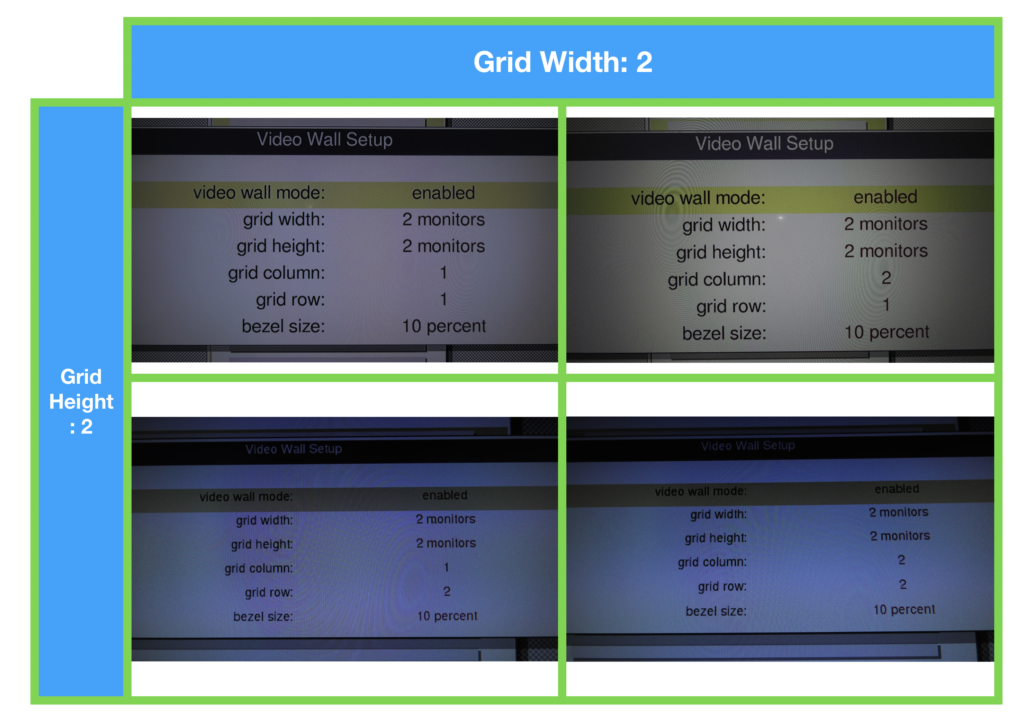
- Open the Menu and go to Advanced Options > Video Wall Setup.
- Enable the Video Wall Mode.
- On each screen, you can adjust Grid Width and Grid Height to make your grid system
- Assign position of individual screen by adjusting its column and row number
Synced monitors can be assigned to different grid systems. Any monitors that don’t have Video Wall Mode enabled will play the full image of the video
Here is an example of the set up for a 4 screen video wall where each screen displays 1/4 of the whole image:

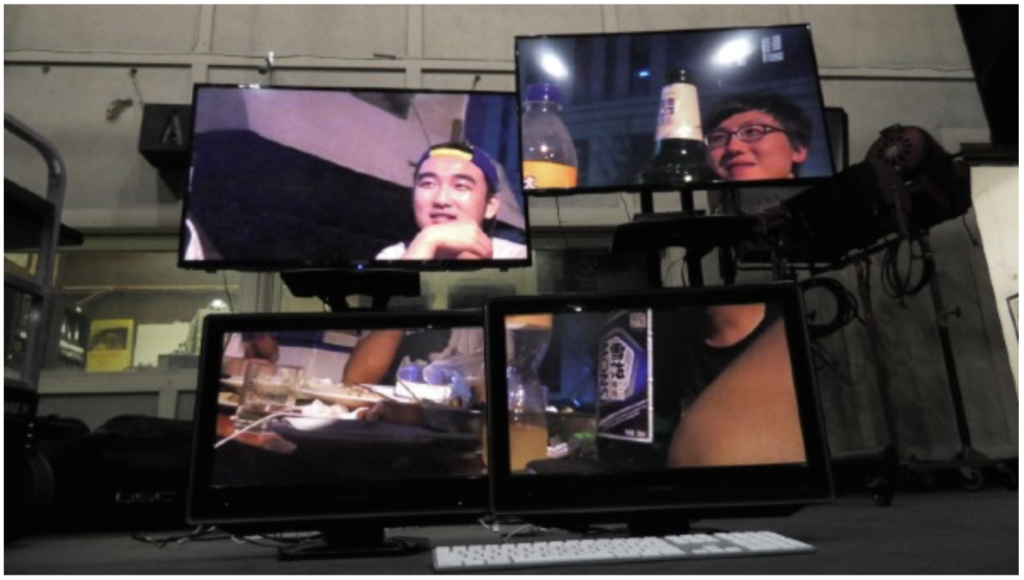
And this is what it looks like:

Table of Contents