
Search Knowledge Base by Keyword
Sound Devices MixPre Quickstart
The MixPre series sound recorders/field mixers are made by Sound Devices, and are compact, lightweight, and without compromise in terms of sound quality. They have become a standard recorder for small-scale film productions. The recorders are available for checkout with a 32 GB SD card already installed, giving you about 60 hours of track record time.
The MixPre-6 and MixPre-3 are very versatile and potentially complex machines. This handout will detail the basics of getting started and recording, utilizing customized Film/Video Sound presets.
The MixPre-6 and MixPre-3 are almost identical in usage. The main difference is that the MixPre-6 has four mic inputs, and the MixPre-3 has three mic inputs. To save space, this guide uses graphics of the MixPre-6.
Power
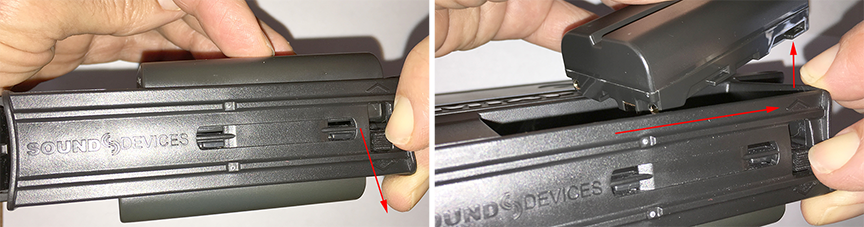
- Make sure the batteries are installed on the rear mount. You can use one or two batteries, and they can be hot-swapped.
- To remove a battery, slide the release level away from the battery you want to remove, and slide the battery toward the release lever and up out of the sled. Do not remove the power sled!
- AC power supplies can be checked out separately from The Cage. They can be useful for long interview or music sessions.
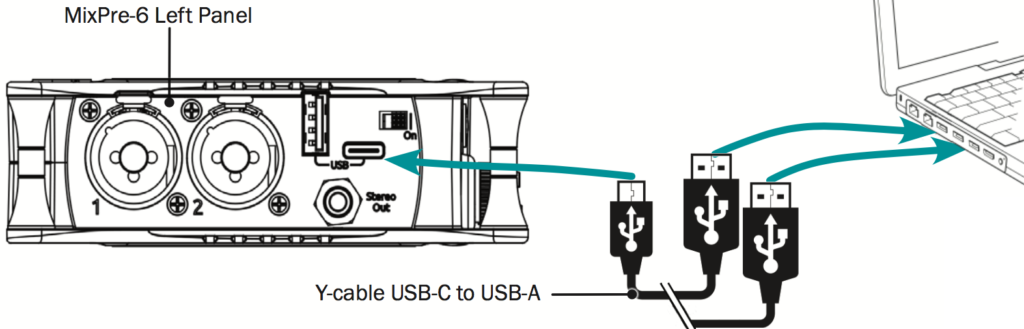
- In an emergency, you can power the MixPre from a laptop using the provided special USB cable. Connect a USB-C to USB-C cable to the MixPre-6 and a USB-C power source. If using a Y-cable USB-C to USB-A, then you must plug it into two USB ports to get enough power. This method is not recommended.
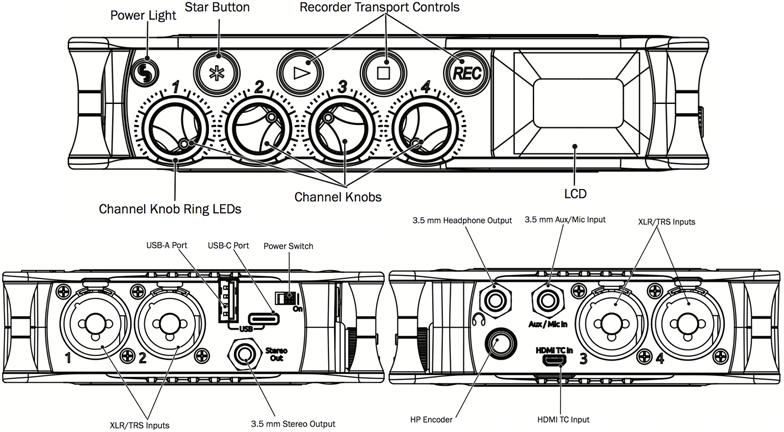
- Turn the MixPre on, using the power switch on the left panel. This will bring up the Home Screen on the front panel. The front panel is a touch screen LCD display, thus menu navigation and operation is done through a combination of tapping the display and pressing and turning the headphone volume/encoder knob.
Format the SD Card
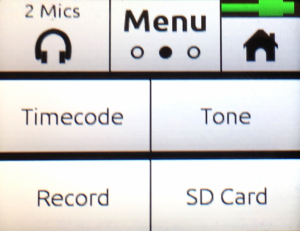
Tap the Menu icon. You’ll see three dots under Menu, indicating 3 pages of menu items. Tap Menu to go to the second page.
- Tap SD Card > Edit > Format.
- When asked to confirm the command to format the card, tap OK.
- Since the MixPre is so versatile, we have created 4 internal Presets for the most common field & studio recording situations:
| MixPre-6 Presets | MixPre-3 Presets |
| 1 Microphone 2 Microphones 4 Microphones (for 3 or 4 inputs) Senn418S (only for the Sennheiser 418S M-S mic) | 1 Microphone 2 Microphones 3 Microphones Senn418S (only for the Sennheiser 418 M-S mic) |
These presets will record 48 kHz, 24-bit WAV files, which is standard for all video production.
Don’t use the Factory Default preset, as it clears all settings and puts the MixPre in a state not well-suited for CalArts production recording.
Download the CalArts Presets from 2 Pop Support
If you are looking at this article online, download the presets using one of the links below:
Click here to download the Mixpre-3 II User Presets
Click here to download the MixPre-6 User Presets
If you are looking at this as a PDF or on paper:
- Go to 2pop.calarts.edu and click on Support in the menu. Navigate to the FVSound section and click on Loading MixPre-3 and MixPre-6 Presets (you may have to click “Show all articles” if you don’t see it listed under FVSound).
- Download the presets using one of the links listed.
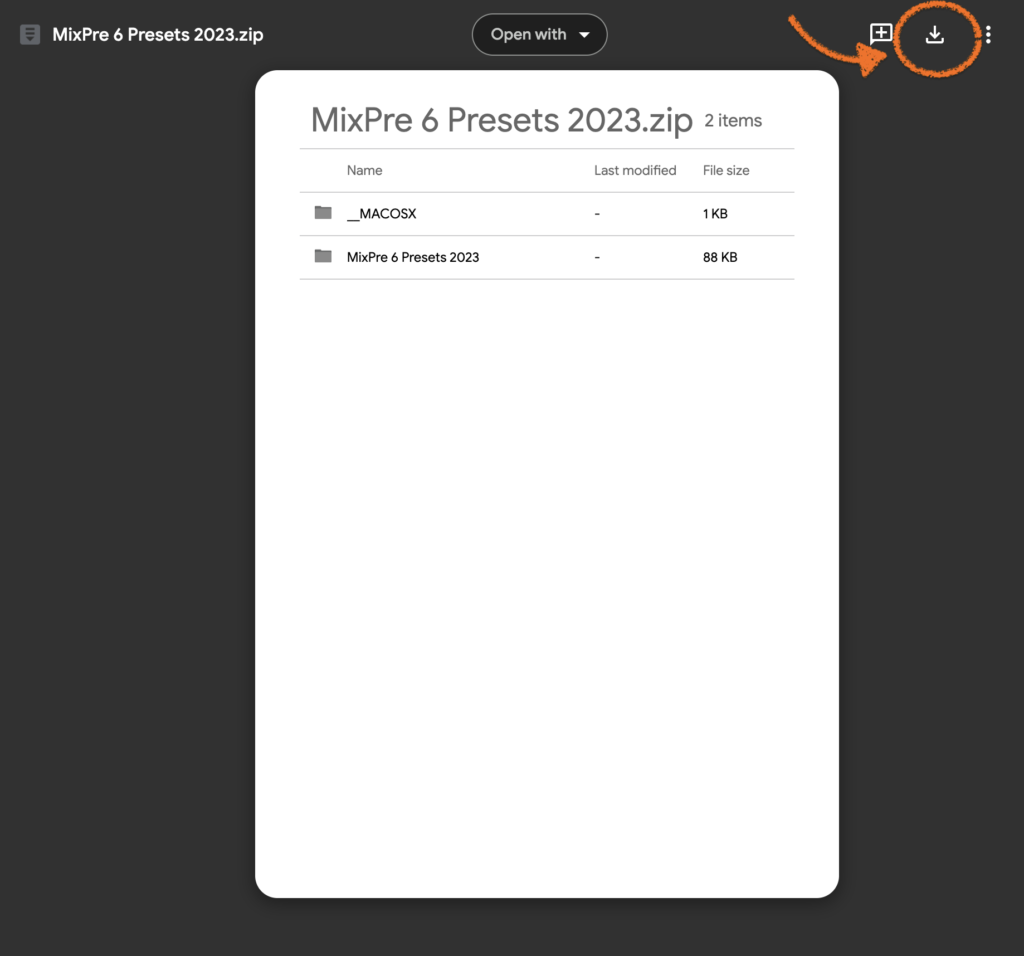
By clicking the download link, you will be taken to a .zip file on Google Drive. Click the download button in the top right corner and set a save location.
Loading the Presets onto the MixPres
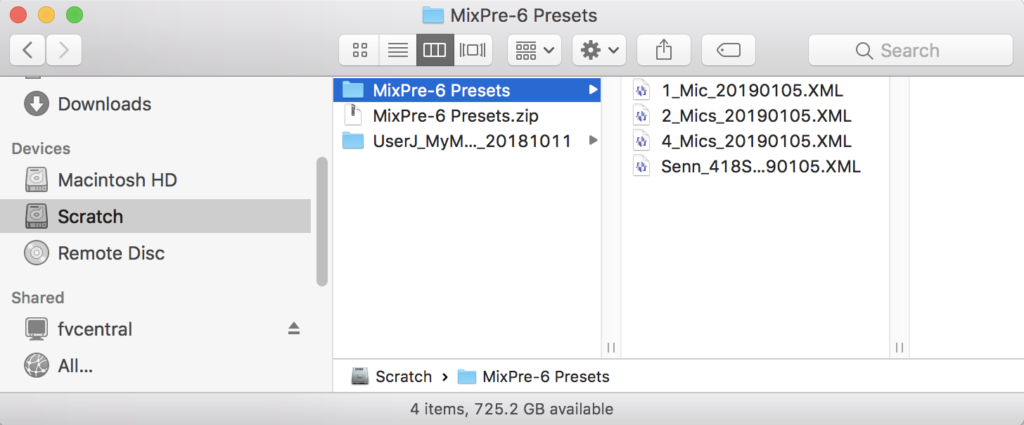
- Double click the downloaded .zip file to uncompress it.
Connect the MixPre to the computer by using the USB cable included in the kit. Plug the USB-C end to the MixPre and both of the USB-A connectors to the computer. Power on the MixPre.
Do not remove the SD card from the MixPre.
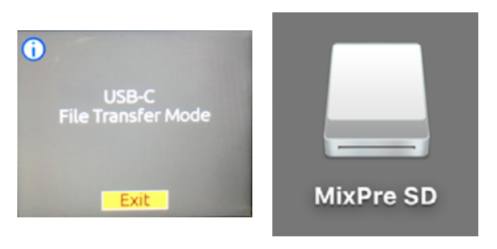
- Turn on the MixPre. Tap Menu > System [page 3] > File Transfer. The MixPre will display that it has entered USB-C File Transfer Mode and a volume called MixPre SD will show up as an external drive on your desktop.
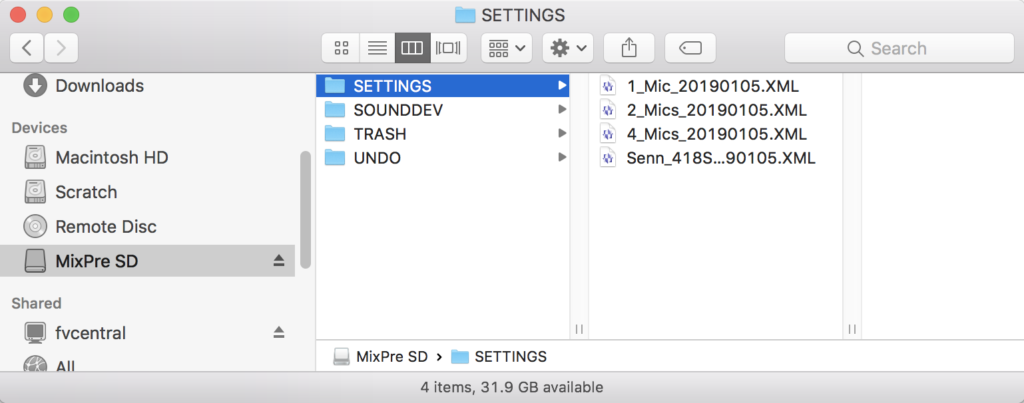
In the MixPre Presets folder, select all the .XML files and copy them into the Settings folder of the MixPre SD.
- When the file transfer is complete, eject the MixPre from the computer. On the MixPre, tap Exit on the Transfer Mode screen.
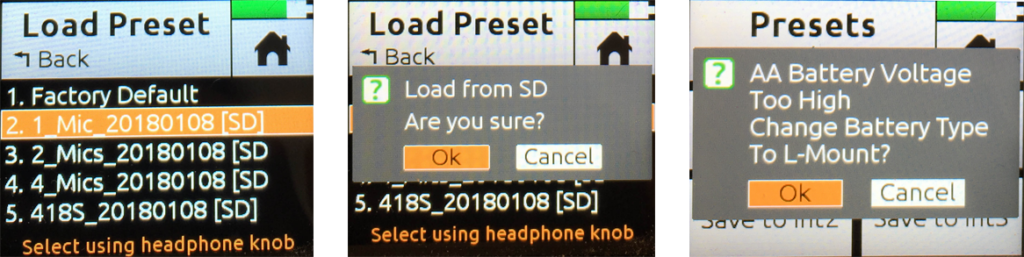
- On the MixPre tap Back to get back to the Menu. Tap Menu > Presets. If you tap Load Presets, you will see the Presets that you just loaded on the MixPre SD. Select and load the one you need. Tap Ok for the “Load from SD.” If you see an additional message that reads “Change Battery Type to L-Mount,” click Ok.
Preparing to Record
When you check out the MixPre from the cage, be sure to load the CalArts custom presets as outlined above. When you’re ready to set up for recording:
- Plug in the microphone(s), starting with Input 1.
- Plug in the headphones to the mini jack on the right side (NOT the jack on the left side). The headphone encoder knob below it controls the volume.
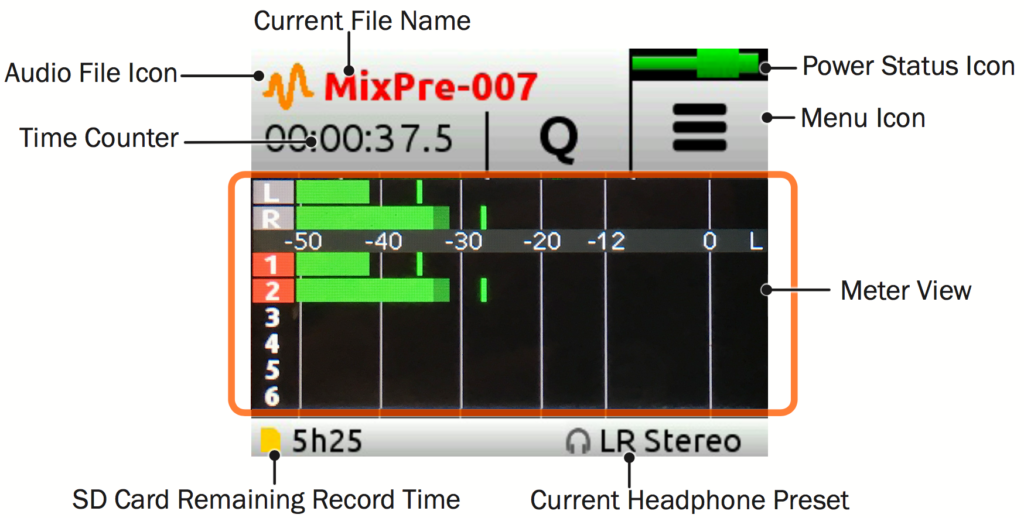
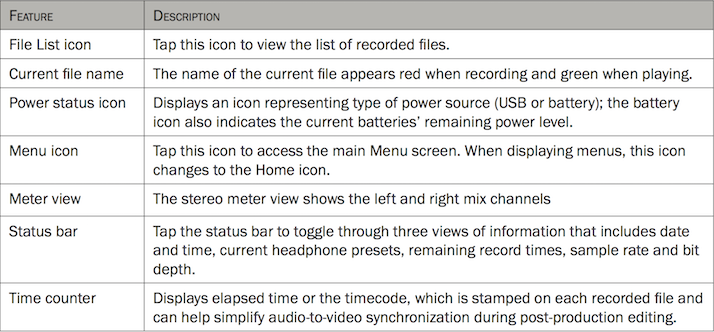
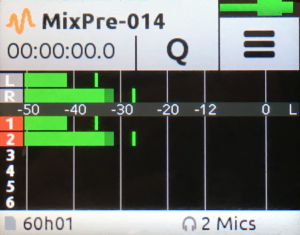
- Go back to the Home menu and tap the audio meters until you see record tracks 1-6 (MixPre-6) or 1-3 (MixPre-3), as well as headphone monitor outputs L&R. The tracks with numbers highlighted red indicate what will be recorded.
- Use the front Channel Knobs to set levels. Peak levels should be between -12 & 0 dB. A ring around each knob will glow green, amber, and red to show recording levels.
- If the 1 Microphone preset is selected, the MixPre will record your single microphone onto mono WAV files, while the signal will go to L & R so it can be heard in both ears.

- If the 2 Microphones preset is selected, it will record 2-channel WAV files. L & R will give the headphones Mic 1 on the left and Mic 2 on the right.
- If the 3 Microphones preset (MixPre-3 only) is selected, it will record 3-channel WAV files. L & R will give the headphones Mics 1 on the left, Mic 2 on both sides, and Mic 3 on the right.
- If the 4 Microphones preset is selected, it will record 4-channel WAV files. L & R will give the headphones Mics 1 & 3 on the left and Mic 2 & 4 on the right.

Since each input is being stored on a separate channel, individual levels and panning can be changed in post-production.
File Naming
- To specify what a file will be named, tap the file name on the upper-left corner of the Home screen, the Edit > Name. Characters are selected via the headphone encoder knob.
- Unfortunately, the MixPre doesn’t display long file names well. Try using your initials and/or a truncated date. In any case, avoid using duplicate file names from day to day because it will confuse some NLEs & DAWs.
The MixPre also has a USB-A port for input from a wired PC (not Mac) keyboard to make file naming much easier. Naming can also be done through the Wingman App. To learn about these features, refer to the MixPre User Guides by Sound Devices in the link at the end of this handout.
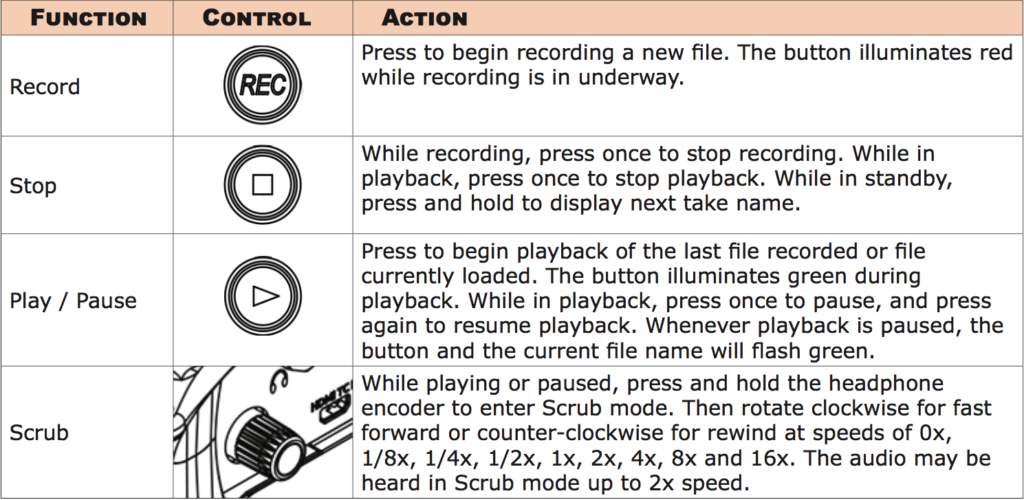
Time to Record!
Two Advanced Features
- Push one of the channel level knobs to display the Channel Menu.
- The first page of the Channel Menu has a Solo button which will let you hear one channel at a time. All channels will keep recording regardless of the Solo status. When a channel is soloed, its light ring will flash orange.
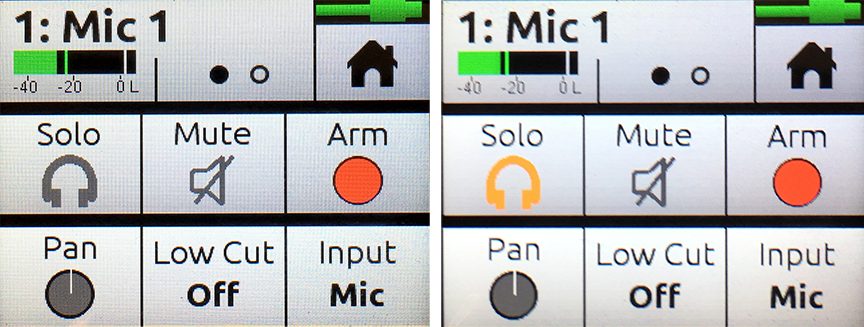
- Tap the Menu dots to access the second page of the Channel Menu, which (among other things) shows the Low Cut filter settings. It can be set up to roll off bass frequencies or reduce mic handling noise, wind noise, and other undesirable low frequency sounds.
- Tap the the Low Cut button and turn the headphone encoder to select a frequency. Typically, 80Hz is a good starting point. Listen carefully and make sure you aren’t losing too much desired low frequency information.

Transferring Your Files to a Computer
- The MixPre can support USB file transfer between its SD and a USB-connected host computer. Connect the MixPre6 to a computer using the special USB cable that came with the recorder.
- On the MixPre, start from the Home Screen.
- Tap Menu > System [page 3] > File Transfer [page 2].
- The MixPre will display that it has entered USB-C File Transfer Mode and a volume called MixPre SD will show up as an external drive on your desktop. Drag files to an appropriate volume.
- When file transfer is complete, eject the volume from the computer. Tap Exit on the Transfer Mode screen to return to the previous operating state.
Want More?
The MixPre is a kind of Swiss Army Knife for sound: it can be used as a mixer, recorder, camera interface, and computer digital audio interface. It can do sub-mixes, and even record timecode for automated dailies syncing.
This handout cannot cover everything. Sound Devices has excellent, clearly-written user guides for the MixPre version 1 recorders: https://cdn.sounddevices.com/wp-content/uploads/2022/05/MixPre-I-User-Guide_050622.pdf
The full user guide also explains the Sound DevicesWingman App, which can be used as a smart remote control for the MixPre recorders.