
Search Knowledge Base by Keyword
Troubleshooting Premiere
Modifying Preferences
On CalArts’ DEP computers (E105, and DEP Suites), many preferences in Premiere have been customized to settings that are commonly used. It’s still important to be aware of these preferences as they may be set differently if you work at home.
- A new window will appear with a preference category selection on the left.
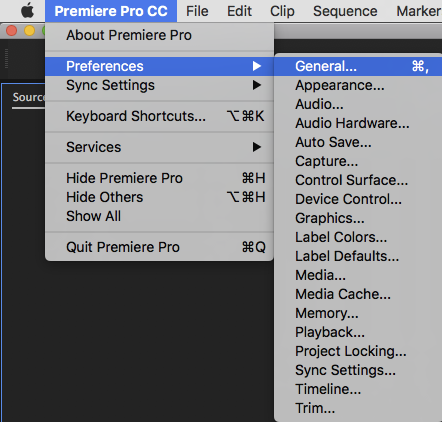
- To modify preferences in Premiere, go to the top menu and click Premiere Pro > Preferences, click on any option.
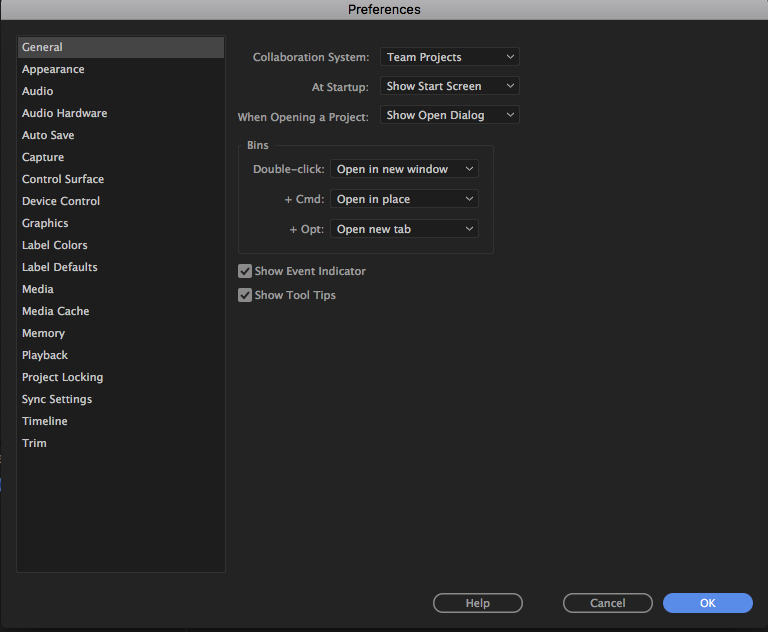
- Select among the different categories on the left to modify.
It’s a good idea to poke around on your own to see which preferences might be relevant to your project and workflow.
- When you are finished modifying preferences, click Ok.
Saving Preferences on School of Film/Video Computers
When working at home, Premiere Pro should save your preferences automatically. If you make modifications on a School of Film/Video computer, Premiere Pro will reset to defaults when you log out of your user account. It’s best to ave your preferences as a last step before you log out and to restore your preferences as a first step when you log in. Be sure to quit all applications before running the Save or Restore Preferences scripts; failure to do so may corrupt your preferences.
Follow these steps to Save and Restore your preferences:
- Once you have set your preferences, save your project and quit Premiere Pro, as well as all other programs that might be running.
- Click on Save Preferences script in the doc. There is a dialog box reminding you to quit all applications. When all applications have been quit, click Yes.

- You’ll notice Terminal application opens when running any scripts in the dock. When the script is finished running, Terminal will be hidden. Be sure to wait until Terminal hides before opening any application or logging out. Terminal can be left running in the background without issue.
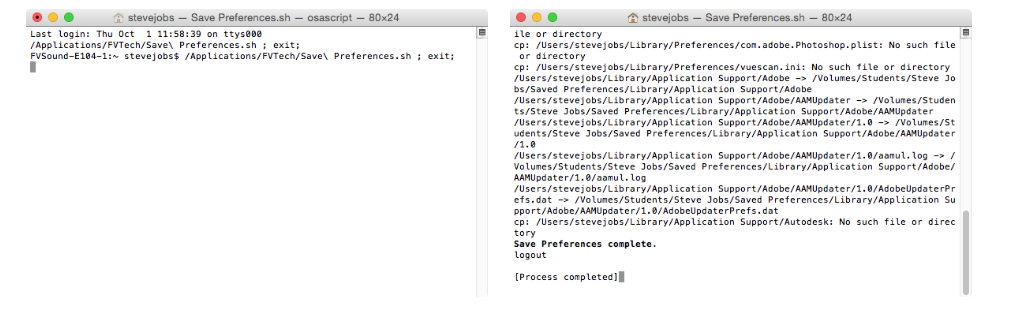
- The next time you log in to your account, navigate to the Restore Preferences button on the dock before you open any applications.

- To restore your preferences, click on the Restore Preferences script in the dock. There is a dialog box reminding you to quit all applications. Once all applications have been quit, click Yes. Once the Restore Preferences script has finished running, you may begin using your applications.
In addition to saving preferences, you can also save custom keyboard shortcuts and workspaces that you’ve modified or created within Premiere Pro.
Media Scaling
If your media looks correct when you open it in your browser, but it’s the wrong size or aspect ratio when you bring it into your timeline, you may want to modify Default Media Scaling.
- Open your preferences and navigate to the Media tab.
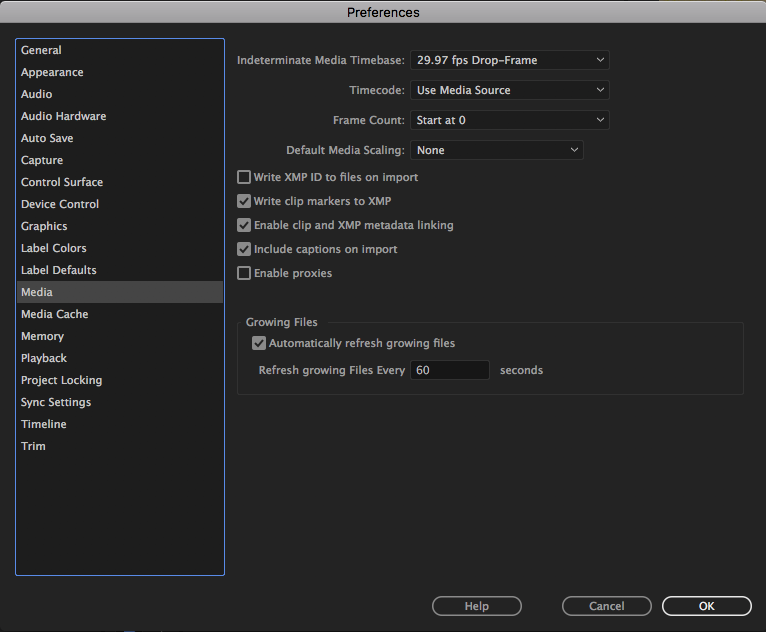
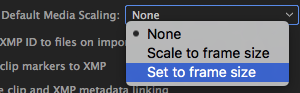
- The Default Media Scaling preferences will determine how the scale of your media is interpreted when you bring it into a sequence with a mis-matched resolution. Set Default Media Scaling to None so your media will preserve its native resolution when brought into a mis-matched sequence. For example, if you bring a UHD clip (3840 x 2160) into an HD sequence (1920 x 1080), your clip will be larger than the sequence and will be dropped by a 1920 x 1080 window.
An example of when you might want Media Scaling set to None is if you’re trying to preserve the sharpness of a lower resolution clip inside a higher resolution sequence.
- If you would prefer to have your media reset to the scale of the sequence you’re working in, choose Set to Frame Size. Now when you bring media with a mis-matched resolution into a sequence, your clip will scale to the size of the sequence’s resolution and your clip’s aspect ratio will be preserved. If you choose Scale to Frame Size, your clip’s aspect ratio may stretch.
Changing this preference will not affect clips that are already in your sequence. It will only affect media that you bring into your sequence after the preference has been set.
Getting Picture on an External Monitor in DEP Edit Suites
All of the secondary reference monitors in DEP edit suites are routed through a Blackmagic Ultrastudio interface (except the projector and large monitor in E41).
- Make sure the monitor is turned on. The power button on the monitor should be labelled.
- If the monitor is power on, but is not displaying an image, the issue is likely with Premiere Pro preferences. Go to: Premiere Pro > Preferences > Playback.
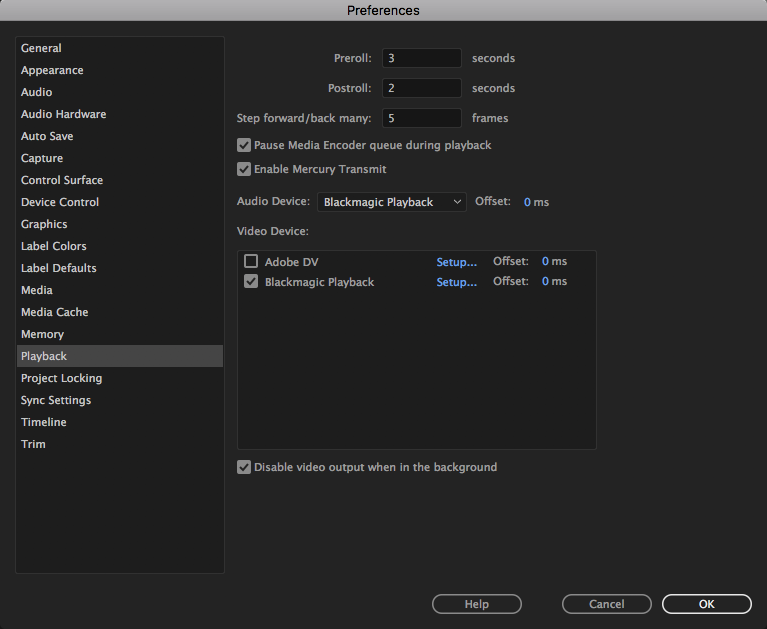
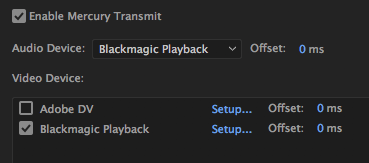
- Make sure Enable Mercury Transmit is checked, and make sure Blackmagic Playback is checked.

- Click the Setup… button next to the Blackmagic Playback.
- If your sequence is HD, select Scale down. If your sequence is UHD or 4K, select Scale up.
- Click Ok in this window, and click Ok to save your preferences.
- Check your External Monitor, if you are still not getting picture, or it looks wrong in any way (i.e. visible interlacing, jitter) proceed to the next steps.
- Click on the Apple menu and go to System Preferences Blackmagic Desktop Video on the lower left.
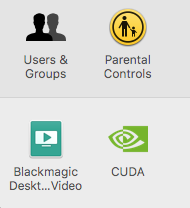
- In the Desktop Video setup window, click the circular icon in the center to open the Preferences panel.

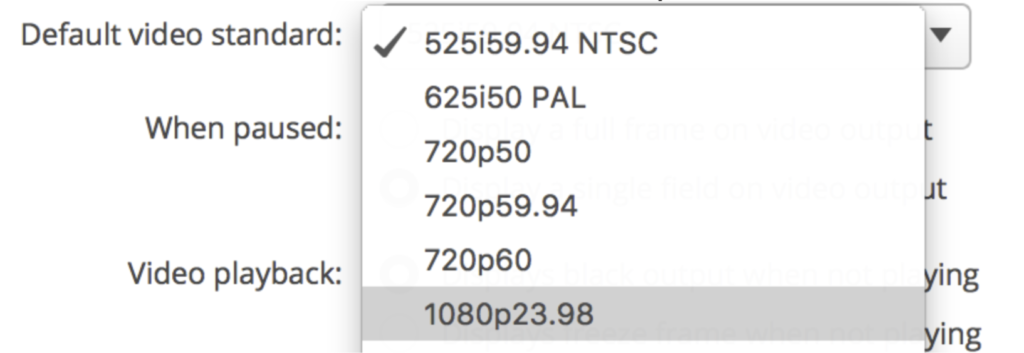
- Next to Default video standard, make sure the option is set to the resolution and framerate of your sequence.
- Scroll down and for the 1080p HD and 2K setting, make sure you select Are output as 1080p progressive video (not 1080pSF).

- You should not need to adjust any other settings. When you have checked or changed both of these settings, click Save and close the Desktop Video Setup window.
- If you are still having issues with the monitor, consult Tech Staff or submit a ticket.
Using non-standard resolutions in Premiere Pro’s sequence settings can also often lead to monitor issues. DEP computers have sequence presets in Premiere Pro that you can use to create your sequences. If your footage is non-standard resolution and you want to keep it that way, you can still edit within a standardized container using one of the sequence presets, or by creating your own. Standard resolutions include 720p HD, 1080p HD, 2K DCI, UHD, and 4k DCI.
Getting Sound Output in DEP Editing Suites
The speakers and headphones in DEP edit suites are routed through an audio interface.
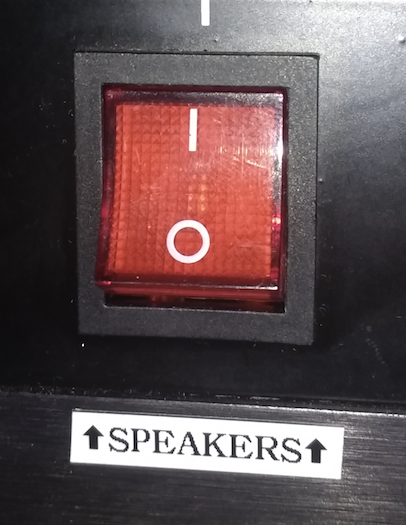
- Make sure the speakers are receiving power. The power switch on the switchboard under the desk should be on.
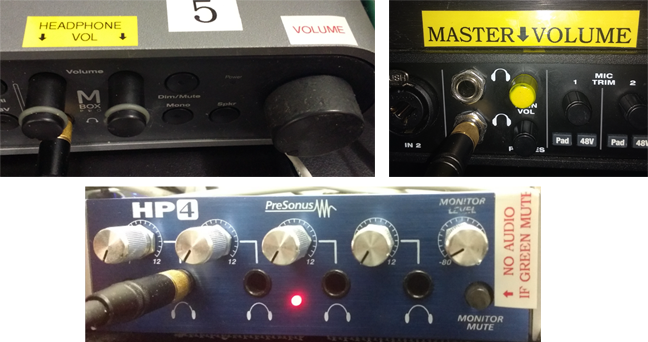
- Check the master and headphone volume is turned up on the audio interface. The audio interface will either be below the desk or sitting on top of the desk, depending on the room.
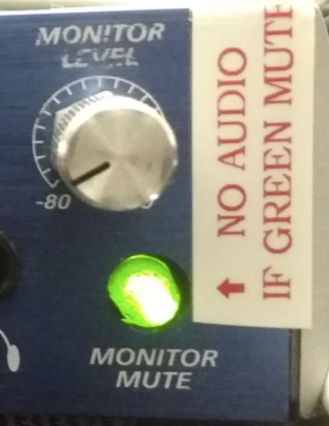
- If the suite you’re in is using the blue PreSonus HP4 pictured below, make sure the Monitor Mute is off. If the button is green, then it is being muted.
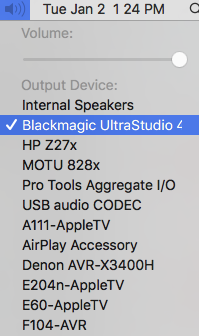
- Check that computer’s audio output setting. Click the speaker button in the menu bar and make sure that Blackmagic Ultrastudio is selected for stereo playback and MOTU 828x for any 5.1 surround sound playback.
- If you are still not getting audio output, the issue is likely with Premiere Pro preferences. Go to: Premiere Pro > Preferences > Playback.

- Make sure Enable Mercury Transmit is checked, and for Audio Device, Blackmagic Playback is selected.
- Click Ok to close the window and Ok to save your preferences.
- If you are still not getting sound, consult Tech Staff or submit a ticket.
If Premiere Pro Freezes or Behaves Abnormally
You can sometimes solve playback issues by cycling Premiere Pro’s Mercury Transmit (output to secondary monitor and speakers).
- In Premiere, go to: Premiere Pro > Preferences > Playback.

- Uncheck the Enable Mercury Transmit.

- Save preferences by clicking Ok.
- Go back to: Premiere Pro > Preferences > Playback and check Enable Mercury Transmit.
- Save preferences by clicking Ok.
- Check your playback issue. If this didn’t solve it, try quitting and reopening Premiere Pro or restarting the computer.
- If you continue to have issues, consult Tech Staff or submit a ticket.
Exporting with Subtitles
If you are exporting a video with subtitles from Premiere Pro, your subtitles may not automatically appear on your exported video.
- Export your sequence as you normally would by going to File > Export > Media.
- Set your export settings as you normally would.
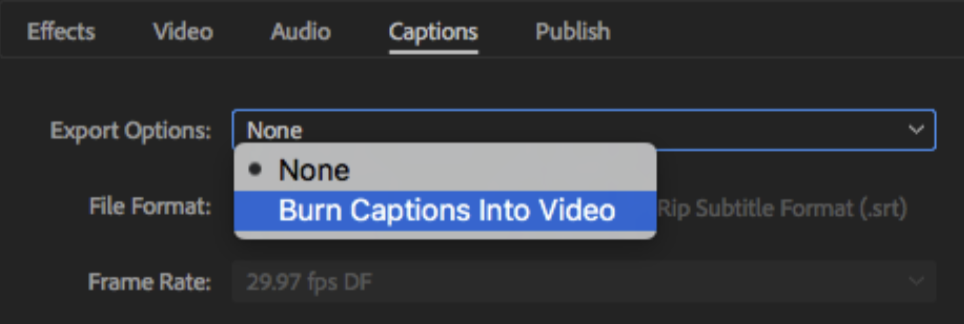
- Click on the Captions tab and next to Export Options, choose Burn Captions Into Video.
- Export your video by clicking Export.
Do not use Adobe Media Encoder to export your video with captions.
Premiere Pro Takes a Long Time to Load Media
If Premiere Pro takes a long time to load media and peak files every time you open your project, it may be a problem with the Media Cache. This is especially likely on School of Film/Video computers since they are erased every time you log out.
To make sure you don’t have to recreate Media Cache and Peak files every time you open your project, the Media Cache should be stored at a proper location on your external hard drive.
You will be prompted to choose the Media Cache location when you first create your project. You can also change the Media Cache location on existing projects.
- In Premiere Pro, go to: Premiere Pro > Preferences > Media Cache.
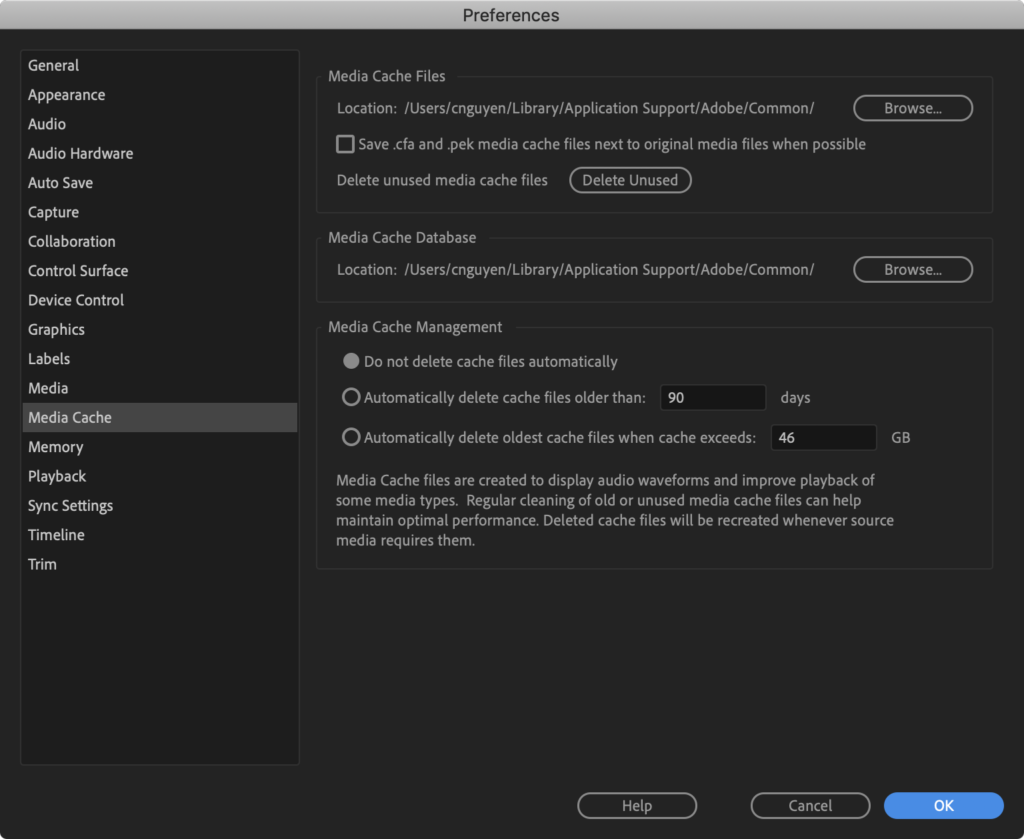
- Next to Media Cache Database, click Browse and choose or create a location on your hard drive. Once you’ve chosen a location, the following dialogue box will appear.
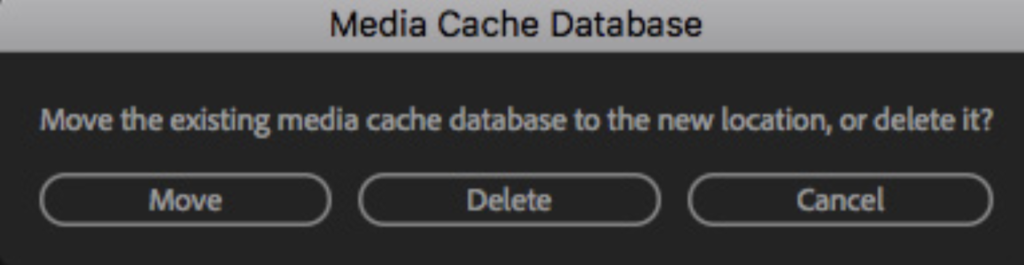
- If you want to move your current Media Cache Database, click Move. Otherwise, click Delete and Premiere Pro will create the Media Cache Database in the new location.
- Repeat this process for the Media Cache Files. Click Browse next to Media Cache Files and choose or create a location on your hard drive.
Premiere Pro should automatically create the Media Cache for your project. Depending on the size of your project, it may take a few minutes or up to several hours. However, now that it’s stored properly, you shouldn’t need to create it again, unless you think your Media cache has been corrupted.
If this is the case, you can delete the Media Cache by navigating to their saved location in the Finder and manually deleting them. It’s a good idea to close Premiere Pro when doing this, and when you reopen Premiere, it will recreate the Media Cache Files.
Importing a Project or Sequence into Another Project
If you:
- are trying to open a Premiere Pro project that was saved in another version of Premiere Pro
- import a Premiere Pro project that was saved on Windows and you’re now on a Mac (or vice versa)
- think your Premiere Pro project may have been corrupted
- import an After Effects composition
You may want to import the old project into a new project, or an individual sequence from your old Premiere Pro project into a new project.
- Go to the Media Browser tab next to the Project tab. Navigate to your old project file. You should be able to see the sequence and media files associated with it.
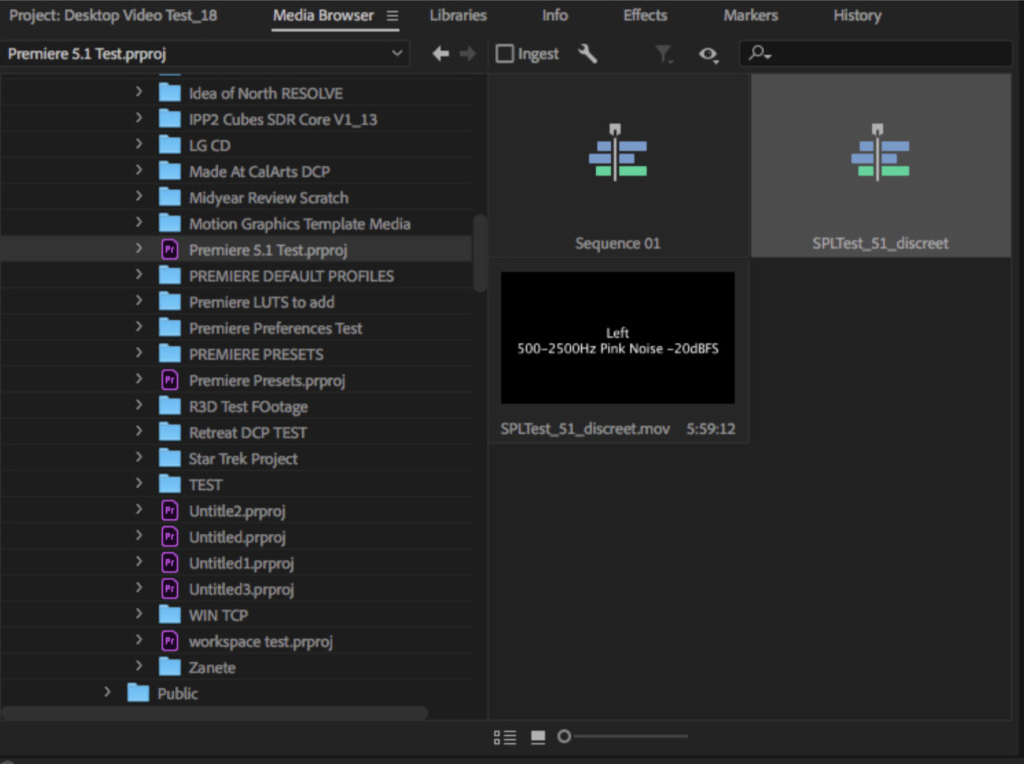
- Choose what to import by right clicking on any or multiple items and select Import.
What to Do When All Else Fails
If something isn’t working the way you expect it to in Premiere Pro and none of the above are helping try the following:
- Restart: Close and restart Premiere Pro. If that doesn’t help, restart the computer.
- Test other media: Sometimes a particular problem is specific to one media type. Testing other supported camera media is good troubleshooting test.
- Use the Media Browser: There are certain media formats that work better when you copy the entire contents, unchanged, of the card to your hard drive and import them into Premiere Pro using the Media Browser.
- Try a new sequence: Sequences can get corrupted. Create a new sequence in the same project and see if fixes the issue. If so, you may be able to copy / paste everything into the new sequence.
- Try a new project: Like sequences, project files can become corrupted. Create a new project, and if that fixes the issues, you might be able to import the old project into the new one. When importing projects, use the Media Browser and import only one sequence at a time. Test each sequence before importing the next one.
- Reset Premiere Pro: Push and hold Shift + Alt when starting Premiere Pro until the Welcome screen appears. This will reset the preferences and plug-ins which can solve many issues.
- Remove all effects and transitions: Sometimes a specific effect or transition, or a setting in one of those, can crash Premiere Pro or cause other odd behavior. Go through your project and remove the effects and transitions to locate the offender.
- Clear the cache: Close Premiere Pro and in the Finder, navigate to the Media Cache location on the hard drive and manually delete all Cache folders and Peak files. When you reopen the project, the Cache files will rebuild.
- Rename Media Folders: Close Premiere Pro and rename the top level folder containing the media. When you reopen the project, relink the media to the new folder and let the cache rebuild.
- Test on a second machine: If your project works on a second machine, there may be a hardware issue on the primary system.
- Render: The system may not be powerful enough to handle sequence playback in real time. Render the timeline to get sequence playback. This is especially necessary when using Dynamically Linked After Effects compositions.
- Turn off CUDA: GPU acceleration isn’t perfect, sometimes the only way to get things working again is to turn it off.
- Do a search online: It’s likely that there are others who have experienced the same problem. Do a search on the internet for the symptoms that you’re experiencing and see if anyone else has solved the problem already.