
Working in 4K
4K has become quite common in the past few years, however there still remains some confusion about what 4K actually is, what it is not, and about the practical considerations of using it. This tech doc is a clarification of the following topics:
- What is 4K?
- Advantages and disadvantages of shooting and finishing in 4K
- Flavors of 4K – standard aspect ratios
- DCPs and DCP aspect ratios
- 4K on the RED Raven – non standard aspect ratios
- Working with Log video and Raw recordings
What is 4K (and why do we care)?
4K is an image resolution. If it about four times the resolution of 1080p HD. A 4K image will be sharper and more detailed than an HD image, and you can get closer to a screen displaying a 4K image than you can to one displaying an HD image before seeing the image break down into individual pixels.
Though 4K technology is becoming increasingly affordable and common, it is not yet omnipresent, and many TVs, projectors, and computer screens on both the professional and consumer markets are not 4K.
Currently in the School of Film/Video, you can view movies in 4K resolution in most of the school’s iMac displays as well as on the LG reference monitors that are in three of the DEP Editing Suites. None of the projectors, including those in classrooms, Bijou, or A111 Mix Theater will project 4K. Outside of CalArts many theaters and festivals project in HD or 2K.
If you are thinking about finishing your film in 4K or making a 4K DCP, it’s a good idea to check with festivals and venues about their technical capabilities beforehand.
Advantages and Disadvantages of Shooting and Finishing in 4K
Whether or not you plan to finish your movie in 4K, there are a number of benefits to shooting in 4K:
- Increased sharpness: 4K downscaled to HD will look sharper than native HD footage.
- Flexible Framing: You can crop, zoom, and move your HD frame within a 4K image without losing resolution. As noted above, there are 4 HD images within one 4K image.
- Increased information: If you downscale a 4K image to HD, you are effectively quadrupling the amount of information you have to work with in color grading. This may also reduce noise and compression artifacting in your image.
There are also drawbacks to shooting in 4K:
- Increased storage requirements: 4K has four times the information as HD, which means that 4K files are approximately four times the size of HD files.
- Slower processing in post: With the quadrupling of information, you will see your renders and playback slow down as you’re editing. To get realtime playback, you will very likely need to create proxies.
- Other Factors: 4K may lack factors that may be more important to your workflow than resolution, such as bit depth, codec, LOG or RAW recording. Some professional cameras don’t record in 4K yet, but they are still in heavy demand on film and TV productions because of these other factors.
If you know that you will be finishing in HD or 2K, you may find that the costs of shooting in 4K simply outweigh the benefits. However, reasons to finish in 4K include:
- Streaming sites such as YouTube and Vimeo support 4K content. Netflix now requires its content to be finished in 4K.
- Some festivals and venues will project 4K DCPs.
- Future proofing. If/when HD becomes obsolete as a resolution, your 4K film will still look good.
Flavors of 4K – Standard Aspect Ratios
Whereas HD refers to two different resolutions that share an aspect ratio of 1.78, also known as 16×9 (1920 x 1080 and 1280 x 720), 4K typically refers to two resolutions that are similar in size, but have different aspect ratios. These are either Ultra High Definition (UHD) or Digital Cinema Initiatives 4K (DCI 4K).
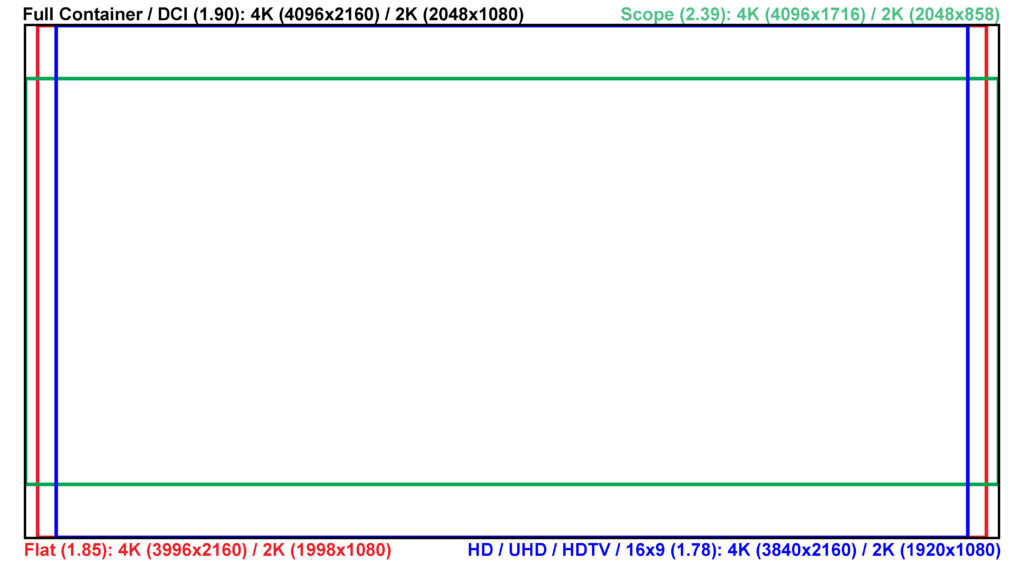
- DCI 4K is the cinema standard for 4K. Its resolution is 4096 x 2160 with a 1.896 aspect ratio (simplified to 1.89 or 1.9). A cinema projector or monitor that can display 4K will typically be displaying DCI 4K. Cinema projectors and monitors that can display DCI 2K will typically share this 1.89 aspect ratio.
- UHD is a consumer format, and is technically not 4K but has come to be referred to as 4K through TV marketing. Its resolution is 3840 x 2160 with a 1.78 aspect ratio (same as HD). TVs and many non-professional cameras that claim 4K resolution typically are displaying or recording at UHD resolution rather than DCI 4K. To make things more confusing, UHD may also be referred to as 2160p (two times 1080p), which differentiates it from 4320p (a resolution that is not yet common, but may also be referred to as UHD).
- Additionally, there are DCP standards for other 4K aspect ratios, such as Flat (1.85) and Scope (2.39), and a variety of non-standard camera recording aspect ratios that use resolutions which share either the horizontal or vertical width of DCI 4K (4096 x 2160). See section below for more details.
When editing in Premiere using an external monitor, such as in DEP Editing Suites, you sequence must be set to DCI, HD, or UHD aspect ratio in order to display your image properly on an external monitor. For example, if your footage is Scope (2.39) and you create a 2.39 sequence sequence in Premiere, it will appear squished in the output to the external monitor. Appropriate sequence settings have been created as CalArts Templates and are available on all DEP computers.
DCPs and DCP Aspect Ratio
What is a DCP?
Digital Cinema Packages (DCPs) are a collection of files used to store and convey digital cinema. They are typically compressed in the JPEG 2000 codec and are in the XYZ color space. DCPs are the format that most movie theaters and film festivals use to project digital cinema. DCPs are generally stored on a hard drive or flash drive and transferred onto a theatrical projector’s internal storage for projection. DCPs are usually projected at 24p or 25p, though newer projectors may support 30p and other framerates.
Why are DCPs used?
DCPs are more reliable, less fragile and superior in image and sound quality than any other digital delivery format. While DVD is limited to SD quality and Blu-ray may be either HD or UHD, DCP may be either 2K or 4K and is much less compressed than Blu-ray. Its physical storage containers are also less susceptible to wear and tear. Unlike digital files, the codec, gamma, color space, resolution, and framerate of a DCO is standardized so that a DCP should look the same regardless of the venue or its projection.
DCP Aspect Ratio and Container
DCPs must be formatted within frames of certain aspect ratios, and either in 4K or 2K. These standards are called containers. While there are four available containers (Full, Flat, Scope, and HDTV), the industry practice is to either use Flat (1.85) or Scope (2.39). Full (1.89) and HDTV (1.78) are not commonly used and not all theaters are capable of properly masking for them. Projectionists will expect to receive a DCP that is either in Flat or Scope container even if the film is 1.78 or 1.89 aspect ratio within a Flat or Scope container. The letterboxing or pillarboxing that results is masked in the theater.
If you decide to make a DCP using Full or HDTV container, you may want to check with the venue or projectionist ahead of time.
Theatrical projectors are capable of displaying either 4K (4096 x 2160) or 2K (2048 x 1080). The resolution of a DCP in a Flat (1.85) container is 3996 x 2160 or 1998 x 1080. The resolution of a DCP in a Scope (2.39) container is 4096 x 1716 or 2048 x 858. When going Flat to Scope, the projector’s lens zooms and the masking widens. Pixels beyond a container’s resolutions are masked within the projector.
Working with 4K on the RED Raven – Non-standard Aspect Ratios
The RED Ravens that are available for checkout from FVCage have a native sensor resolution of 4608 x 2160. You can choose smaller aspect ratios and resolutions within this full resolution, such as 16:9 and DCI. If you choose to shoot at the sensor’s Full resolution, this can create problems in post-production because the sensor’s full resolution aspect ratio (2.13) is not standard and when finishing a film and creating a DCP, you will either need to crop or create non-standard letterboxing to fit your image within a standard aspect ratio.
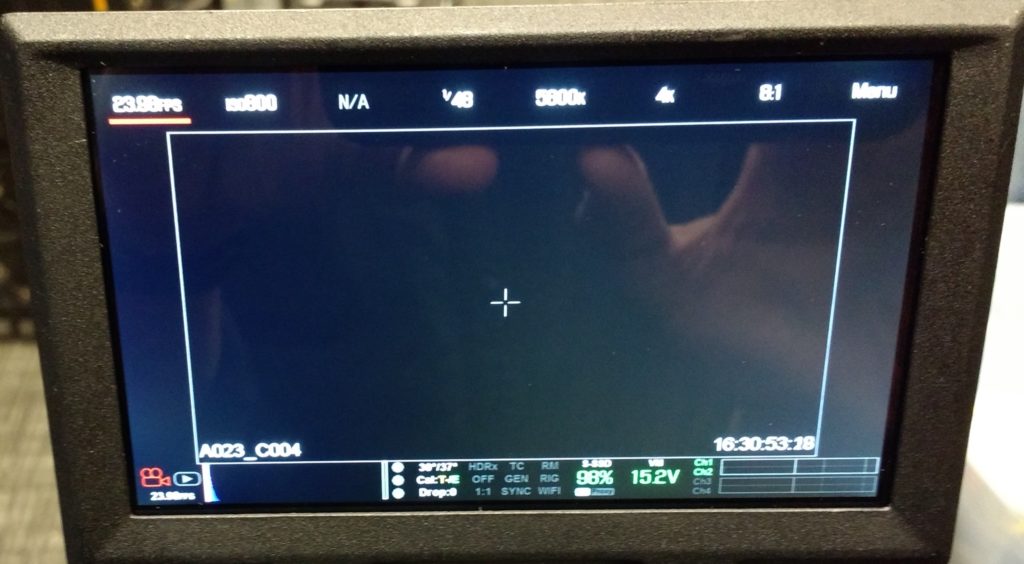
Fortunately, RED cameras come equipped with overlay frame guides that you can apply in camera that will provide you with an overlaid frame on the EVF, LCD, and external monitors so you can choose and see a standard frame size within the media you’re recording. CalArts Tech Staff highly recommend using these frame guides so you can frame accordingly in production rather than finding yourself with an unexpected framing decision when you’re ready to finish or making a DCP.
After you have chosen the resolution and aspect ratio that you’ll be shooting at, follow these steps to turn on frame guides. This is less important if you’re shooting at the same aspect ratio you plan to finish at, but particularly important if shooting at full resolution.
The RED WS (widescreen) resolution preset is 2.37:1, which is close to the DCP Scope aspect ratio of 2.39:1, but like RED Full Frame, it’s not standard. This holds true for RED 2:1 as well as any custom resolutions.
- Power on the RED camera and wait for it to load.
- Press the Menu button on the top right corner of the touch screen
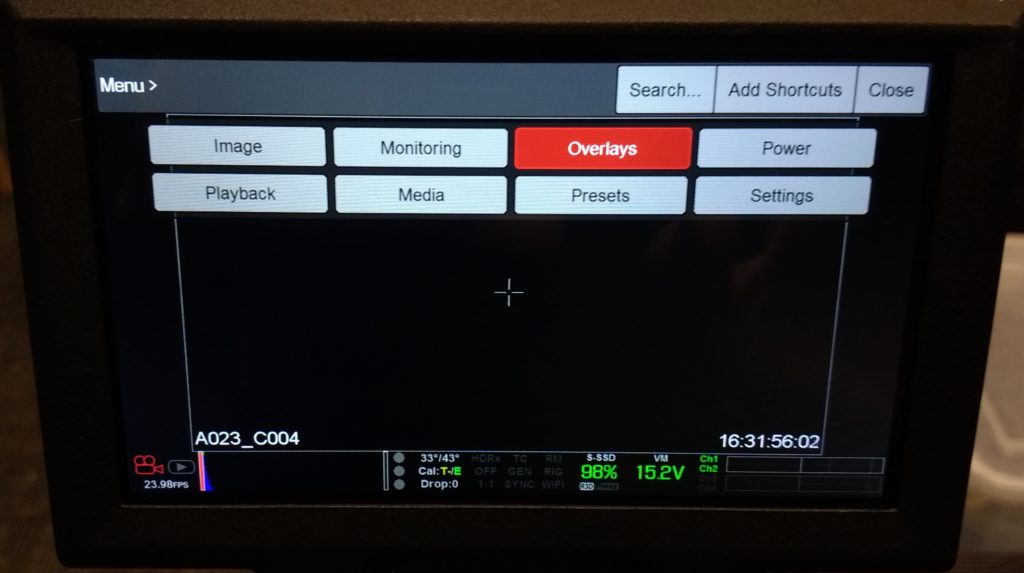
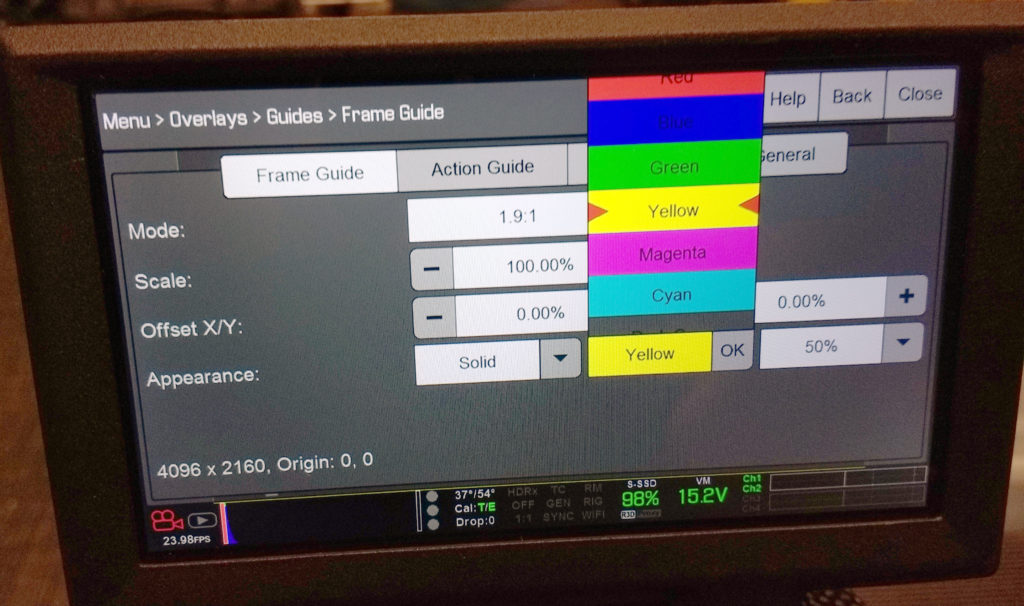
- Press the Overlays button.

- Press Guides. Within the Frames Guide tab, you will see a dropdown menu of Mode with a wide variety of options.
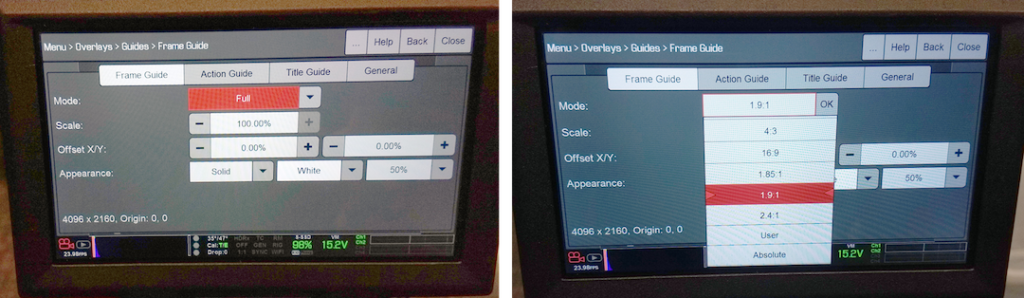
- Choose according to your planned finishing resolution. If you’re not certain, a good default choice is 1.9:1, which is DCI aspect ratio (the projected aspect ratio of a DCP).
- You can also modify how these frame guides will display with the appearance settings.
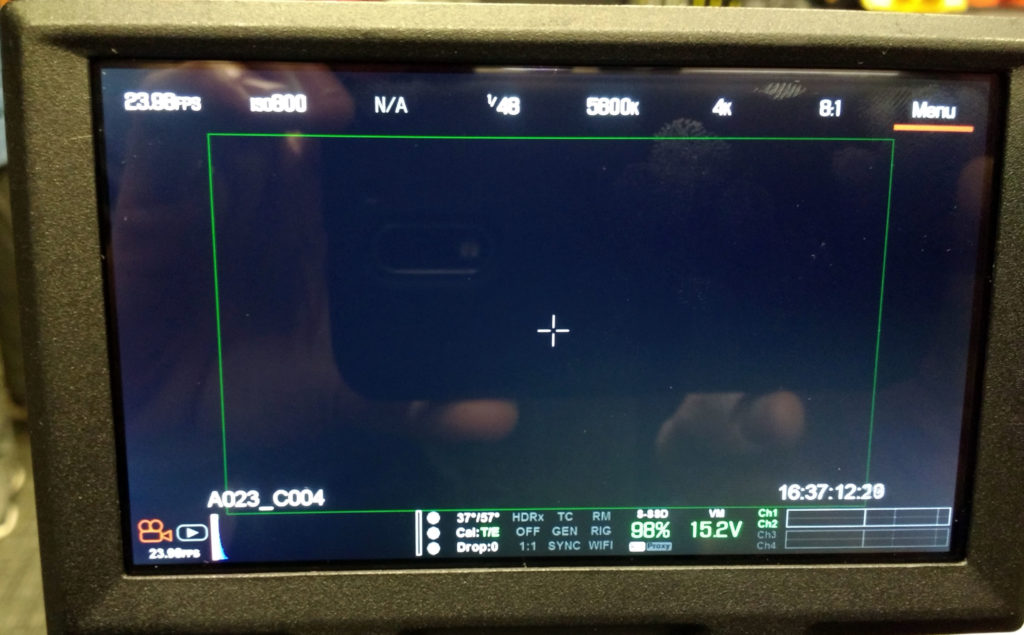
- Close the Menu. You should now see your frame guides.
Working with Log Video and Raw Recordings
Log and Raw formats are a separate consideration from resolution. Many cameras that are capable of recording in 4K are also capable of recording in Log color space or Raw format. Before using these formats, you should have an understanding of what Log and Raw are and how to process them.
What is Raw? What is Log?
Raw is not video, but sensor data before video processing (like white balance and ISO) are applied to it. Raw does not mean uncompressed. For example, Raw recorded on a RED camera (.r3d) may be compressed at a chosen setting anywhere from 2:1 to 22:1 compression.
Log is video with a gamma curve that has been mapped to a particular camera’s sensor in order to maximize the information that is recorded, especially in areas of shadow, highlights, and high saturation–areas where standard video recording might clip and lose detail. Log video requires a LUT for proper viewing.
For a more in depth explanation of the difference between RAW, Log, and Uncompressed video, go here: https://www.hdvideopro.com/workflow/capture-workflow/formats-explained/
How to Process Log in Premiere Pro
Before you do anything with your Log footage, you should have some idea of what kind of Log you’re working with. Different camera brands use different kinds of Log and some cameras have multiple flavors of Log. For example, Sony’s version of Log is called S-Log and comes as S-Log2 and S-Log3.
- If you shot the footage that you’re working with, you should know what kind of Log setting you chose to record, or you can figure it out based on the camera you used.
- If you didn’t shoot the footage, ask the DP.
- If you can’t figure out what kind of Log curve the footage is using, read on–you should be able to figure it out by trial and error.
- Download a LUT for the Log. These are generally referred to as Camera LUTs, Technical LUTs, or Input LUTs. You should be able to find the Camera LUT on the manufacturer’s website.
As opposed to Look LUTs, which may be used to stylize the look of footage, but are not a necessary part of the post-production, Camera LUTs are necessary for proper color correction of Log footage, and even for proper viewing of footage during the editing process. You may want to apply the appropriate Camera LUT to your footage when you begin editing so you don’t get too accustomed to the “Log Look” as you edit.
- Open your Premiere Pro project and go to the Color tab. Under the Basic Correction tab, click on the Input LUT dropdown menu. Select Browse… and navigate to the LUT you downloaded.
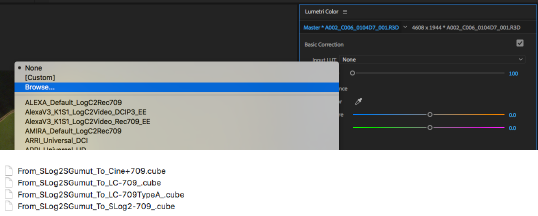
- There may be several LUTs to choose from. You can try each of them and see what looks best.
- If you are trying to figure out what kind of Log curve your footage uses, you can download multiple Camera LUTs to see which one looks right for your footage.
- Once you have selected your LUT, you can apply other color correction and grading adjustments to your Log footage as you would normally.
If you want to make a color correction adjustment before applying a Camera LUT (i.e. if you underexposed your footage and notice that highlights or shadows get clipped when the LUT is applied), you can apply the LUT under the Creative tab in the Look dropdown menu instead. This will allow you to make other adjustments in the Basic tab before the LUT is applied.
How to Process Raw in Premiere Pro
Before doing anything with your Raw footage, you should have some idea of what kind of Raw you’re working with. Different camera brands use different kind of Raw. You can tell what kind of Raw you’re working with by the file extension. For example, RED Code, which is the proprietary RED Raw coded, uses the file extension .r3d.
With certain kinds of Raw you can modify Raw settings within Premiere Pro. The setting you can modify will vary from format to format.
- To access these settings, select your media in the browser or timeline. Navigate to Effects Controls and click the Master tab. Look at the Source Settings drop down menu.
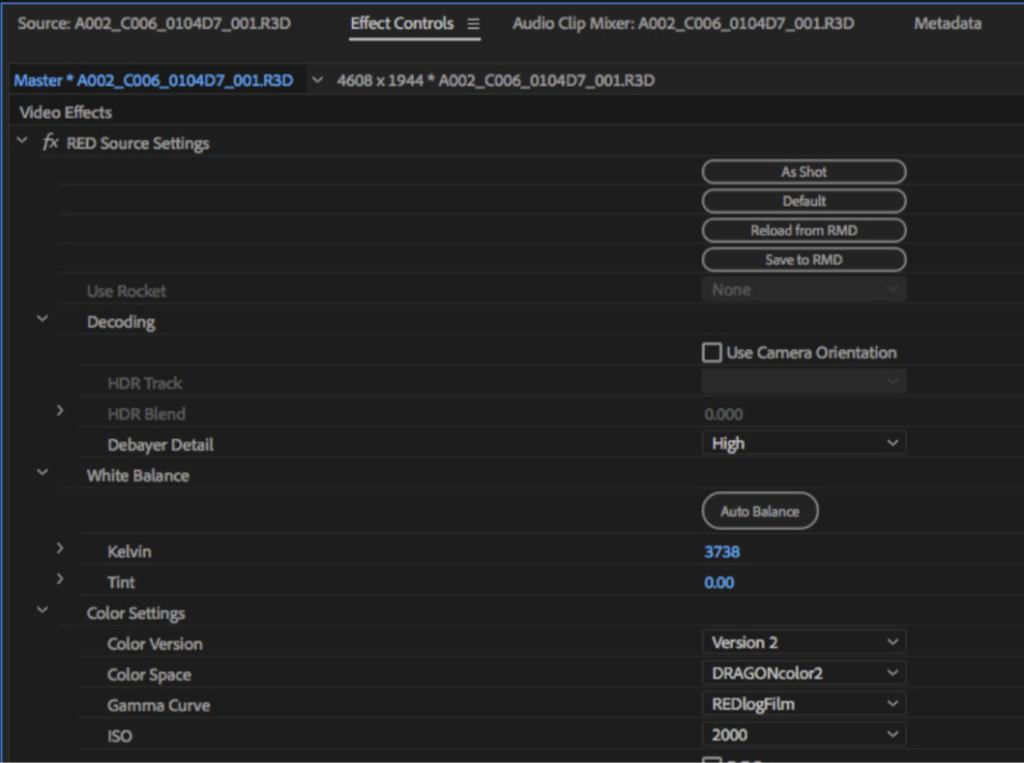
- Your source settings will default to the settings chosen in camera by the DP. You can modify these settings as desired.
- With .r3d media, you can choose the Color Space and Gamma with which you’d like to interpret the footage. If you choose to interpret your footage with a Log Gamma Curve, you should also follow the How to process Log in Premiere Pro workflow above.
- Once you’ve chosen the correct settings, you can apply other color correction and grading adjustments to your Raw footage as you normally would. You can always return to your Source Settings later and modify them throughout the editing or color correction process.