
FV Installation/Stage Equipment Reservation Requests on WebCheckout
Please note that WebCheckout is for reserving FV equipment only.
To make a reservation request for FV spaces, please do so via the Production/Installation Space Reservation Form.
More information on how to reserve FV spaces can be found here.
The video above will walk you through how to make an FV Installation/Stage equipment reservation request on WebCheckout.
WebCheckout is the new way to make equipment reservation requests. This is replacing the FV Installation/Production Reservation Request Form for equipment requests only.
This article will explain how to use WebCheckout to make FV Installation/Production Reservation Requests.
For all projects, you must still fill out a FV Project Form before making any equipment/space reservation requests via WebCheckout.
How to Log On to WebCheckout
- First, log into your account by visiting: https://calarts.webcheckout.net/sso/patron#!/.
- Please bookmark this page for future use.
- Then use your CalArts credentials to log in.
- Once logged in, you should see the CalArts WebCheckout Patron Portal.

How to Make a Reservation Request
- To make a reservation request, please click on New Reservation on the sidebar, or New on the topbar.

- Then choose your Checkout Center, and select OK. This will take you to the Reservation Request page.
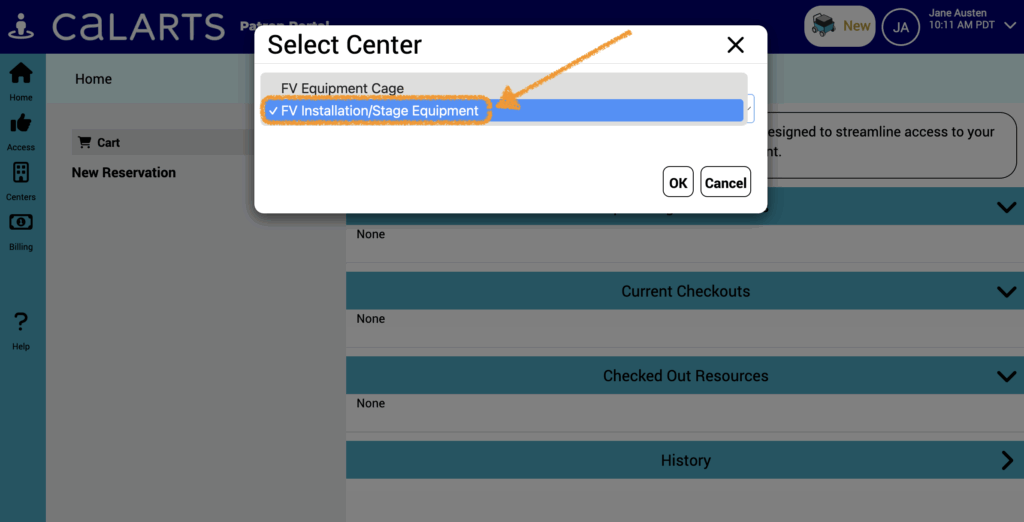
- Then you will see the Message of the Day pop up with important information such as the FV Installation/Stage hours of operation.

3. Once you dismiss the Message of the Day, you will get to the Reservation Request page.
- On this page, you must fill out a start and end date/time for when you are wanting to make a reservation and your Project Unique ID
4. Click on the triangles to the right of the calendar dates to select your requested checkout and return dates.

5. Click on the arrows to the right of the times to select your requested times for checking out and returning equipment.

6. Once you’ve selected your dates and times, you can click on the green arrow to save your changes. The red undo arrow will reset your reservation request.

7. Then fill out the Project Unique ID Field.
- This is a mandatory field which is indicated by the red highlight and warning symbol.
8. There is an optional ‘Additional Notes’ field. This is for any extra information you would like to be added to your reservation request
Adding Equipment to your Reservation Request
Once you have selected an ideal date and time that you want to reserve equipment and filled out your Project Unique ID, you can start adding equipment that you would like to reserve.
- To do this click Browse Catalog.

- From here, you can click through the Catalog and add equipment that you would like to request to your cart.

- Navigate to an item you would like to reserve and click the plus symbol to add it to your Reservation Request Cart.

- Once you have added items, they will show up in your reservation items. Additionally, the number of the items you have requested will show in your cart on the topbar.

- Once you have filled out the dates/times, unique Project ID, and added the equipment you would like to request, you can click Submit Reservation.

Common Issues and How to Troubleshoot
If you have selected a day that is a weekend/holiday, you will not be allowed to submit your reservation.
- Make sure you have selected a workday (typically Monday to Friday) for equipment pickups and returns.
If you have selected multiple of an item, but the FV Installation/Stage area doesn’t have as many as you are requesting, it will look like none are available.
- Try reducing how many of an item you are requesting to see if that solves the issue.