
Setting up equipment
Projector carts – aiming the projector
The video projectors on our carts have adjustment dials for positioning the image on the screen.
The dials are on the side of the projector – the top dial will move the image up and down, and the lower dial will move it left and right. There should be enough vertical adjustment for the projector to work with any screen. You may have to move the cart left or right to help center the image horizontally.
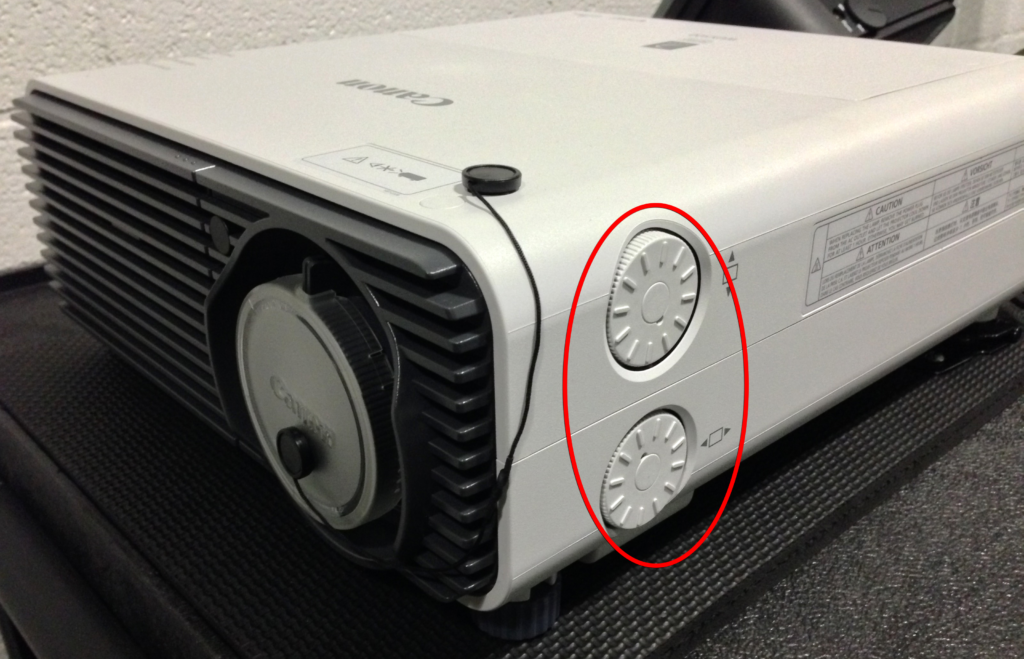
Zoom and focus are adjusted manually using the lever and focus ring at the front of the lens. Be sure to remove the lens cap before use, and replace it when putting the cart away.
Classroom carts – Mac Mini
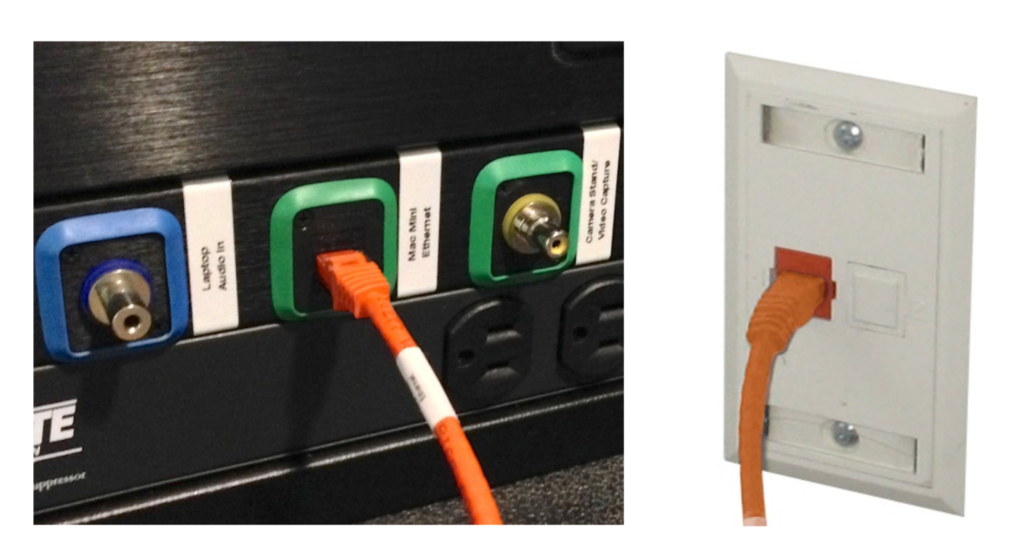
For a Mac Mini on a cart to work, it must be connected to the network. Each cart has an orange cable hanging from the side that must be plugged into the network port on the input panel of the cart, and into a network port in the classroom. The network ports in the classrooms are usually orange, but may be difficult to locate. If you cannot find one, or if a port doesn’t work, let us know so we can contact CA-IT about it.
When you first plug in and turn on the Mac Mini, it may take it a minute to connect to the network. If you can’t login, wait a minute, then try again.
The Mac Minis built into the classrooms (The Palace, A221O, A221G and A116) are already connected to the network.
Sony camera stands
The portable Sony camera stands can display live video on a projector or TV, and capture images using TVPaint.
All of our carts and classroom racks can be connected to these stands. The Palace has its own camera over the desk, so a portable camera stand isn’t necessary.
Plug the end of the video cable with the adapter on it into the Camera Stand input on the front of the rack. Connect the other end (with the twist-lock connector) to the camera stand.

Plug in the camera stand’s power cable – you can use one of the outlets on the front of the rack – and turn the camera stand’s power switch on.
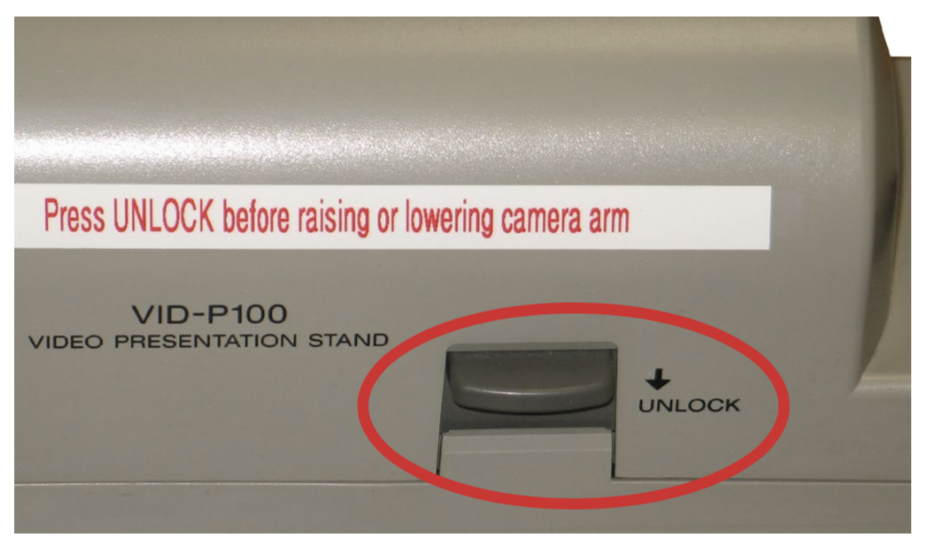
IMPORTANT – when raising or lowering the camera, be sure to press the UNLOCK lever, or the stand could be damaged.
See the Pencil Test instructions for how to use the camera stand, and capture video using TVPaint.
Note: A108 and A109 currently cannot capture video.
The A/V receivers – volume
The A/V receivers in the classrooms and labs have a low default volume. You may need to turn the volume up to 65 or higher to hear clearly, depending on the room or source.
Projector carts – setting volume
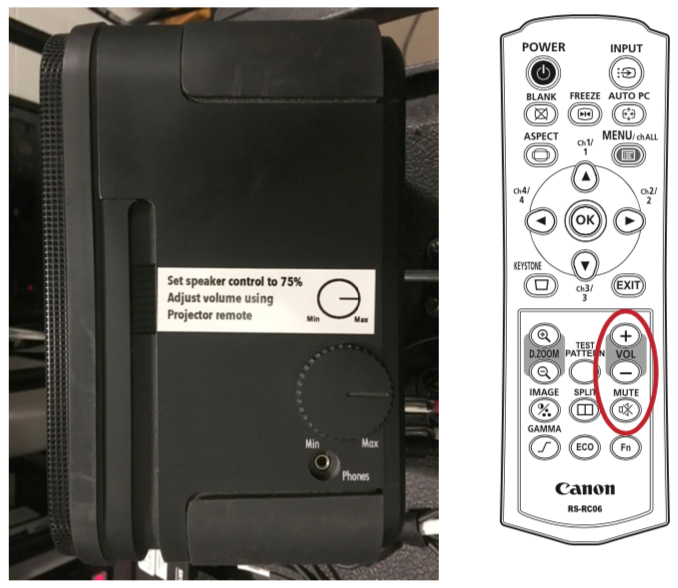
One of the speakers on each projector cart has a volume dial on its side. Adjust that to about 75% of full volume (so it’s pointing to the right). That sets the level for both speakers.
Use the Projector remote to adjust volume up and down. If you aren’t hearing anything, the projector may have been muted. Press Mute on the remote to un-mute the sound.
HDTV carts – setting volume
The HDTV carts all have soundbars beneath the TVs. All audio plays through the soundbar.
The soundbar should automatically turn on when the cart is plugged in and keep its settings from the last time it was used. On the right side of its front panel, it will display that it’s On, and which Input it’s set for.
If needed, the controls for the soundbar are on its right side. From left to right, the controls are:
- Volume – and +
- Input
- Power on/off
The settings should be:
- Input: Aux
- Volume: 60
With the soundbar set to 60, use the TV’s remote control to adjust volume or mute the sound.

If you aren’t hearing anything, make sure the TV volume is turned up, and not muted.
Note: If the soundbar doesn’t receive any signal for awhile, it will turn itself off. To turn it back on again, just press its Power button.
Do not turn the soundbar off. It will power off when the cart is unplugged.
Portable Cintiqs
Plug one end of the USB-C cable into the Mac Mini Portable Cintiq connector on the rack (or on the front wall in the Palace).
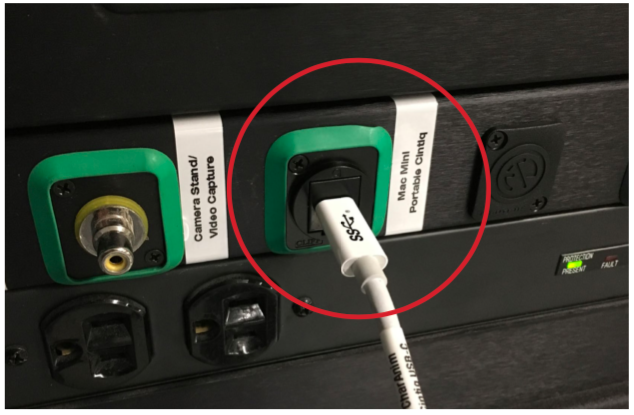
If you see only a gray screen (either on the Cintiq, or on the projector or HDTV), turn on Screen Mirroring by pressing command ⌘ + F1 on the Mac Mini keyboard.
Plug the other end of the cable into any of the Cintiq’s three USB-C ports (there are two on the left, one on the right). Press and hold the power button on the top of the Cintiq for about three seconds to turn it on.
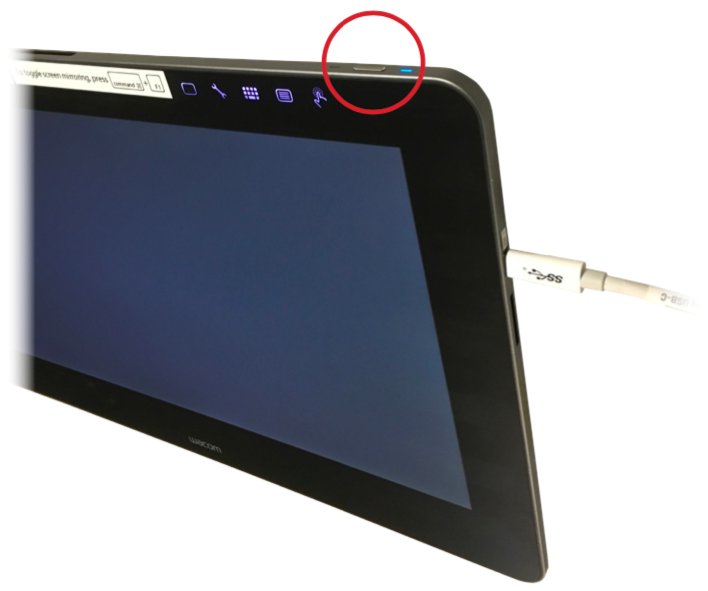
Note: the USB-C ports are checked by the Cintiq in order from left to right. The Cintiq will start up faster from the top left port. If the Cintiq doesn’t connect with one port, try a different one.
If you need to enable/disable display mirroring, press command ⌘ + F1 on the Mac Mini keyboard.
The Cintiq may ask to be calibrated when it’s connected (since we have different Cintiqs and different systems). Just tap the screen with the Cintiq pen, and follow the instructions.
Rechargeable keyboards and mice
The keyboards and mice in The Palace, A221O, A221G and A116 do not have replaceable batteries. Instead, they get plugged into recharging cables in the upper drawer of the racks to recharge.
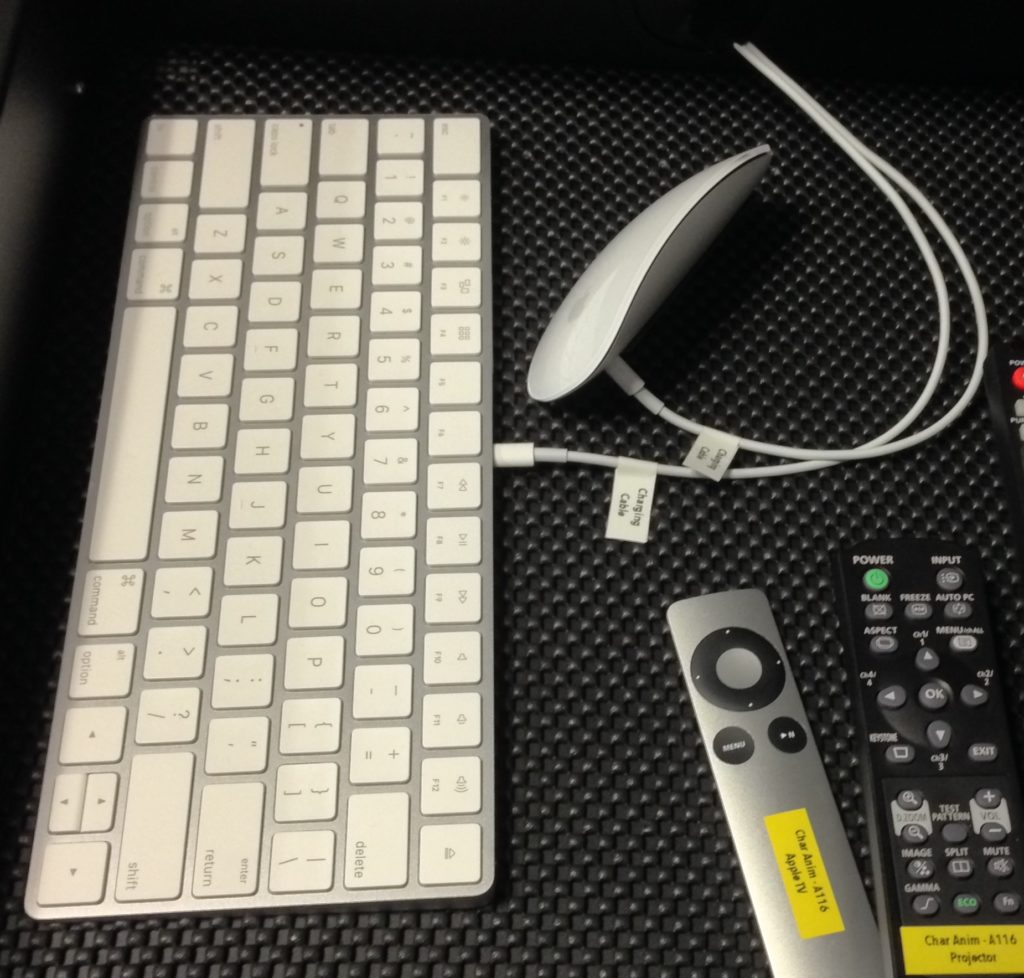
These can be left plugged in after a class, so they’re always fully charged. The charge levels can be checked the same way as the ones with removable batteries (see following page).
Please be sure to leave the mice and keyboards switched on, so they’ll automatically connect to the Mac Minis.
The cables are for charging only – they’re not connected to the Mac Minis.
Rechargeable batteries
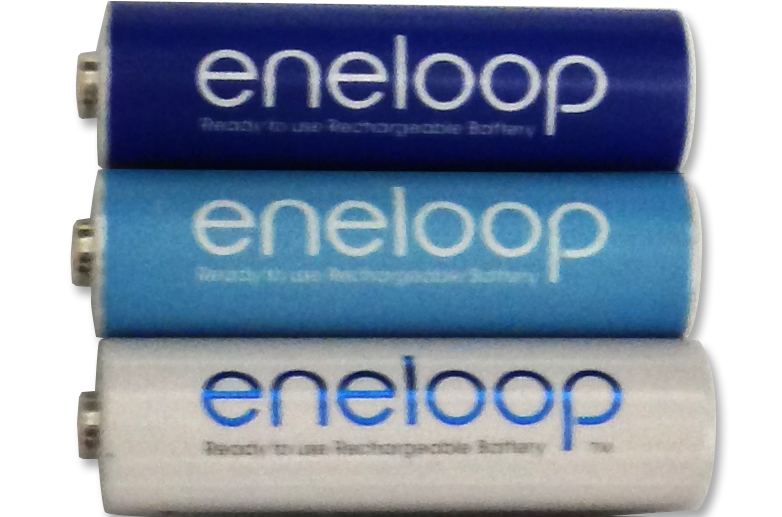
The wireless keyboards and mice on our carts, and all remote controls, use rechargeable batteries. Extra charged batteries are kept in the small plastic drawer in the TA cabinet.
We use Eneloop rechargeable batteries – which come in different colors (usually blue, white, or green). The keyboards and mice take AA, the remotes are a mix of AA and AAA.
When rechargeable batteries get low or stop working please do not throw them away. Put the old batteries in the chargers to recharge them.
There are four chargers in the TA cabinet. Please see the diagram on the chargers for the proper way to insert the batteries. The chargers will take AA and AAA batteries. There are four lights on each charger, one for each battery. The lights are color coded to show how much charge each battery still has: Red = 0 to 20%, Yellow = 20 to 80 %, Green = 80 to 100%.
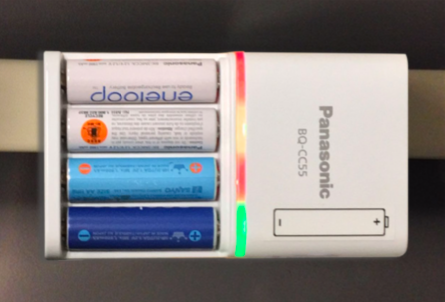
When a light turns off, that battery is completely charged.
If you see batteries that are fully charged, please take them out of the chargers, and put them in the drawer with the other rechargeable batteries.
Important: Other types of batteries should never be put into a charger. The only devices we keep alkaline batteries for are the wireless microphones for the PA systems. Alkaline batteries should be left in the same drawers as the microphones, and discarded in the battery bin near The Palace when replaced.

Checking the battery levels
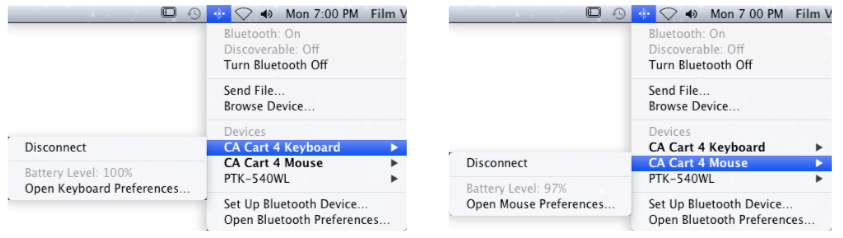
Every time you set up for a class that will use a Mac Mini, check its battery levels. Go to the Bluetooth menu in the Mac menu bar, and highlight either the keyboard or mouse to display the current battery level. If the battery level is under 35%, swap the batteries out, and put the old ones in the chargers.
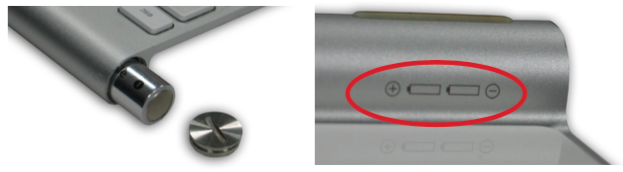
Wireless keyboards (carts)
The wireless keyboards used for the carts use two AA
batteries. The batteries are accessed by using a coin, key
or screwdriver (which we keep in the rack drawers) to
unscrew the cap on the side of the keyboard. Please see the
diagram under the keyboard to know which way to install the
batteries.
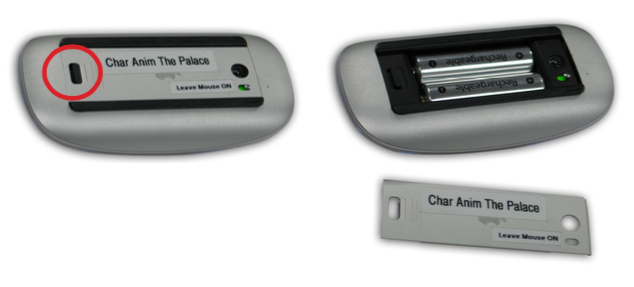
Wireless mice (carts)
The wireless mice used for the carts use two AA batteries. The batteries are accessed by pressing the tab on the bottom of the mouse, and removing the door. Please see the diagram in the battery compartment to know which way to install them.
Wireless mice should always be left switched on. They will reconnect to the Mac Minis, and automatically go into a power save mode as needed.
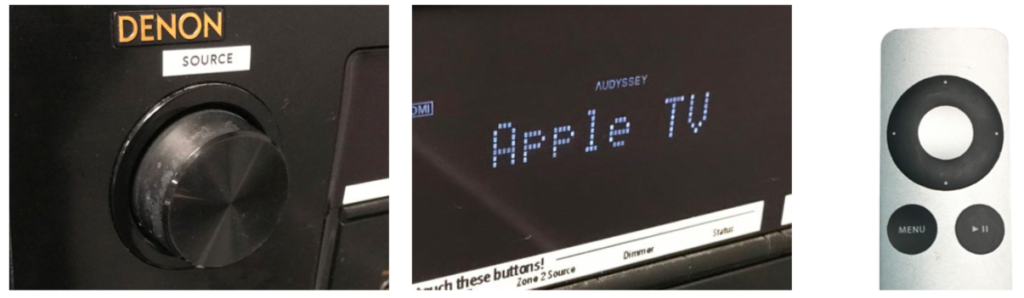
Using AirPlay
To use AirPlay for wirelessly projecting Apple laptops, iPads or other AirPlay-compatible devices, first make sure that the video projector or TV is turned on, then select Apple TV for the source (if using one of the classroom racks, use the Source dial to select it). If no image appears on screen, the Apple TV may be in sleep mode. Click any button on the Apple TV remote to wake it up.
On the laptop or other device, Bluetooth must be on, and WiFI must be set to either CASecure or CAGuest. If using an iOS device, select Screen Mirroring in the Control Center, and a list of available Apple TVs will appear. On a Mac Laptop, use the Displays icon in the menu bar to see the Apple TVs. Choose the Apple TV for the room you’re in.
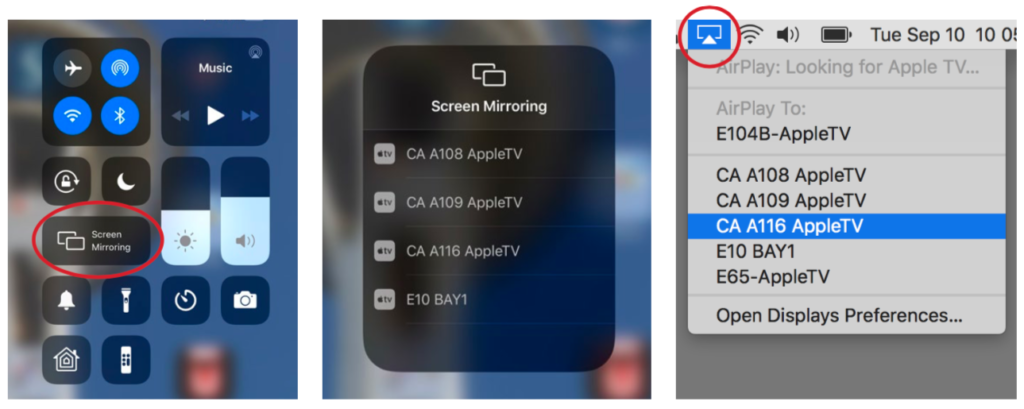
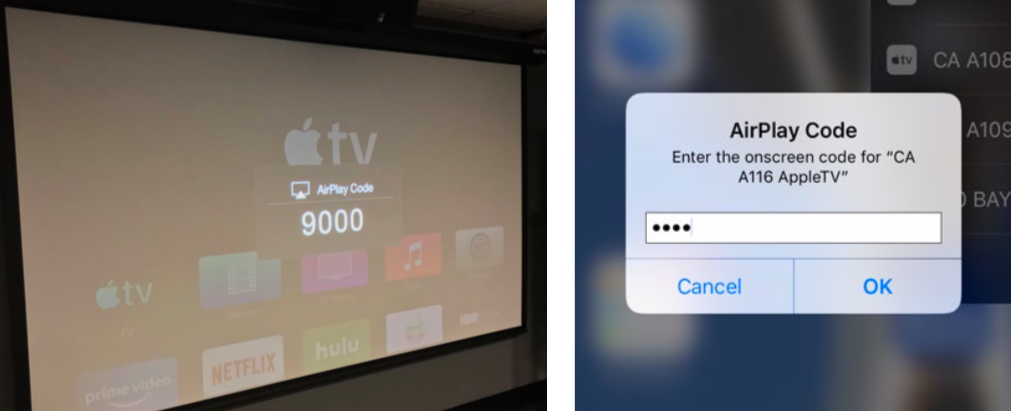
A four-digit code will appear on the Apple TV’s screen. When prompted, enter this code on the laptop or other device.
After class, once the device is out-of- range, the Apple TV will automatically disconnect from it.
PA Systems
The Palace, A108 and A109 have permanently installed PA systems. The speakers are installed near the ceiling, at the front of the room. The Palace has two speakers, A108 and A109 each have one.
The PA speakers should always be left on. They don’t need to be turned on or off.
Wireless microphones and spare batteries for each PA are located in drawers in the equipment racks in each room. The microphones for one system cannot be used with another.
A108 and A109 each have one lapel microphone with transmitter.
The person using it should clip the microphone on their shirt or collar,
as near to their face as possible. The transmitter can clip on a belt or be
placed in a pocket.
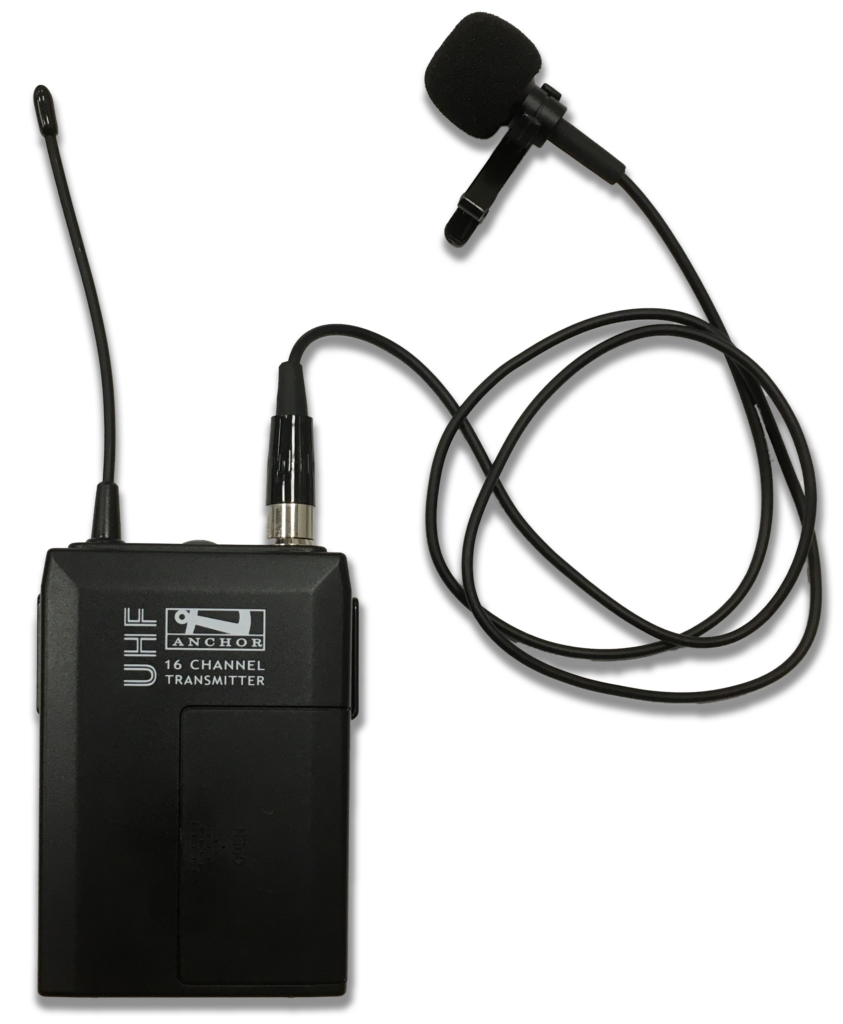
To turn on the microphone, press the button on the top of the transmitter until the red light turns on, (or slide the switch to On, depending on the model).
The Palace system has two microphones: a lapel with transmitter, and a handheld. If needed for a special event or class, we have an additional microphone of each type available (one lapel, one handheld). However, only two microphones in total can be used at the same time, so we can have one of each or two lapels or two handhelds. The Palace microphones also have their own volume controls and mute buttons: on the transmitter (for the lapel) or on the microphone (for the handheld).
There are remote controls for each PA system to adjust the volume of the speakers. Point the remote directly at the speaker and use the Up/Down buttons to adjust the volume. You may not see the volume dial move on the speaker – but the volume will change.
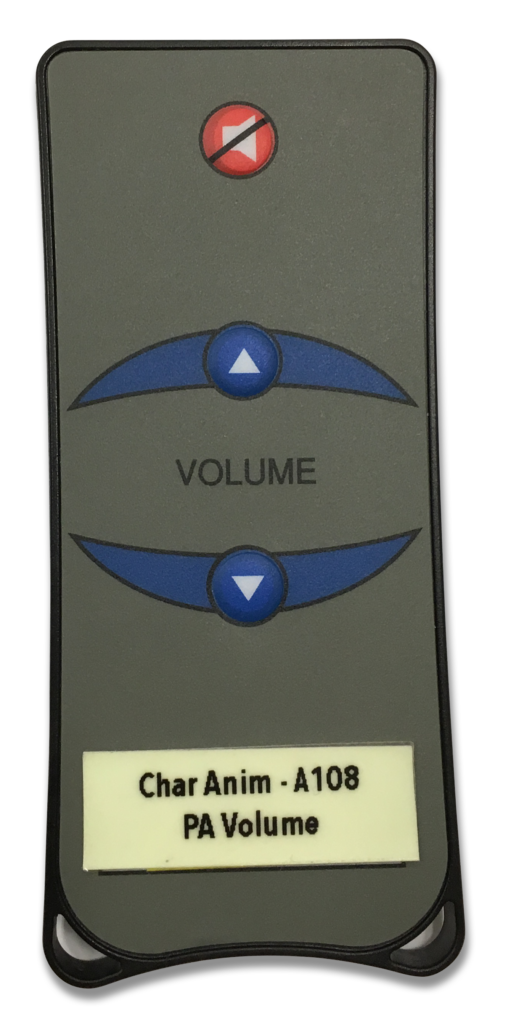
In the Palace, the remote control should be aimed at the left speaker – that will control the volume for both speakers. The speaker on the right does not have its own volume control – it follows the left one. There’s also a mute button at the top of the remote. Note: In the Palace, the mute button only mutes the left speaker. The right speaker will not mute.
There is also a portable PA in the TA cabinet. The portable PA system has a speaker, adjustable stand, one lapel microphone with transmitter and one handheld microphone (the microphones are in a plastic bin in the cabinet). Only one microphone can be used at a time. This PA can be taken anywhere it’s needed, and is checked out just like the rest of the equipment. The stand telescopes, so the speaker can be raised up for better coverage. Be careful where placing the PA speaker so it’s not a potential trip hazard.
Avoiding feedback
Microphones will feed back if used too close to the PA speakers. If necessary, turn the speaker volume down with the remote until the feedback subsides. For the portable system, try to place the speaker away from the person who will be using the microphone.
Batteries
For the PA microphones, we use Alkaline batteries. If the microphone isn’t working – change batteries. We keep some spare batteries in each drawer with the microphones. If we’re out or nearly out of batteries, please let us know.
Important: Do not recharge the alkaline batteries. Dispose of them in the battery recycling bin in the Character Animation hallway.