
Laybacks in FCPX
The layback is the final step in the post-production process wherein the final sound mix is married with picture. At CalArts, sound is mixed for 5.1 surround sound playback, LtRt stereo playback with Dolby Compatibility, and Internet Only playback. In Final Cut Pro X, a sequence must be created for each sound mix with and without leader. This process will involve several steps.
- You will create and organize a folder with all the necessary files for delivery.
- You will create a Final Cut Pro X Project for a variety file based outputs.
- You will output three different Quicktime files (a master .mov file, an internet only .mp4 file, and a 5.1 file without leader for the Bijou) and three DVD & Blu-ray assets (an .ac3, .m2v, and .264 (you will change the .264 extension to .m4v)). If a student asks for a specific output, they can be made using the same process.
Preparing for the Layback
- Copy the Template folder found at FVCentral > Operations > Laybacks > Templates into the FVCentral > Operations > Laybacks > In Progress folder. Use the standard naming convention.
Standard Naming Convention (LastFM_MyMovieTitle_YYYYMMDD)
Start with your capitalized last name, the capital first letter of your first name, then the capital first letter of your middle name. For example, if your name is Steven Paul Jobs: JobsSP
Next, to add a project name or title, use an underscore, followed by an abbreviated project name without spaces. Capitalize each word of the project name or title. For example, if your project name is My Movie: JobsSP_MyMovie
Then, to add a date, use an underscore, followed by the year, month, and day without spaces. For example, if the date is April 1, 1976: JobsSP_MyMovie_19760401
Supplemental information can be added after the date, such as version, audio, frame rate, or codec information. For example, if your file is version 2, with LtRt audio, at 24fps, and Pro Res HQ codec: JobsSP_MyMovie_19760401_v02_LtRt_24p_PRHQ
- Copy the folder name to the clipboard for later use.
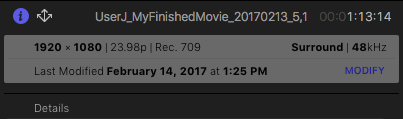
- Find the final video file at FVCentral > Submissions > Laybacks. Do not use the video file in the Pro Tools session unless explicitly told to. Confirm that the file is named correctly according to the standard naming convention, rename it if needed. Open the file in Switch to make sure that the file is ProRes 422 (HQ), 1920×1080, 23.98 (or 29.97 or 24 or 25), with no sound (if there is sound we will remove it in FCPX).
If the codec, resolution, or frame rate do not match the above, ask for assistance before proceeding with the layback.
- Find the client’s mix folder at FVCentral > Operations >Mixes > Completed [Paid] or Completed [Unpaid]. Check the Session Setup screenshot for the sample rate, bit depth, and timecode of the session (48kHz, 24 bit, and 23.98 or 24 or 29.97 or 25). You will need this information to make the correct FCP X project.
Creating a Final Cut Pro X Library and Importing Media
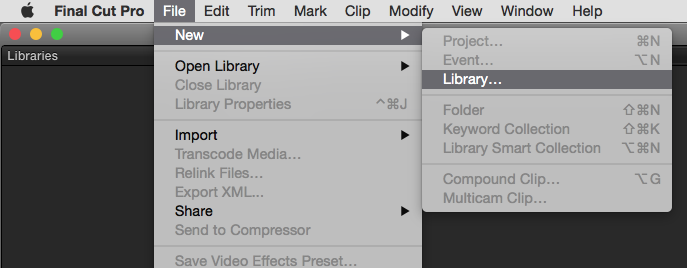
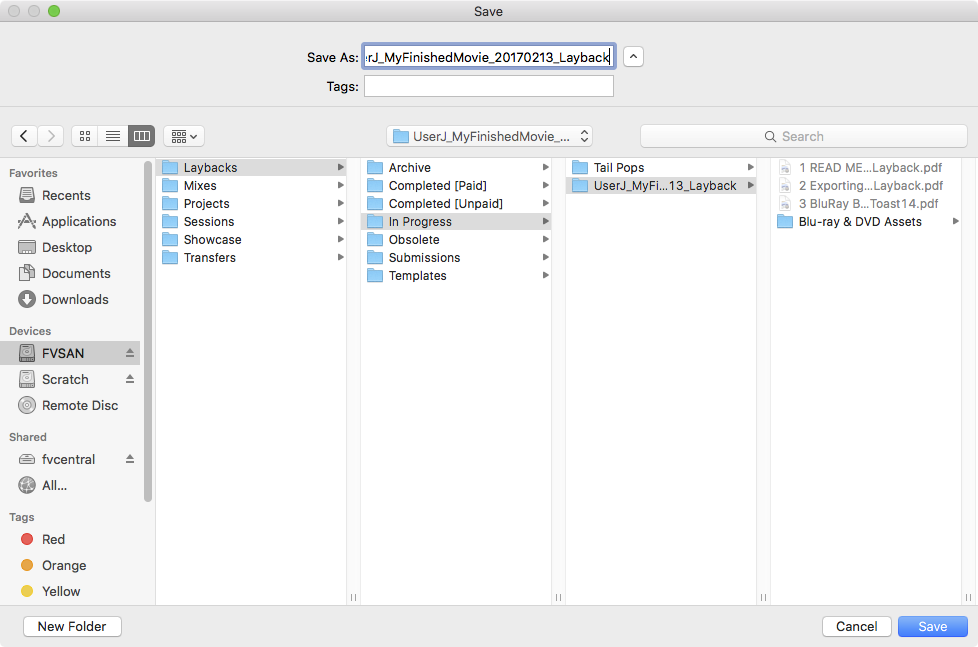
- Once you have launched Final Cut Pro X, you will need to create a new library. Go to File > New > Library. Use the standard naming convention to name the library and save it in the layback folder you just created on FVCentral.
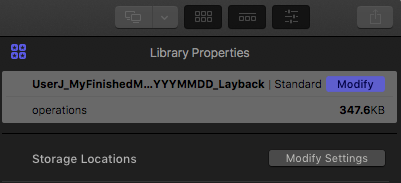
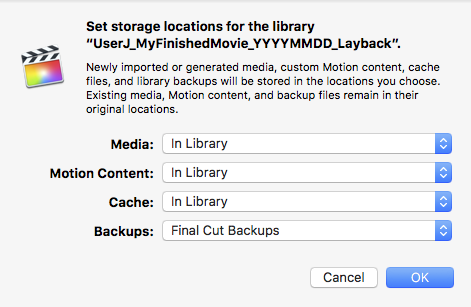
- Select the library and click Modify Settings for Storage Locations. In the storage locations dialog box change Media and Motion Content to In Library.
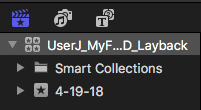
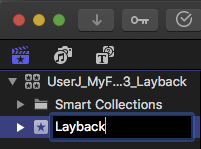
- Inside of the library, an event will be created. Rename it Layback.
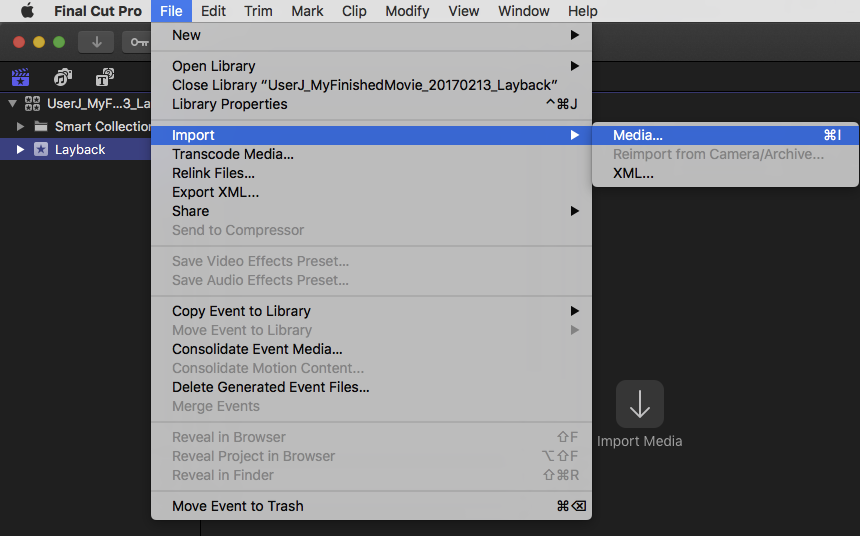
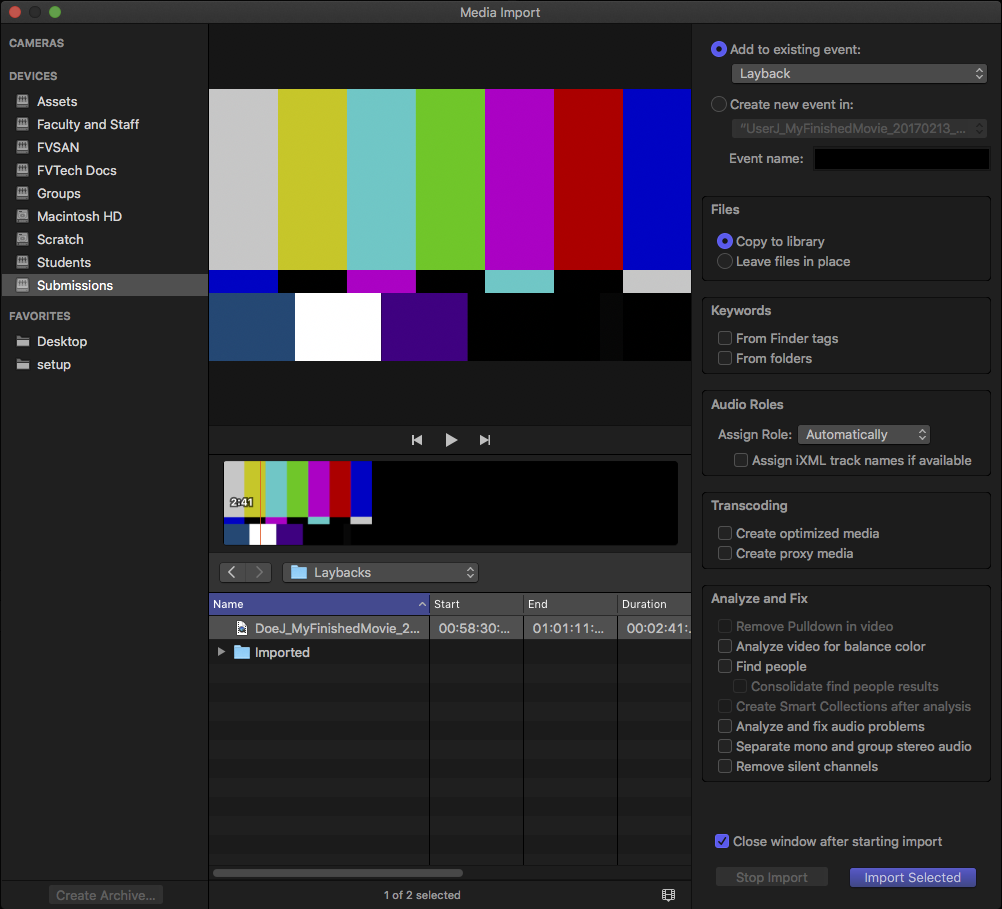
- Now you’re ready to import the media. Go to File > Import > Media. In the Import window, find the video at FVCentral > Submissions > Laybacks and in the Media Import window, Add to existing event should be checked and set to Layback. Check Copy to library and Close window after starting import. Click Import Selected.
- The same process can be used for importing the audio mix files. In the import window, you can find the audio files under FVCentral > Operations > Mixes > Completed[Paid] or Completed[Unpaid]. Import all 10 final mix files: 5.1 (L, R, C, LFE, Ls, Rs), Internet Only (L, R) and LtRt (L, R).
Make sure you do not quit while files are importing. To check Background Tasks, go to Window > Background Tasks. If FCPX crashes, reimport the files. Both of these cases could lead to linking of files and incorrect structure in the FCPX library.
To see your imported media in a list view, click the List Mode button in the top right corner of the Browser workspace (circled here in red).![]()
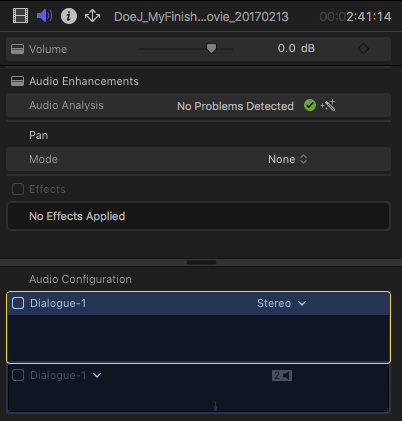
- The audio channel configuration has to be assigned before they are used for the layback. For each mix file, select it and in the Inspector window on the right, under the Audio tab, in the Audio Configuration section, assign each file to their respective channels.

- Click on the video file and, if present, uncheck the Audio Configuration to make sure the video has no audio when we use it for the layback.
The Layback
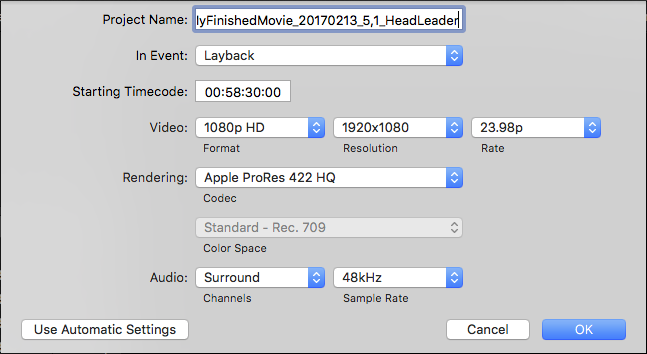
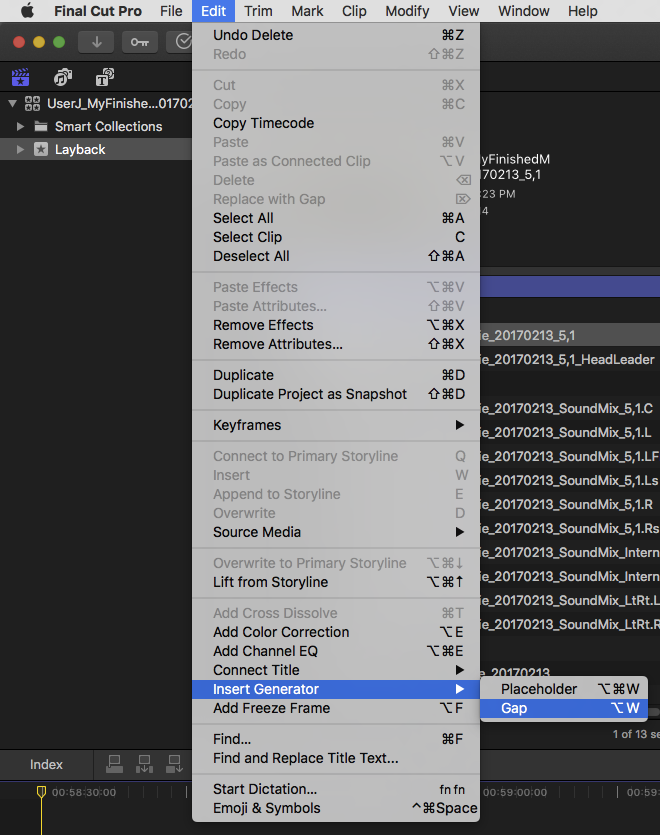
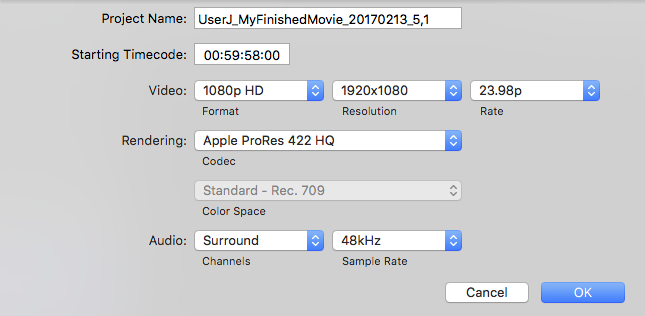
- Now we’re ready for the layback. We will make a total of 5 projects within our Final Cut Pro Event, one for each layback. First, we’ll do the layback for the master file. Go to File > New > Project and name it with the CalArts naming convention, appending it with “_5,1_HeadLeader”. In Event should be set to Layback. Start Timecode is 00:58:30:00. If the Video and Audio settings are hidden, click Use Custom Settings. Set Video to 1080p HD Format and 1920×1080 Resolution, then select the frame rate which matches that of their final video. Set Rendering to Apple ProRes 422 (HQ). Set Audio to Surround Channels and 48kHz Sample Rate. Click OK.
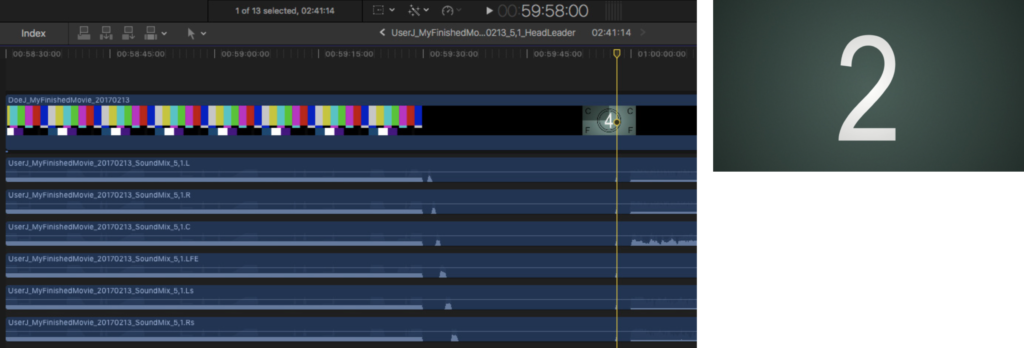
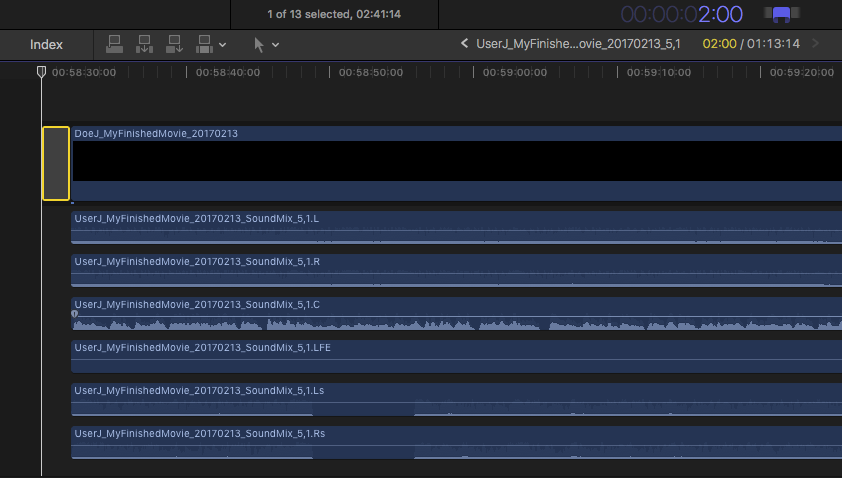
- Double click on the project to open it in the timeline window. Drag the video to the beginning of the timeline and then the 5.1 audio files in SMPTE order: L, R, C, LFE, Ls, Rs.
- Check that the “2” occurs at 00:59:58:00, zoom into the end of the project and see if the audio file needs to be trimmed. If there is a tail pop, check that it is in sync.
If the audio extends past the end of the image or the image ends exactly at the end of the project, add a gap by going to Edit > Insert Generator > Gap and change the duration by hitting ctrl + D and typing in the desired length.
- Now you’re ready for the next layback, 5.1 without leader. Right click on the _5,1_Leader project and duplicate it. Rename it by appending “_5,1” to the original CalArts naming convention. Double click on the project to open it in the timeline window.
- Trim off the head leader of the project. Go to 1:00:00:00 and use the blade tool (shortcut: “b”) + shift to cut all tracks. Change to the arrow tool (shortcut: “a”) and delete the head leader.
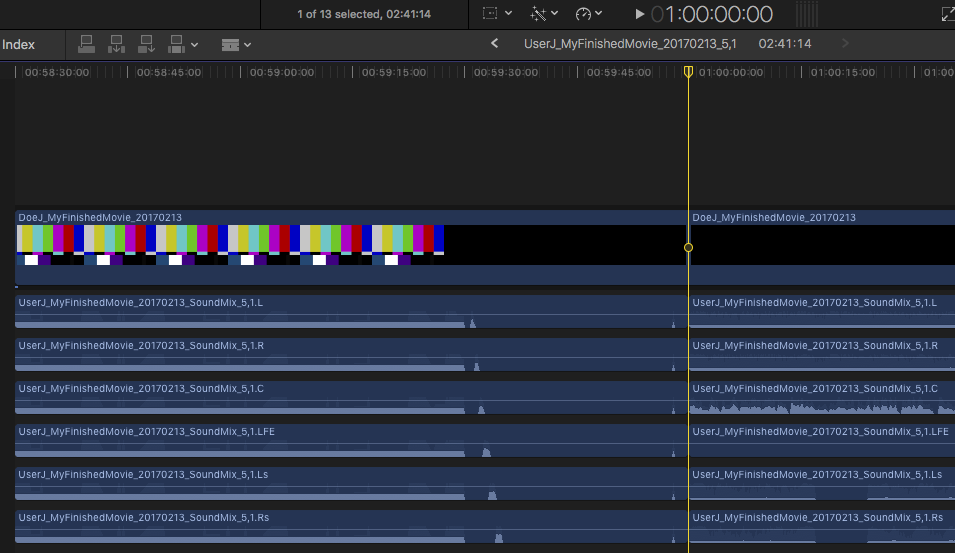
- A 2 second gap needs to be inserted at the beginning of the video. Go to Edit > Insert Generator > Gap. Double click on the Gap in the timeline, press ctrl + D and type “200” to change the gap length to 2 seconds. Press Enter.
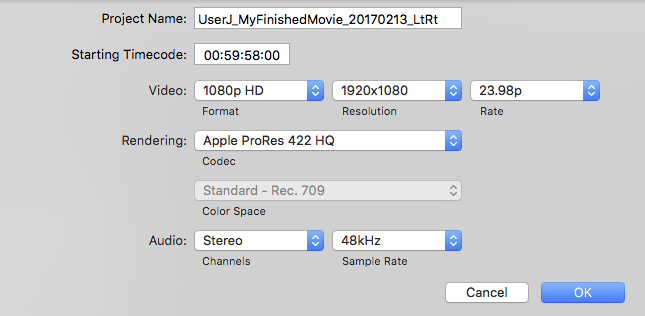
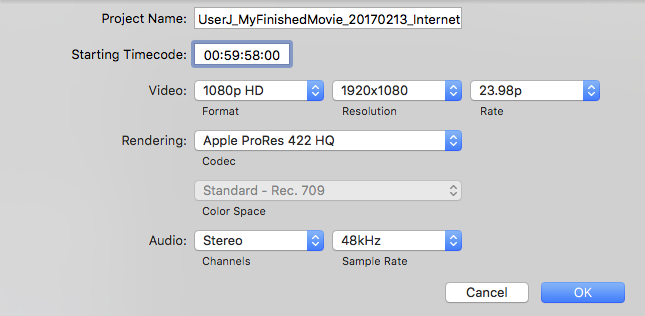
- The Starting Timecode needs to be changed. Select the project and in the Inspector window, click Modify and change the Starting Timecode to 00:59:58:00. Click OK. Make sure picture begins at 1:00:00:00.
- If there is tail pop, it must be removed. The tail pop placement varies per project and removing it will require some timecode math. A tail pop occurs exactly 2 seconds after last image and the place to cut will depend on the frame rate. To remove the tail pop, find the 2 and use the following table to determine how much to subtract from the timecode:
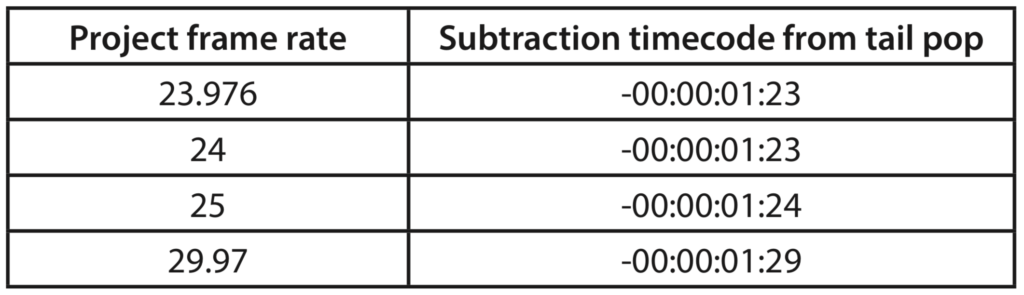
You can also think of these values as ‘one frame forward, 2 seconds back’ from the tail pop. Advance one frame after the 2, then cut 2 seconds prior to that.
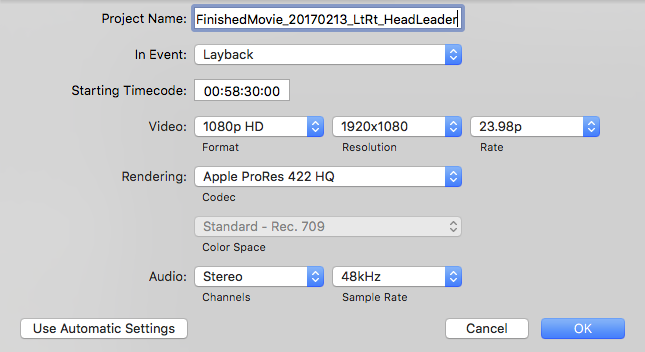
- Now we’re ready for to do the stereo laybacks. Make a new project, name it using the standard naming convention, appending it with “_LtRt_HeadLeader”. In Event should still be set to Layback. Start Timecode is 00:58:30:00. Set Video to 1080p HD Format and 1920×1080 Resolution, then select the frame rate which matches that of their final video. Set Rendering to Apple ProRes 422 (HQ). Set Audio to Stereo Channels and 48kHz Sample Rate. Click OK.
- Double click the project to open it in the timeline window. Drag the video to the beginning of the timeline and add the LtRt audio tracks in correct order: L, R. Check that the 2 occurs at 00:59:58:00 and zoom in to see if the audio file has to be trimmed at the end of the project. Now on to the fourth layback, LtRt without the leader.
- Duplicate the project and rename it, appending the CalArts naming convention with “_LtRt” . Open it in the timeline window. Trim off the head leader of the project using the blade tool + shift to cut through all the tracks at 1:00:00:00 and delete. Insert a gap using the insert generator in the edit menu and change the duration by pressing ctrl + D and setting it to 2 seconds. Change the Starting Timecode to 00:59:58:00 by modifying the LtRt project settings and clicking OK. If there is a tail pop, trim it off.
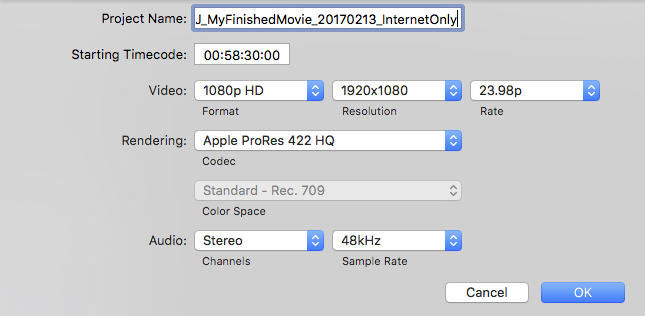
- The final layback is the Internet Only version. Make a new project, name it using the CalArts naming convention, appending it with “_InternetOnly”. Start Timecode is 00:58:30:00. Set Video to 1080p HD Format and 1920×1080 Resolution, then select the frame rate which matches that of their final video. Set Rendering to Apple ProRes 422 (HQ). Set Audio to Stereo Channels and 48kHz Sample Rate. Click OK.
- Double click the project to open it in the timeline window. Drag the video to the beginning of the timeline and add the Internet Only audio tracks in correct order: L, R. Check that the 2 occurs at 00:59:58:00 and see if the audio file has to be trimmed at the end of the project by zooming in. The Internet Only version does not need leader, so we will trim it off without duplicating the project. Use the blade tool + shift to cut through all the tracks at 1:00:00:00 and delete the leader. Insert a gap using the insert generator in the edit menu and change the duration to two seconds by pressing ctrl + D. Change the Starting Timecode to 00:59:58:00 by modifying the Internet Only project settings and clicking OK. If there is a tail pop, trim it off.
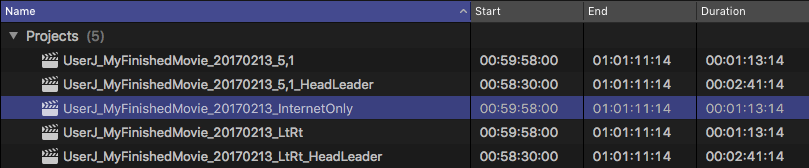
- All 5 laybacks are done. Double-check that all projects with leader begin at 00:58:30:00, all those without leader begin at 00:59:58:00, and that all the projects have the same ending timecode. Now on to exporting.
Exporting
- We will export 5 different files (5.1 Master, Internet Only, Blu-ray, DVD, and AC3 ) directly to the folder you have created in FVCentral > Operations > Laybacks > In Progress and one 5.1 without leader file that will be exported to FVCentral > Submissions > Bijou > Laybacks.
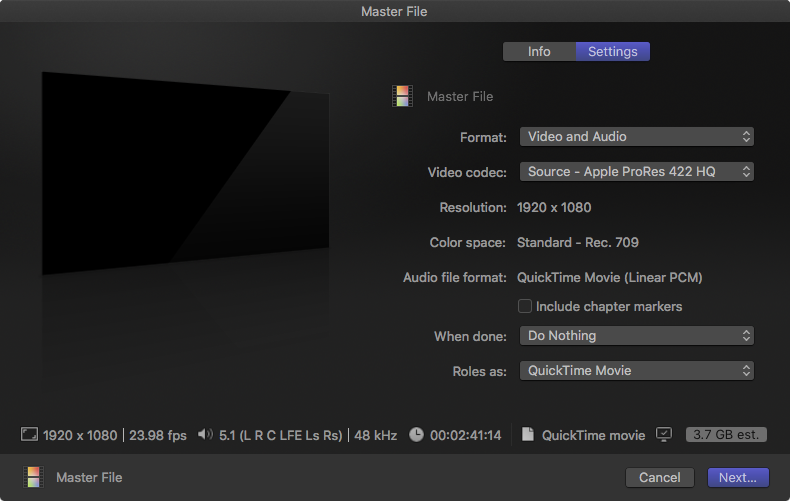
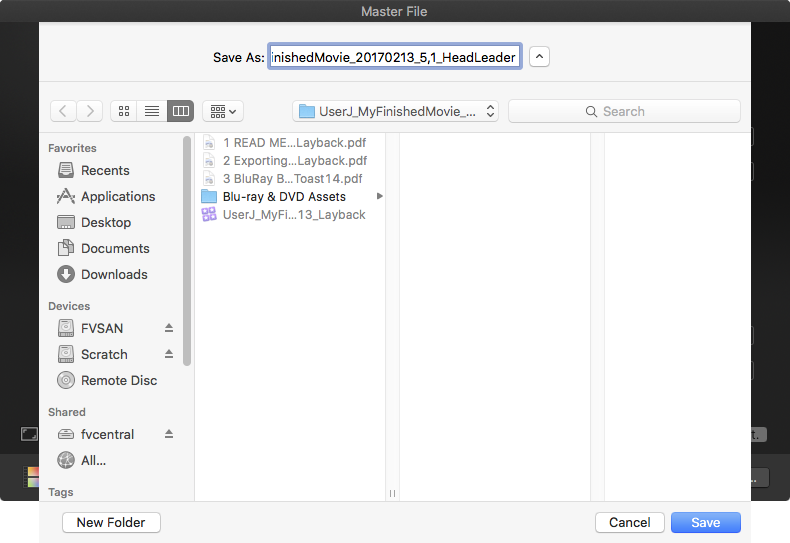
- The Master File: Click on the 5.1_HeadLeader project and go to File > Share > Master File. Check under the Settings tab that the export is Video and Audio, Source – Apple ProRes 422 HQ, 1920×1080, matching source frame rate, 5.1 surround sound, 48kHz sample rate, and Quicktime Movie. Uncheck Include chapter markers. Select Do Nothing where it says “Open With” (it will then change to “When Done”). Click Next. In the Save window, check the file name includes 5,1_HeadLeader, save it in the folder you created in FVCentral > Operations > Laybacks > In Progress and click Save.
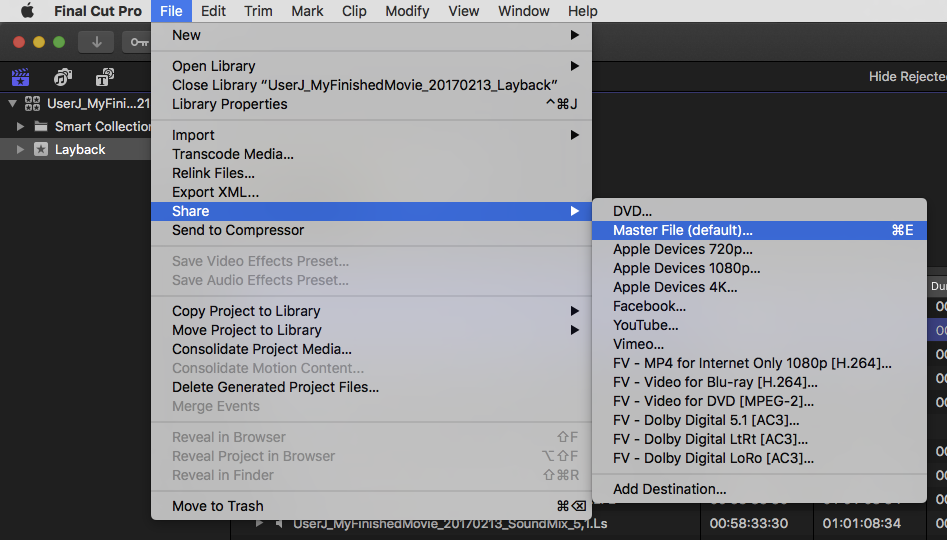
- The Internet Only File: Click on the InternetOnly project and go to File > Share > FV – MP4 for Internet Only 1080p [H.264]. Check under the Settings tab that the export is 1920×1080, matching source frame rate, Stereo sound, 48kHz sample rate, and H.264 File. Click Next. In the Save window, check that the file name includes InternetOnly, save it in the folder you created in FVCentral > Operations > Laybacks > In Progress and click Save.
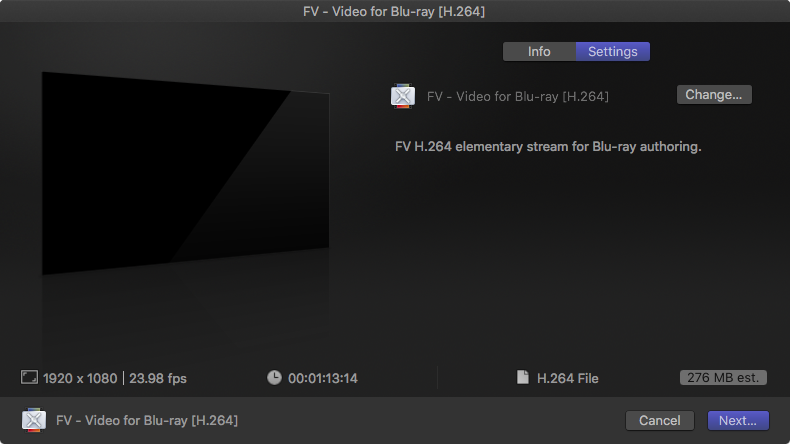
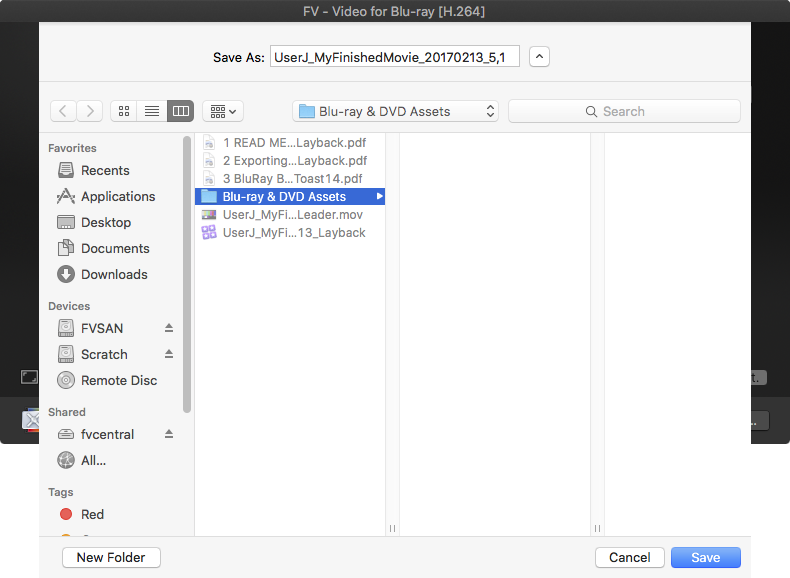
- The Blu-ray .264 File: Click on the 5.1 project (no leader) and go to File > Share > FV – Video for Blu-ray [H.264]. Check under the settings tab that the export is 1920×1080, matching source frame rate, and H.264. There is no sound for this file, we will export it separately. Click Next. In the Save window, check that the file name includes 5.1, save it in the Blu-ray & DVD Assets folder of the layback folder and click Save.
- The DVD .m2v File: Click on the 5.1 project (no leader) and go to File > Share > FV – Video for DVD [MPEG-2]. Check under the settings tab that the export is 720×480, matching source frame rate, and MPEG-2. There is no sound for this file, we will export it separately. Click Next. In the Save window, check that the file name includes 5.1, save it in the Blu-ray & DVD Assets folder of the layback folder and click Save.
Do not make an .m2v file for a 24 fps project. The file will not be sync.
- The AC3 Audio File: Click on the 5.1 project (no leader) and go to File > Share > FV – Dolby Digital 5.1 [AC3]. Check under the settings tab that the export is 5.1 Surround Sound, 48 kHz, and AC3. This is the audio file to use with the Blu-ray & DVD Assets. Click Next. In the Save window, check that the file name includes 5.1, save it in the Blu- ray & DVD Assets folder of the layback folder and click Save.
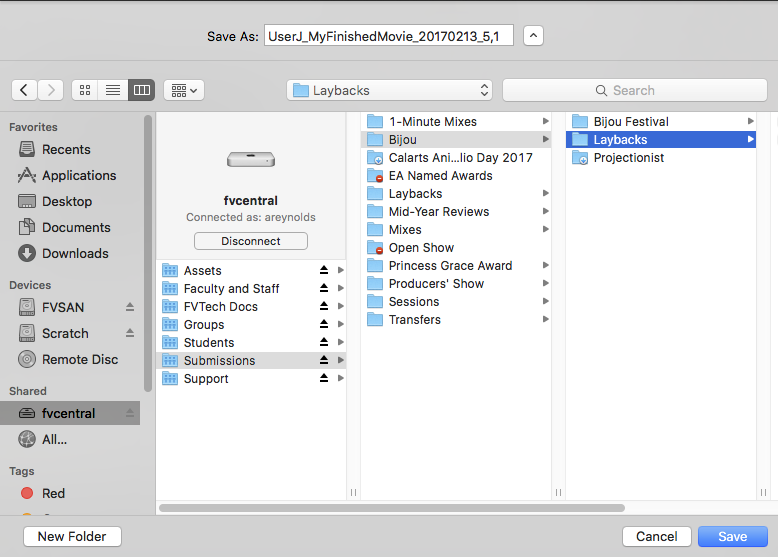
- The Bijou Fest File: Click on the 5.1 project (no leader) and go to File > Share > Master File. Check under the Settings tab that the export is Video and Audio, Source – Apple ProRes 422 HQ, 1920×1080, matching source frame rate, 5.1 surround sound, 48kHz sample rate, and Quicktime Movie. Uncheck Include chapter markers. Select Do Nothing where it says “Open With” (it will then change to “When Done”). Click Next. In the Save window, check the file name includes 5,1 and save it in FVCentral > Submissions > Bijou > Laybacks.
Tidying Up
- Check the file structure of the Layback folder you’ve created in FVCentral > Operations > Laybacks > In Progress. There should be the FCPX library you created, the 5.1 Master .mov file, the Internet Only .mov file, and the Blu-ray & DVD Assets folder with an .m2v for DVD, .264 for Blu-ray, and .ac3 audio file.
Double check the files for picture and sound in Switch. Make sure they are named correctly and close the library in FCPX before moving the Layback folder.
- Rename the Blu-ray file with .m4v extension.
- Move the entire folder to the appropriate “Completed” folder on FVCentral > Operations > Laybacks and the original silent video file from FVCentral > Submissions > Laybacks to FVCentral > Submissions > Laybacks > Imported.
- Make sure there is a 5.1 no leader output in FVCentral > Submissions > Bijou > Laybacks.
- Fill out the Layback form and put it in the Completed section of the paper file organizer.
Revising Layback
If a layback needs to be revised/redone, do not open the old library. Create a new library with the current date and move the old layback into the FVCentral > Operations > Laybacks > Obsolete. Staple a new Mixes and Layback form to the old one and fill it out accordingly.