
Analog Audio Transfer
This Tech Document will walk you through the steps of transferring an analog audio format (i.e. vinyl, cassette tape, etc.) into a digital format via Pro Tools.
This document will address a vinyl transfer specifically. However, with the exception of the initial patching, the steps will be the same for any other analog audio transfer.
Patching
To send your audio signal into Protools, patch the appropriate left and right outputs (in this case Phono Out Left and Right) into the 1st and 2nd inputs of Mac #2 Pro Tools 192 In (Mac #1 Pro Tools 192 In if you are using Mac #1).
Be sure to patch the Left and Right outputs with the corresponding 1st and 2nd inputs
Setting Up Pro Tools
- Once Pro Tools opens up, you should get a start up box similar to the one shown below. Make sure your setting match the settings shown here (File Type: BWF(.WAV), Sample Rate: 48kHz, Bit Depth: 24 Bit, I/O Settings: FV[E104])
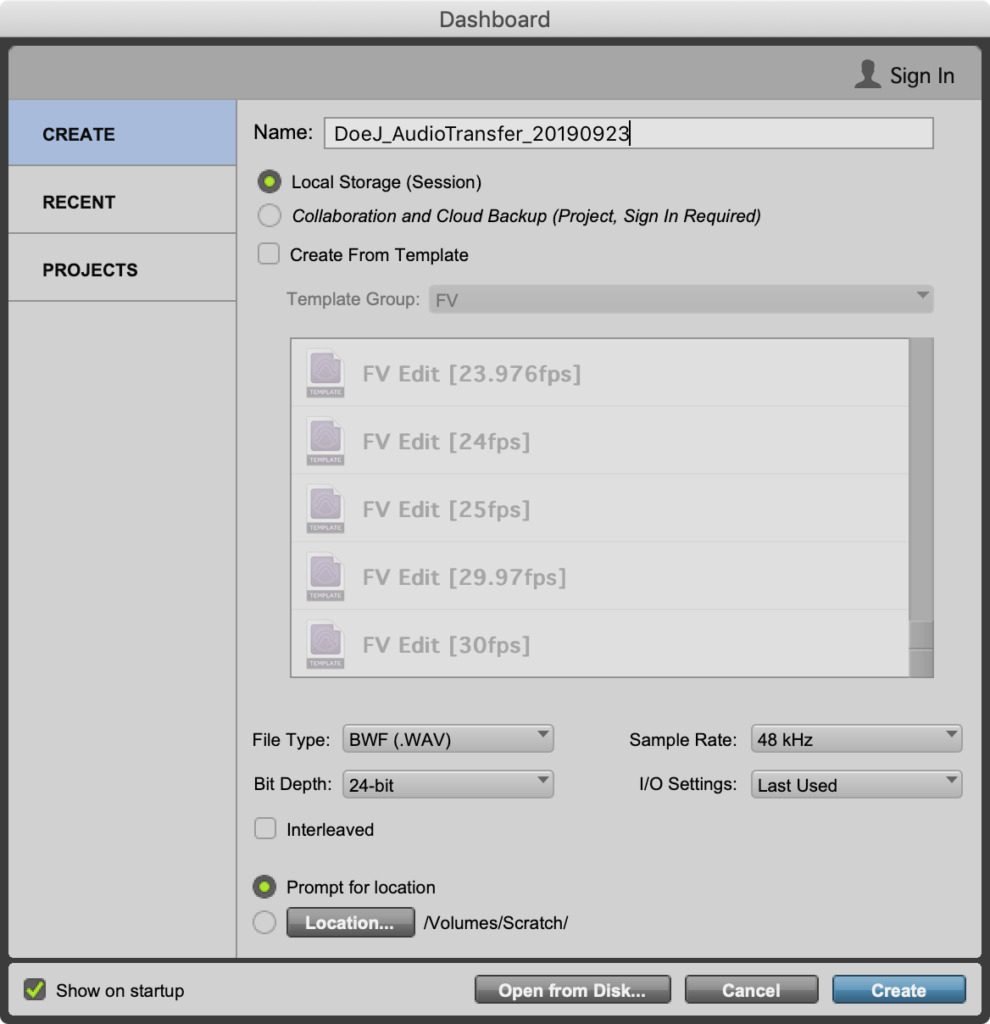
- Click OK once your settings match. You will then need to choose what to name your Pro Tools project (LastFM_MyMovieTitle_YYYYMMDD) and where you want to save the file. Then click Save.
- Once the Pro Tools edit view opens up, go to Track > New. This will bring up a box that lets you choose what kind of track you want to create. Change the new track type from a Mono track to a Stereo track. Click create once you’re set.
- Now would be a good time to rename your new track to correspond to the name of the project.
Get your Analog Format Ready
- Go over and get the vinyl your transferring ready to play on the record player (or cassette in cassette player, etc).
- Start the playback of your audio to make sure your levels look good in Pro Tools. Record enable your track and be sure you are getting a signal.
If there is no sound coming from the Mac near fields at this point, make sure the side mixer’s Pro Tools 192 1-2 Out and Main Mix knobs are turned up.
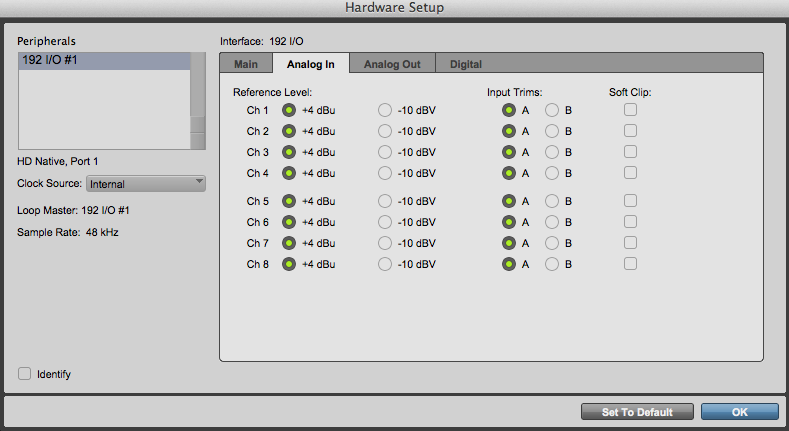
- If the input levels seem low you can easily adjust your trim levels in Pro Tools. Go to Setup > Hardware > Analog In. There you will find an option to choose either Trim A or Trim B. Trim A is equal to -20 dBFS while Trim B
is equal to -15 dBFS. Trim A is the default analog input setting, so if you find your input level to be too low try selecting Trim B.
Record Your Audio
- Once you have the appropriate trim setting set, you’re ready to transfer your audio.
- In Pro Tools, press the record button followed by the play button. Then start your audio playback (drop the needle on the record or press play on the cassette).
- When the audio has finished playing, stop recording in your Pro Tools session and then stop your audio playback.
Finishing Up
- Check the audio you just recorded and make sure nothing looks funny.
- If everything looks good then the transfer is done. Save your Pro Tools session before you close it. Log your time on the transfer sheet and close up the record player.