
ADR Prep
ADR (Automated Dialogue Replacement) is the process or re-recording dialogue after production has ended. It should be considered as a last resort effort to improve audio quality. Below is the step by step process to prepare a Pro Tools session for ADR.
It is not a fast process and you should allot 1 hour of prep for each minute of ADR that needs to be recorded.
The Script
- Although there may already have a script that was written prior to shooting, you must prepare a version of the script for ADR that has the dialogue exactly as performed.
- A master ADR script should be prepared where each line to be recorded is given a name/number relating to the scene and character, e.g. 14cMary01 or Mary14c01.
- A separate ADR script should be prepared for each character, containing only that character’s lines, one line of dialogue per line of ADR script, with the scene number, character’s name and the line number.
Pro Tools Session Elements
An ADR Pro Tools Session will include the following:
- Picture – put the whole film in the proper timeline. If you’re only doing an excerpt, it should be in the proper time code
- Production Dialogue – this will serve as the reference for the actors. It should be split onto separate tracks by character, not by camera angle and numbered according to the script numbering. If there are long passages of dialogue (or passages with long pauses) by a single character, split them into shorter segments.
- ADR Beeps – to act as a guide for the actors. They can be found on FVCentral > Support > ADR Beeps.wav
- Record Tracks – empty audio track for the ADR to be recorded on for each character
- Marker Selections – this will begin 1 second before the clip and extends a half a second or so after, this will be determine the record length.
- Pre-roll – 2 seconds of pre-roll that will be set in the Transport Window and made active
Preparing the Reference Audio
- Import the scene into Pro Tools using an AAF that you have exported from your editing software.
- Find the scene/s that will be ADR’d and put a correspondingly numbered marker at the beginning of each scene. The example in this handout has only one scene.
- Delete the reference audio from the scenes/shots that aren’t being ADR’d.
- Isolate each line in the reference track and make it into a separate clip.
- Rename the reference clips with the characters’ line numbers (e.g. V1-01, J1-01, etc). Double click on the clip in the Clip List to do so.
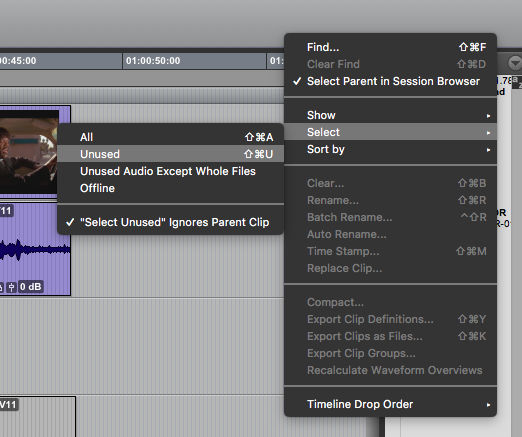
- When you’ve finished renaming, you can select the rest of the audio clips (not the video) in the Clip List. Go to the pull down menu in the Clip List > Select > Unused and right click Clear or shift + cmd + B.
Preparing the Record Tracks
- You will now have to add audio tracks. Each character will need three tracks total: 1 reference/cue track, 1 ADR beeps track, and 1 record track.
- Go to Track > New and create the needed number of Mono tracks. Rename the tracks for reference/cue, beeps and recording (e.g. Vincent Cue, Vincent Beeps, Vincent Record).

It’s important that the tracks to be recorded on are named with the character’s name or an abbreviation, the scene number, and the line number. This will help make sense of what the recorded files are later since the name of the record track is the name the newly recorded clip will be. The engineer will need to change the characters’ ADR track names each time they move to a new line.
- Move each of the character’s reference clips to the corresponding “ref/cue” track holding down ctrl + option to make sure you don’t lose sync.
Preparing the ADR Beep Tracks
- Import the “ADR Beeps.wav” file from Support folder on FVCentral. Make sure it’s set to Copy in the import window.
- Position the cursor at the beginning of a reference/cue clip or select it with the grabber.
- Hold down ctrl + cmd and drag the ADR beeps file from the Clip List to the corresponding Beep track. This will snap the end of the beeps clip to the cursor or the beginning of the selected clip.
- Repeat this until every reference clip has ADR beeps in front of it.
Creating Memory Selections
- Now we’re going to create memory selections for each line. This will create the length and time location where each take’s recording of the line will take place.
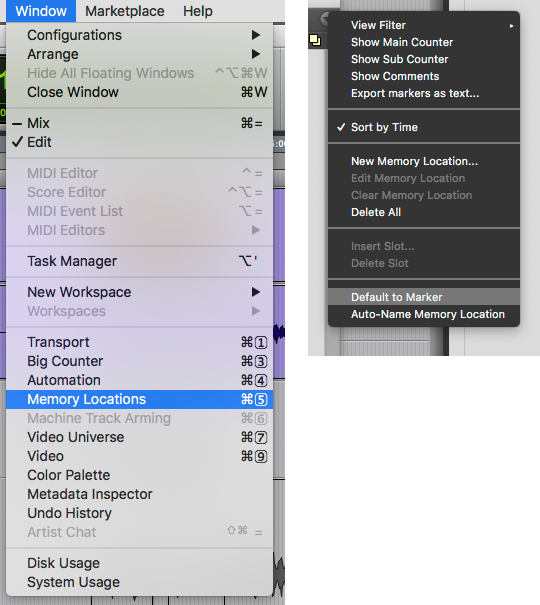
- Open the Memory Locations window by going to Window > Memory Locations or cmd + 5 (numeric keypad). Go to the pull down menu and Uncheck Default to Marker. This will make any new memory locations be selections instead of markers.
- Select (click + drag) a half second or so before to a half second or so after the reference clip. Push Enter on the number pad and the New Memory Location dialogue box will open. Rename it to match the name of the reference clip.
- Repeat until selections have been made for all the reference clips.
- Now whenever you click on a memory location, the selection will show in the edit window.
- If you have a lot of markers, you can filter and sort the view using the same pull down menu.
Pre-Roll
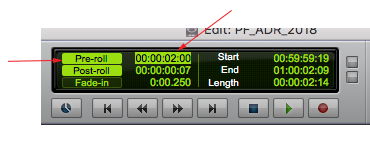
- Now the pre-roll has to be set.
- In the Transport Window, click on the pre-roll time display.
- Enter 2:00 then push the Enter/Return key.
- Make sure that pre-roll is highlighted (meaning it is active). If it is not highlighted, click on it to activate.
- Make sure the Insertion Follows Playback button is inactive (gray).
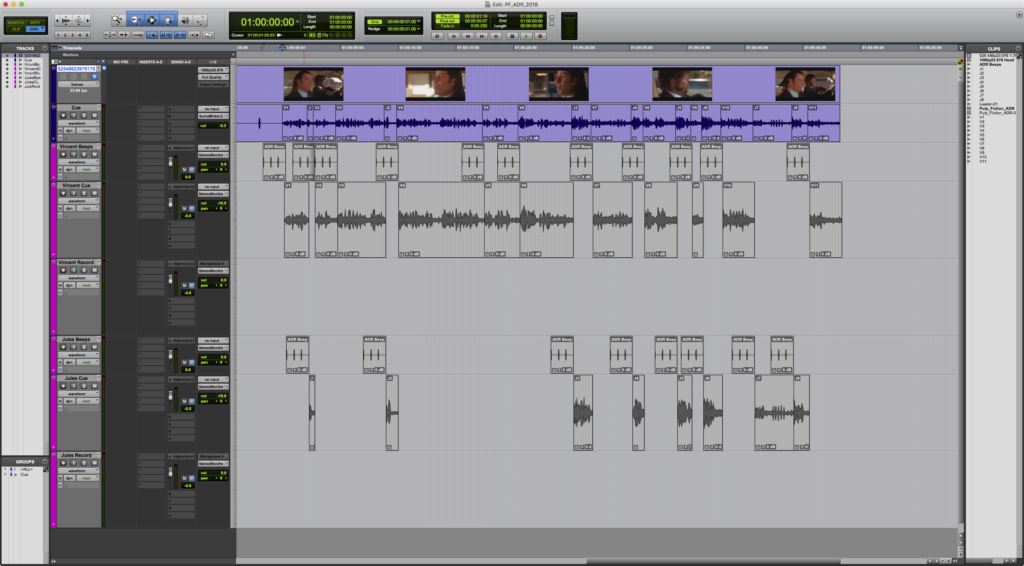
Completed ADR Pro Tools Session
Now the Pro Tools session is complete. All the tracks are prepped and the memory selections have been made. Now it’s ready to go for the recording session.