
A112 Quickstart Guide
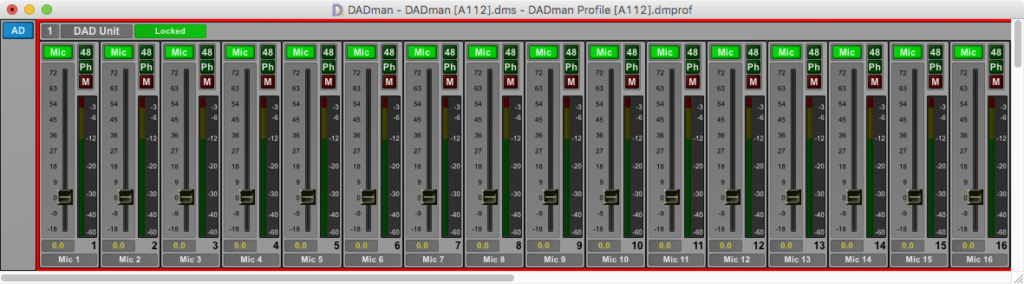
The Recording Studio (A112) Control Room employs a Pro Tools Ultimate system paired with an Avid S6 M10 control surface for audio recording. Additionally, the space doubles as an ITU 5.1 surround sound mixing and editing suite. 16 digital mic preamps and 4 analogue mic preamps enable recording everything from monologue, to voiceover, to foley, to musical scores for film and video. The mixing desk also features HDMI and Aux panel inputs. This handout will explain the startup, operating, and shutdown procedures for the room.
Power On…
- Power on the UPS. The S6 Control Surface will power on.
- Wait for the load up screen on the S6 to finish, as well as for the purple LEDs on each module to light up and go out. Then power on the Mac.
- Wait for the Mac login screen to appear, then power on the SurgeX.
DADman and the S6
- Log in to the Mac with your FV user login. Upon login, the DADman control app will autolaunch in the background.
Before doing anything, wait! Opening other apps immediately could prevent the S6 from connecting to the Mac properly.
- Wait for the S6 WSControl app to successfully connect to the S6. This icon:
 in the right-hand side of the menu bar will spin intermittently until this process is complete. It may take a minute.

- Click inside the DADman user interface window to bring the app forward. The S6 will respond by bringing the faders and DAD Unit controls up.
- On the S6 Master Module touchscreen, press Monitoring to confirm that the proper monitor profile has been loaded.
The HDX (Pro Tools) and Dante (Mac) monitoring sources are selected upon startup. Other sources include SDI, HDMI, and AUX. DADman starts with the main volume at reference: 0dB.
- Now that the S6 is locked to the DADman monitor profile, you can begin working.
If you are ever unable to see the monitoring controls on the S6 for any reason, you can go back into the DADman software to access those controls. Scroll down to the ‘Mon’ section where you can do everything from selecting sources to controlling the main volume.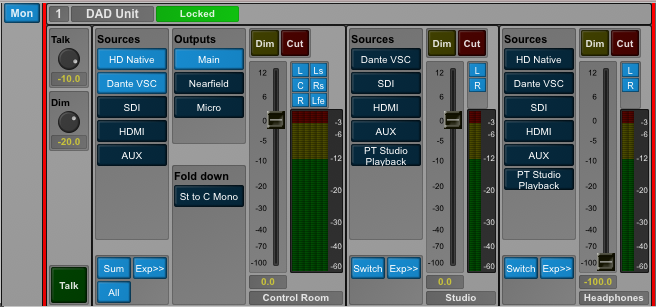
Video Routing in A112
- The 27″ NEC monitor on the left is the primary display for the Mac and the 23″ NEC monitor to the right is the secondary.
- If you need to use the monitor cart in the live room, plug in its power cord and plug the BNC cable attached to the monitor into the Video 1 output on the I/O panel. Press the power button on the back of the monitor to turn it on.
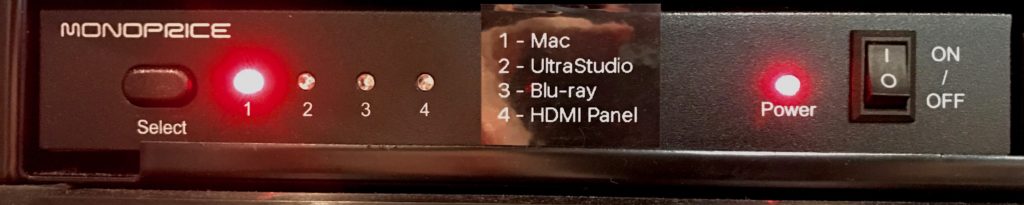
- There are 4 possible SDI video sources which can be routed to the secondary monitor and the monitor cart: the Mac Pro (1), the Blackmagic UltraStudio video interface (2), the Blu-ray player (3), and the HDMI Panel input (4). The Monoprice SDI switcher in the rack routes one of those 4 inputs to both the secondary monitor (via its HDMI input) and to the Video 1 output on the I/O panel in the live room.
- Additionally, you can change the video input source for the secondary monitor itself in the control room. The DisplayPort (DP) input shows the Mac secondary display, the VGA (D-SUB) input shows the TM7 Meter Bridge display, and the HDMI input shows whatever has been selected on the SDI Switcher (Mac, UltraStudio, Blu-ray, or HDMI Panel).

The monitor cart will always display what is selected on the SDI switcher, as will the HDMI input on the secondary monitor. The DisplayPort input of the secondary monitor will always show the Mac.
Shutting Down
- Shut off the SurgeX by pressing the square red button on the front of the unit.
- Shut down the Mac.
- To shut down the S6, press the home button, then go to Settings > About > Shut Down.
- Finally, power down the UPS by pressing the long top button above the LCD screen interface. It will ask you to confirm shut down; press the down arrow to say ‘Yes’, then press the Return key to complete the shutdown process. TLDR: long top button, bottom right, bottom left.